Bracket popped off of Fleck 5800SXT

Users who are viewing this thread

pete187

New Member
Messages
13
Reaction score
0
Points
1
Location
Iowa
So I installed a softener and carbon tanks, both with the Fleck 5800SXT. Install seemed simple enough, although when I went to do initial settings the water from the carbon tank was coming out with a lot of force from the discharge hose and my basement drain couldn't keep up. I'm having that drain snaked tomorrow as it sounds like there is an obstruction there.

In the meantime, I put both tanks in bypass and unplugged them. That was on Tuesday or Weds this week. Today, one of the little silver brackets on the bypass at the back of the 5800 on the carbon tank popped off and water was shooting across the room in every direction.

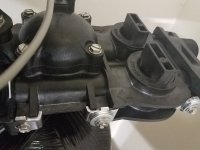
I have the mess cleaned up and I have since re-tightened these metal brackets. Did I just not push these on fully and tighten them adequately? I don't see how I could have messed up the bypass install, as the arrows show the flow on them. I didn't think there would be that much force with the water simply going through bypass. Any advice? My wife fully thinks I'm an idiot at this point and should have had the local Culligan guy put a tank in. :(
 

Attachments

  • 1329154432056367585.jpg
    1329154432056367585.jpg
    50.3 KB · Views: 201

Reach4

Well-Known Member
Messages
38,863
Reaction score
4,430
Points
113
Location
IL
Is that output side of the output side fully seated? It somehow looks like that clip is farther out on the left.

When you put things with rubber seals back together, it is best to very lightly coat the seals with suitable silicone grease.
 

pete187

New Member
Messages
13
Reaction score
0
Points
1
Location
Iowa
Is that output side of the output side fully seated? It somehow looks like that clip is farther out on the left.

When you put things with rubber seals back together, it is best to very lightly coat the seals with suitable silicone grease.

Feels solid, but I'll double check again. I did use silicone grease as well. It actually popped off on the opposite side, the input side. Had to have been user error on my part initially, right?
 

Bannerman

Well-Known Member
Messages
4,827
Reaction score
785
Points
113
Location
Ontario, Canada
I thought if it was the tank side, cold water within the tank will expand as it warms so with no place to expand to, will increase pressure on all components until the weakest component lets go.

As Reach mentioned, the retainer clip on the left in the photo appears odd. To me, it appears that it may be bent. Perhaps the opposite clip is similar, so it may not be fully engaging with the plastic shoulder on the yoke even as the screw is fully tightened.
 

pete187

New Member
Messages
13
Reaction score
0
Points
1
Location
Iowa
I checked them again. I do see what you are saying in the picture, but in person it is seems seated. I'd prefer to see this connection be bracketed with bolts to ensure something like this can't happen honestly. But hopefully this was a one off thing of me not having something seated properly the first go around.
 

ditttohead

Water systems designer, R&D
Messages
6,091
Reaction score
456
Points
83
Location
Ontario California
It was installed incorrectly. Fleck has used this connection for decades and the cause of this type of failure is always user error. I have seen it a few times in my 30+ years of field work on the Fleck valves.

Here is a recent picture a friend of mine sent, he totally admits to not connecting it correctly, :)
 

Attachments

  • spray.jpg
    spray.jpg
    61.1 KB · Views: 201

pete187

New Member
Messages
13
Reaction score
0
Points
1
Location
Iowa
It was installed incorrectly. Fleck has used this connection for decades and the cause of this type of failure is always user error. I have seen it a few times in my 30+ years of field work on the Fleck valves.

Here is a recent picture a friend of mine sent, he totally admits to not connecting it correctly, :)

Ha, yes that looks familiar. Except in my basement and soaking carpet in the next room. :)

So, what do you think now ditto? No way I bent anything with hand tools I don't think. Should I completely unscrew them again and put on? Everything feels awfully tight at this point. Think I just didn't get one centered and tightened down the first go around?
 

In Seok Hwang

NewStart
Messages
30
Reaction score
0
Points
6
Location
North Cal.
Ha, yes that looks familiar. Except in my basement and soaking carpet in the next room. :)

So, what do you think now ditto? No way I bent anything with hand tools I don't think. Should I completely unscrew them again and put on? Everything feels awfully tight at this point. Think I just didn't get one centered and tightened down the first go around?

Hi, there.

I also installing the water-softener after on-line ordering and waiting for plumbing.
Anyway, I had similar experience on installing bypass valve to the control head.

The bracket is very loose and the screw is not tight enough and the manual
only mention that never tighten the screw too much otherwise it will punch the valuve.

So, my solution is to add some washers (actually 3 AAA and one more small one) as shown in the picture.
It will help screw tighten simultaneously securing some margin to protect valve.

Wish it help in your case also.
 

Attachments

  • Washer-Bracket.jpg
    Washer-Bracket.jpg
    36 KB · Views: 130

In Seok Hwang

NewStart
Messages
30
Reaction score
0
Points
6
Location
North Cal.
Maybe, some clip is missing in my case to hold the bracket.
Hmm.. I'd better contact the seller. Thanks.

Contacted the seller and got a response of no necessity of washer.

It seems that the max. screw depth reach the outer diameter of pipe line of the bypass valve and yoke so on.
My parts of bypass valve and yoke still have some rooms of tightness since hole was initially shallow.
Thus,I removed 2 of 3 washers and left one for future tightness margin.

Also, I realized that seller installed water meter have the same screw which hold the clip between control head an meter housing.
.It is tightened w/o washer as shown in picture (before removing washers). -_-.

Thanks for help me avoid potential water mess at the first test run ^^.

Regards
 

Attachments

  • Crip and Screw_Depth.jpg
    Crip and Screw_Depth.jpg
    69 KB · Views: 147
Top
Hey, wait a minute.

This is awkward, but...

It looks like you're using an ad blocker. We get it, but (1) terrylove.com can't live without ads, and (2) ad blockers can cause issues with videos and comments. If you'd like to support the site, please allow ads.

If any particular ad is your REASON for blocking ads, please let us know. We might be able to do something about it. Thanks.
I've Disabled AdBlock    No Thanks