Aquia and drilling holes in tile

Users who are viewing this thread

Mike50

DIY Senior Member
Messages
698
Reaction score
0
Points
0
Location
Southern California
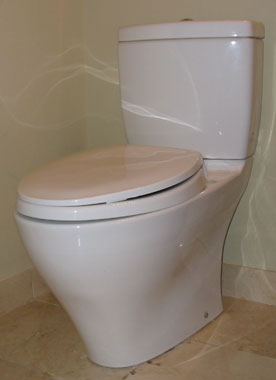
I think I'm sold on this toilet and I'm ready to buy one...
The tile thruout my home and bathrooms are 11 X 11 square mexican saltillo tiles. 1/3 inch thick.
As many of you know they are very soft tile similar to a terra cotta flower pot. Very inexpensive-about a dollar per tile.

Would this soft thick material be a factor, in any way to be considered when installing an Aquia?

note: all tiles are flawed/imperfect made in Mexico and very inexpensive.
So, making recut tiles "look or fit perfectly" simply is not an issue whatsoever.
The natural variations in colour/flaws, & animal footprints are part of the look.

My plumber had to use a shim on one side to level the last kohler memoirs toilet because there is no such thing as a level saltillo floor.

http://www.johnbridge.com/Saltillo_Tile_Photos.htm
This is what I'm referring to.

Mike
 
Last edited:

Terry

The Plumbing Wizard
Staff member
Messages
29,942
Reaction score
3,459
Points
113
Location
Bothell, Washington
Website
terrylove.com
Soft is good. The $5.95 tile bit should zip right through it.

If you do shim, do it from the back, door shims work fine.
Caulk all the way around the bowl with the Aquia.
 

Mike50

DIY Senior Member
Messages
698
Reaction score
0
Points
0
Location
Southern California
You're the man Terry. Thank you very much. I was worried and now I reeeally want that toilet.
My research reveals this is the way of the future...not to mention it has a minimalist design.

It's "green" and over time I could save some dough as the water prices increase around here.

I agree with the other poster in that the most offensive thing about toilets
is urine spray. Therefore deep is good. It sure sounds like a winner to me.

Mike
 

mtjl

New Member
Messages
7
Reaction score
0
Points
0
Ok, I'm looking at replacing my old toilet. I know I want a toto (my Dad has one) He says the Drake is the best, however I like the look of the skirted models, they look more sanitary. Plus, the bolts on my old toilet have rusted again. I really like the Aquia because of the dual flush option. My question is about all this drilling into floors that must be done. Do all the 'skirted' toilets require drilling multiple holes or just the Aquia? I live in a very old house with tile in the bathroom. The tiles are 1" hex shaped and I'm afraid they would break with drilling. :eek:

If I go with a more traditional set up like the Drake, how do prevent the bolts from rusting, corroding, etc? :confused: Yes, I have caps on the bolt and no, it doesn't keep them from rusting.
 

Ho333ard

New Member
Messages
74
Reaction score
0
Points
0
Location
Illinois
Terry said:
aquia_angle.jpg

A homeowner installed Toto Aquia on a Marble floor.
Looks like a nice job by the homeowner.
If the homeowner can do it, the plumber should be able to do it also.

JD has a lot of it right, except the Aquia only has a 12" adapter.
The toilet would still stick out a ways in your case.
With a standard 12" rough-in, it would stick out from the wall about 1/2"
The Aquia toilet has a fairly quiet flush.
I don't even think about the water in the trapway sound anymore.
It's like how you get used to the fan on your computer being on all the time.

If you have a tile bit, I bought one at the hardware store the other day for $5.95 that was made for tile. It looked like an arrow head. It's the the type I use the most.
If the tile is really hard, I just pull out my rotohammer.
Tile on the floor or concrete has never stopped me.
I couldn't even imagine selling someone a different toilet and getting away with it, when the customer already had a very nice toilet there.

Installed my Carrolton, same procedure, yesterday.
Used a tile bit . . . the holes weren't clean but it didn't matter since we used 2" drywall screws into the plywood below instead of the supplied hardware.
None of it will be even remotely visible once the unifit and the toilet are in place. I s'pose if you need to use the supplied anchors you'd bast get the holes clean.

Good to hear the trapway runoff is normal . . . I've been experiencing it about 24 hours now, and it's a bit wierd, but in general this thing is really quiet-- more of a quick rushing water sound than a real "flushing" sound like in an airport bathroom . . . I really doubt you'd notice the sound from the next room at all.
 

Jadnashua

Retired Defense Industry Engineer xxx
Messages
32,770
Reaction score
1,190
Points
113
Location
New England
All of the skirted models (as far as I know) used an adapter to mount the toilet, the toilet itself does not attached directly to the flange, the adapter does. All of the adapters need to be anchored with additional holes. I have a Vespin (2-piece) and a Carlyle (one piece) and each uses the same unifit adapter. The Aquia uses a different, adapter, but same situation. The holes will be hidden by the base of the toilet by quite a bit because of the skirt.
 

mtjl

New Member
Messages
7
Reaction score
0
Points
0
You just confirmed what I saw when I went to my local Toto dealer. So, is it possible to drill holes in to 1" tiles without cracking? I'm wondering if I should even be concerned about the tiles cracking since they will be under the toilet and not seen. What do you think?
 

Ho333ard

New Member
Messages
74
Reaction score
0
Points
0
Location
Illinois
mtjl said:
You just confirmed what I saw when I went to my local Toto dealer. So, is it possible to drill holes in to 1" tiles without cracking? I'm wondering if I should even be concerned about the tiles cracking since they will be under the toilet and not seen. What do you think?

You have 1" thick tiles?

If you are planning to skip the anchors included w/ the adapter and just use longer screws into the subfloor like I did, then a little crumbling won't matter.
Might not be a bad idea to shoot some caulk down those holes if that happens.

Caveat-- I know much less than 99% of posters here and would be glad to be overruled.
 

Jadnashua

Retired Defense Industry Engineer xxx
Messages
32,770
Reaction score
1,190
Points
113
Location
New England
Since the holes and the tile will be under the toilet, I wouldn't worry about it. ALso, most tile from a long time ago isn't anywhere near as hard as the porcelain tiles available today. A glass, carbide, or diamond bit should cut the tile okay. do it slow and use a spray bottle to keep the bit wet to keep it cool.
 

JK60

Engineer
Messages
189
Reaction score
0
Points
0
Location
San Francisco
ChrisG said:
Quick aside: I'm one of those fledging DIYers who takes at least 8x longer than anyone else. So the though of drilling into my floor seems awful. Just checked with my wife, she assuremed me that I take 10x longer.

Being a DIYer myself I think the formula for the amount of time it takes to do a job is to take your original estimate, double it, and then go to the next unit of measure. If you estimate two hours, doubling it is 4 hours, and next unit of measure is 4 days. It's probably not as bad as that but I am surprised at how much longer these jobs seem to take.
 

mtjl

New Member
Messages
7
Reaction score
0
Points
0
The tiles are 1" in diameter (they are small hex shaped) I have no idea how thick they are. That's nice to know that the older tiles tend to be softer, maybe they will be less prone to cracking.

4 days! :eek: I hope it doesn't take me that long to change out this toilet. It's our only one! I don't think the neighbor would appreciate us knocking on his door. :p LOL.

Now I just have to go and order our new toilet....... :)
 

Jadnashua

Retired Defense Industry Engineer xxx
Messages
32,770
Reaction score
1,190
Points
113
Location
New England
Through hard porcelain (PE=5), with a dull carbide bit, it took me an hour to drill the 4 (or was it six?) holes to mount the adapter. Anyways, about 10-minutes per hole. Now, on older softer ceramic stuff, it shouldn't take that long. It only took about 30-seconds to drill through granite tile to mount the shower door, but that was with a new bit (carbide). Put a piece of tape on the floor. Mark the holes. The tape will help you get the hole started without the drill bit skating. Use the adapter as a template...get it square with the wall...measure twice, drill once. All is well.....
 

mtjl

New Member
Messages
7
Reaction score
0
Points
0
Thanks for the advice! It's much appreciated. :) I'll let you know how it goes.
 

ChrisG

New Member
Messages
9
Reaction score
0
Points
0
Location
North Carolina
Uni-fitted

As promised, I'm back to share my experiences. I finally received the toilet from *********.com, only took 2 months :)

I drilled the required 6 holes. The first one took me about 45minutes. The remaining took around 8 minutes a piece! The key was to go buy more carbide drill bits and learn to bear down. I made a little dam out of my daughters' play dough, poured water in and pressed down hard (but not too hard).

All told I ended up using 4 drill bits. $8 each from Lowes.

The holes were really nice and clean, which turned out to be a problem since the Toto supplied anchors didn't come remotely close to fitting into the nicely drilled holes. The supplied anchors were more like 5/8 inch. What's the deal with that? :mad:

I decided to use some drywall anchors I had that fit into the holes. Seems to work, I'm assuming the brass screws made it all the way into the plywood under the backerboard under the tile because they seem to be holding well.

Now for the next problem!
As you can see from this, I have a bit of spacing problem. The water supply prevents the Aquia from going back as far as it should.
Being the simple minded person that I am I've come up with 3 possible solutions:
  1. Shorten the water supply stub-out from its current 4.5 inches to 1 inch. Thus missing the back side of the Aquia.
  2. Move the water supply stub-out to the left a few inches (i.e. more work)
  3. Fit a 90 degree elbow on the stub-out and move to the left (some work but kind of ugly)

Any suggestions, what do you folks think?
 

Attachments

  • toto-unift.jpg
    toto-unift.jpg
    32 KB · Views: 704

Terry

The Plumbing Wizard
Staff member
Messages
29,942
Reaction score
3,459
Points
113
Location
Bothell, Washington
Website
terrylove.com
The shutoff will work fine once you cut it back closer.

There will be plenty of room behind the bowl for it.

It's too bad you had a two month wait.

In the Seattle area, I stock the Cotton White, Bone and Sedonia Beige/Biscuit colors.
I have people coming by all the time for them.

Well, you've done the hard part.
Don't forget to sand the inside of the tank where the bolts go down.
Sometimes I even sand where the flush valve is too.
 

mts

New Member
Messages
2
Reaction score
0
Points
0
Thank you - Aquia Installed

Terry - I wrote to you back in February concerned about installing the Aquia that I had bought... we finally had it installed and I am here to report on it... if I get ambitious -- I'll add a photo someday!

(1) Toilet flushes no problem. Everyone who is worried about stains/spotting, etc. Get over it. I can't stand a dirty toilet bowl -- and I have had no problems. (i.e. I am picky and have high standards-- and it is more than fine)
(2) Installation -- Our plumber had never done one before-- and it took him 4 hours. He told us we had the Ferrari of toilets, and I think he had a hard time with the extra holes-- but he got it done
(3) Noise-- there is a trickling noise of water (starting down the drain) while you are going to the loo-- but it is really that big of a deal
(4) Buttons - I love the two buttons, and there is really little need for the larger one. One of my friends asked "Is the bigger button for the one that you use more often"-- which made me laugh really hard. It doesn't matter much even if she doesn't understand -- because it saves so much water even at the 1.6 gallons/flush level! (My old toilet was 3.5 gallons!)


Thanks for your web site!
 

neoikon

New Member
Messages
4
Reaction score
0
Points
1
Location
Texas
ChrisG said:
As promised, I'm back to share my experiences. I finally received the toilet from *********.com, only took 2 months :)

I drilled the required 6 holes. The first one took me about 45minutes. The remaining took around 8 minutes a piece! The key was to go buy more carbide drill bits and learn to bear down. I made a little dam out of my daughters' play dough, poured water in and pressed down hard (but not too hard).

All told I ended up using 4 drill bits. $8 each from Lowes.

The holes were really nice and clean, which turned out to be a problem since the Toto supplied anchors didn't come remotely close to fitting into the nicely drilled holes. The supplied anchors were more like 5/8 inch. What's the deal with that? :mad:

I decided to use some drywall anchors I had that fit into the holes. Seems to work, I'm assuming the brass screws made it all the way into the plywood under the backerboard under the tile because they seem to be holding well.

Now for the next problem!
As you can see from this, I have a bit of spacing problem. The water supply prevents the Aquia from going back as far as it should.
Being the simple minded person that I am I've come up with 3 possible solutions:
  1. Shorten the water supply stub-out from its current 4.5 inches to 1 inch. Thus missing the back side of the Aquia.
  2. Move the water supply stub-out to the left a few inches (i.e. more work)
  3. Fit a 90 degree elbow on the stub-out and move to the left (some work but kind of ugly)

Any suggestions, what do you folks think?


I installed my two Aquia's last week, which was my first time installing any toilet. Drilling the holes were a pain! I have new porclean tile that my masonry drill bit didn't want to go through, so I rented a hammer drill from Home Depot. Man, cut though it like butter! Even going slow, it chipped the tile a bit, but its all hidden under the toilet skirt, so it's okay.

I had a similar issue with my water supply. One thing that I did do was replace the faucet with a 1/4 turn faucet. The toilet is one of those items that you want to turn off in a hurry when need be! Plus, if the faucet is hard/awkward to turn due to its position in relation to the toilet, I wanted it to be as easy as possible to turn on and off.

In response to your problem, on one of things I had to do on one of my two toilets is move the water supply a bit. Again, I'm a novice, so I just cut a little bit into the sheetrock, bent the pipe over a little bit, and put something in the hole to hold it there. I didn't move it very much, maybe 1/2" to 1". The small, circular, metal cover that goes on the wall still covered everything (to give you can idea of how little I moved it and how little I cut into the wall.)

Good luck!
Daniel
 
Last edited:
Top
Hey, wait a minute.

This is awkward, but...

It looks like you're using an ad blocker. We get it, but (1) terrylove.com can't live without ads, and (2) ad blockers can cause issues with videos and comments. If you'd like to support the site, please allow ads.

If any particular ad is your REASON for blocking ads, please let us know. We might be able to do something about it. Thanks.
I've Disabled AdBlock    No Thanks