Pretty much.
That would be a code violation, and increases the risk of rotting out the roof deck. Cellulose is somewhat protective of the wood by wicking away moisture, but it doesn't have an infinite storage capacity. Once the cellulose becomes truly wet (it can happen, even from vapor diffusion, particularly on north facing or shaded roof areas) it's doing more harm than good.
Where you have access to the roof deck from the inside you can install
closed cell foam directly to the underside of the roof deck. Most closed cell foam is a Class-II vapor retarder at 1" of depth (~R6) , which would be sufficient to protect the roof deck, but not enough to keep more than (R6 x 1.5=) R9 of fiber insulation dry. As long as the foam is at least 40% of the total R the fiber stays dry. If those are 2x8 (?) rafters you have 7.25" to work with. Installing 2" of closed cell foam (~R12-R14) and filling the remaining 5.25" with cellulose (R19.4) blown in netting (or compressed R20 cellulose batts), or a compressed R20 fiberglass batt (~R19 @ 5.25" ) or compressed R19 batt (~R17 @ 5.25") using Certainteed MemBrain as an interior side vapor retarder would be pretty safe, even if a bit marginal on R-ratio. Any of those solutions would put it in the R30 range, which isn't terrible.
Read and understand this document before making any big changes. The cheat sheet is Table 3, the zone 5A Chicago row. You can see over in the
2" ccSPF + spray fiberglass column that at R38 total the roof deck is completely safe with 2" of closed cell foam, but with R12 foam at the exterior side and R26 on the interior the fiber insulation could get damp enough to support mold on the rafters. MemBrain detailed as an air barrier would fix that.
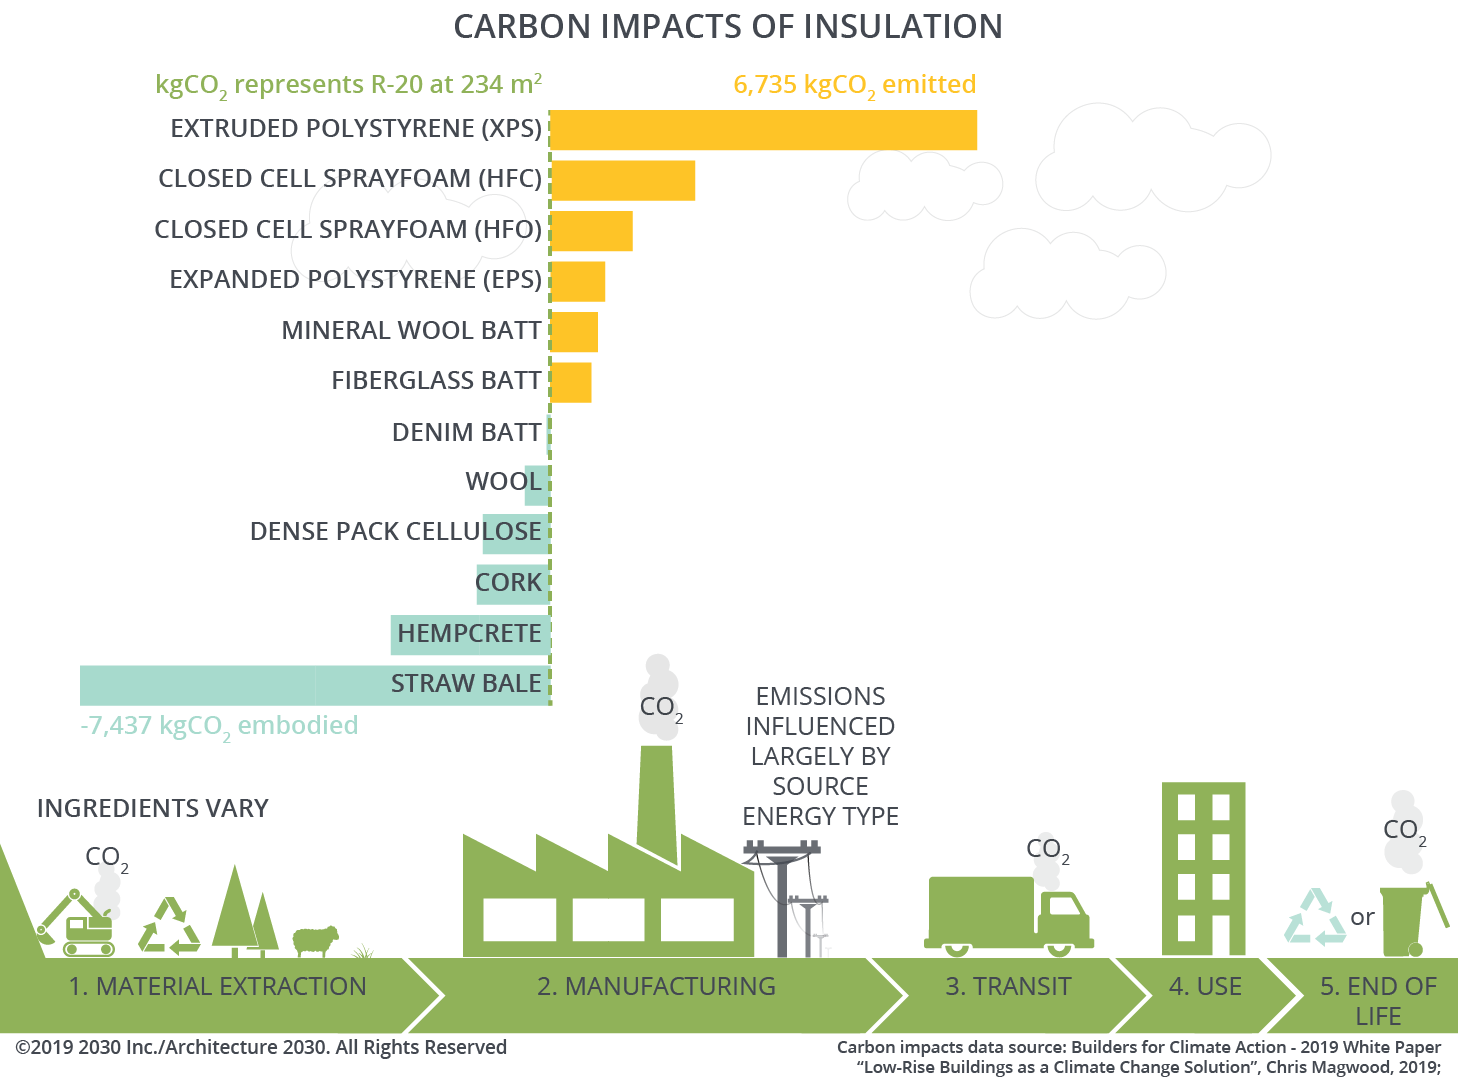
If hiring a pro to do the foam part DO go with the newer foams blown with HFO1234ze, which is quite a bit less environmentally damaging than the cheaper stuff blown with HFC245fa (an
extreme greenhouse gas.) The HFO foam runs about R7/inch rather than R6/inch, giving it a bit more dew point margin too, but it still takes 2" to be able to fill out the rest of the R with much cheaper (and DIY-able) fiber. If using a DIY foam kit you're pretty much stuck with the R6/inch HFC245fa goods for now. The HFC foams run about $1.00-$1.25 per square foot per inch of depth, the HFO foams about $1.25-$1.40 per square foot per inch of depth. It's not cheap, but it does air seal well at 2", protects the wood from taking on excessive moisture via diffusion, yet still allows the roof deck to dry toward the interior. Asphalt shingles + #30 felt layups severely inhibit drying toward the exterior, as does rain/dew wetting, snow cover, etc. Roofs are not just tilted walls, and the assembly MUST be allowed to dry toward the interior to have any resilience (even if that drying is only very slowly through 2" of spray foam.)
The CO2e footprint of closed cell foam (even HFO blown foam) is considerable- its' expensive environmentally as well as financially:
If you care about this stuff, cellulose (blown or batts) is by far the greener way to fatten out the R-value. It becomes sequestered carbon, and thus has a negative carbon footprint. Denim batts have similar hygric capacity- it too is protective of the wood, but growing cotton is more carbon intensive than growing trees, even when the pulp & papermaking aspects are accounted for.
") Floating the chemical cannisters in a tub of warm water near the upper end of the recommended temps gets around the cooling that occurs from falling pressure in the cans as the chemicals get dispensed.
Floating the chemical cannisters in a tub of warm water near the upper end of the recommended temps gets around the cooling that occurs from falling pressure in the cans as the chemicals get dispensed.