Garden Tub Spout Pipe Too Short

Users who are viewing this thread

Yourrid

New Member
Messages
4
Reaction score
0
Points
1
Location
ATL
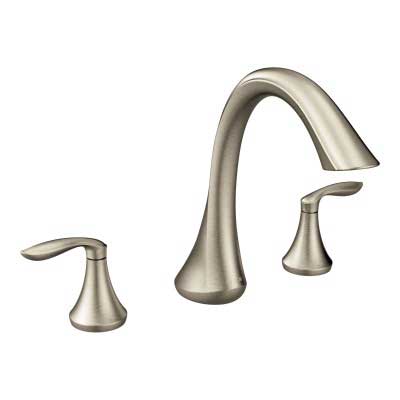
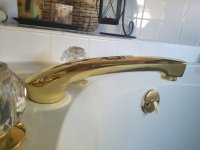
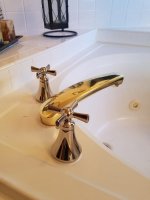
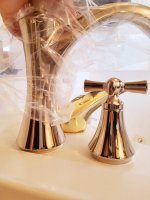
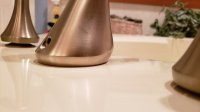
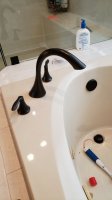
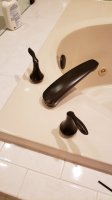
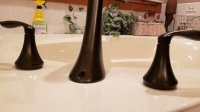
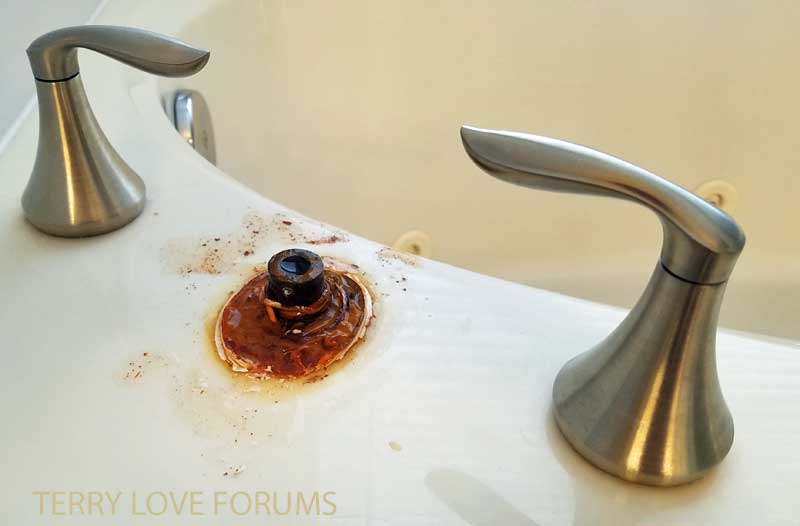
Hey gang. First post here and I'm in need of some help. I'm a pretty good DIY'er but this one has me scratching my head. I recently purchased my first house and am trying to fix a leaking garden tub spout. I did some research and found it is a Moen Eva series 2 handle roman tub faucet. The problem is whenever I fill up the tub, water leaks out of the base of the faucet. Someone used a ton a caulk trying to fix this problem prior to me, and didn't fix it properly.

Link to PDF for faucet:
https://docs.google.com/viewerng/vi...m/shared/docs/exploded-parts-views/t943pt.pdf

So I ordered the o-ring that fits into the base of the faucet and then took it all apart. Here's what I found.

moen-eva-tub-01.jpg


moen-eva-tub-02.jpg


moen-eva-tub-03.jpg


moen-eva-tub-04.jpg


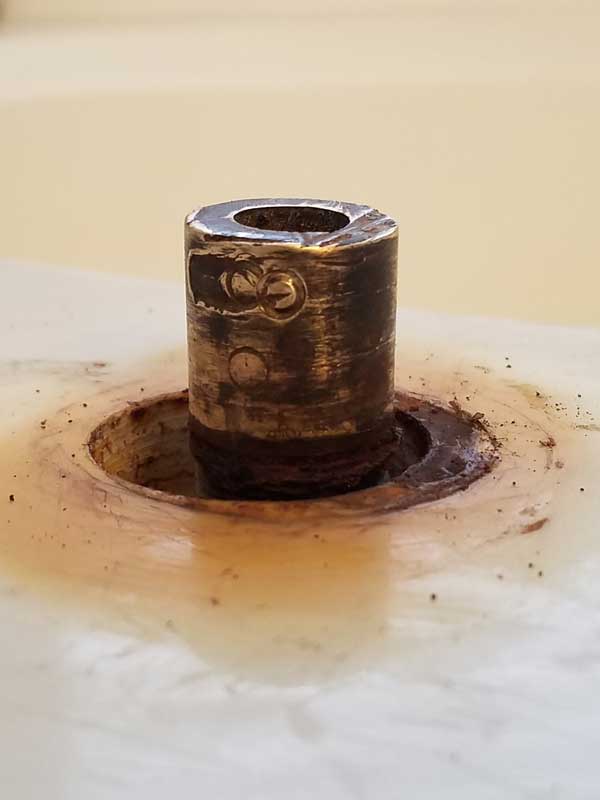
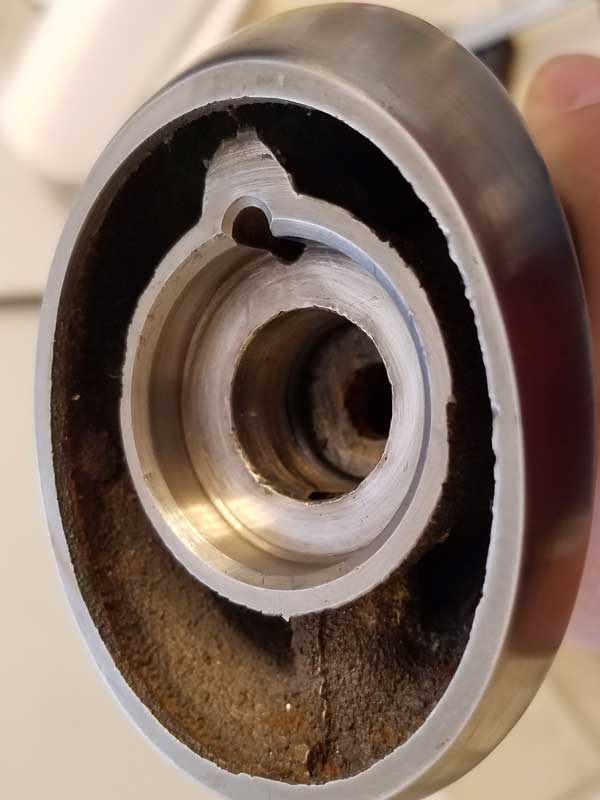
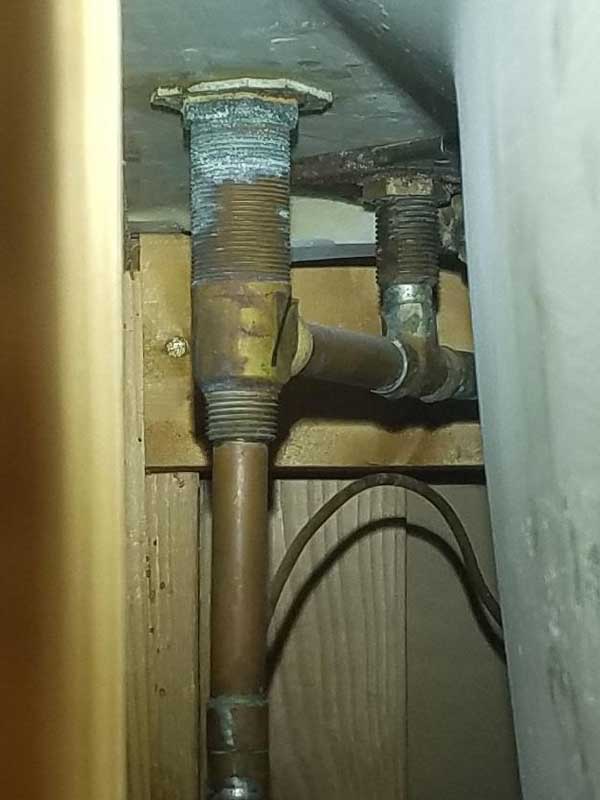
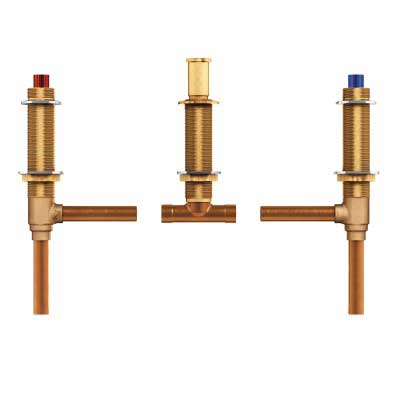
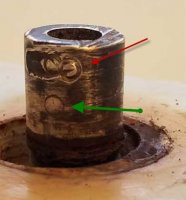
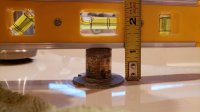
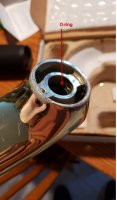
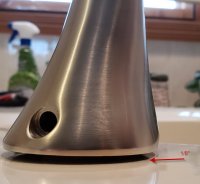
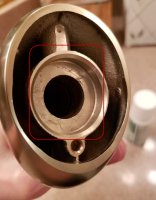
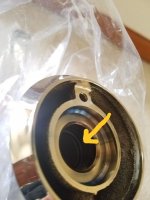
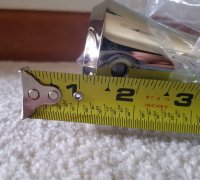
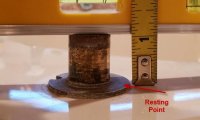
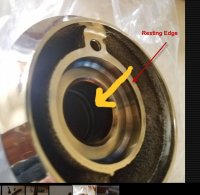
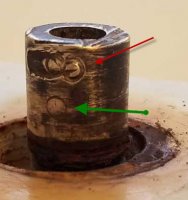
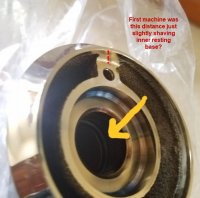
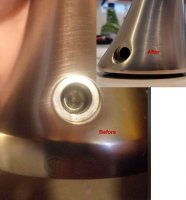
Here is my problem. The copper pipe is too short from the base of the tub. If you look at the picture with the bottom of the faucet, you can see an o-ring way down in there. The purpose is for the O-ring to fit snugly around the top of the pipe. Well, that o-ring sits 1.141" deep from the base of the faucet to the very end of the opening. The pipe only sits 0.93" from the top of the tub. So there's nearly 1/4" difference. So that O-ring probably isn't even touching the pipe.

I can't figure out if the pipe is adjustable as it looks like a solid piece of pipe to my untrained eye. So I have no idea how to fix this. The previous owners put half a tube of caulk in there and called it a day... but that just won't do for me. Unfortunately there's no way for me to get to the base of the pipes without tearing down the front trim of the tub so I'm honestly considering taking the faucet to a machine shop and see if they can chop off .25" off the base to make it all match up.

If anyone has a suggestion, I'd greatly appreciate it!
 
Last edited by a moderator:

JamesDaddy

New Member
Messages
1
Reaction score
0
Points
1
Location
New York
I have this exact same scenario with what appears to be the exact same Moen replacement spout. Unfortunately I don't have an answer, but hopefully bumping the thread will help.
 

Reach4

Well-Known Member
Messages
38,863
Reaction score
4,430
Points
113
Location
IL
Is the problem area in the A and B area that I marked on the photo?

img_3.jpg
 
Last edited by a moderator:

Yourrid

New Member
Messages
4
Reaction score
0
Points
1
Location
ATL
Reach4, A and B are for the cold water handle. The issue is at U,V,W. Somehow that entire assembly needs to go up 1/4".

James, I recently took the entire front wall off of the tub so I could access these pipes. They have the Moen symbol on the pipes so I'm assuming this was some kind of kit when it was first installed. My plan was to cut all of this out and install a new faucet if needed (not another Moen). I'm still hopeful that I can get this one to work, but I just can't figure it out.

Check out this PDF of the install: http://www.moen.com/shared/docs/instruction-sheets/ins10592.pdf

If you look at step #3, there seems to be a "spout shank tool" that adjust the height of the pipe. I can't find a single spec on it (dimensions) so I may call Moen and see what we can come up with.

I'll take some pictures of the entire assembly this afternoon and post them. Hopefully someone can help us!
 

Yourrid

New Member
Messages
4
Reaction score
0
Points
1
Location
ATL
I took a few more pictures of my setup. I put a large hex key down the faucet pipe and there isn't any adjustment fitting in there. Which doesn't matter since the entire pipe is one solid pipe (no way to extend it up or down.)

So it looks like I need to replace this one outlet pipe with another one, and measure it correctly this time (something the previous owners failed to do). Undecided if I want to attempt to sweat the pipes together myself or hire a plumber to do it.
 
Last edited by a moderator:

hj

Master Plumber
Messages
33,603
Reaction score
1,042
Points
113
Location
Cave Creek, Arizona
Website
www.terrylove.com
1. A hex key will NOT work in place of a square bar.
2. Until you get the square bar you do NOT know if there is a part that screws up and down.
3. What you THINK you see may NOT be what IS.
4. I am not familiar with that faucet, but I see no reason why they would show a picture of the adjusting tool being used if that was NOT the way to do it.
 

Yourrid

New Member
Messages
4
Reaction score
0
Points
1
Location
ATL
1. A hex key will NOT work in place of a square bar.
2. Until you get the square bar you do NOT know if there is a part that screws up and down.
3. What you THINK you see may NOT be what IS.
4. I am not familiar with that faucet, but I see no reason why they would show a picture of the adjusting tool being used if that was NOT the way to do it.
HJ, I appreciate you input, however I used some compressed air to shoot out all of the water in the pipe, and the interior walls of the pipe are smooth and round. Even with the square tool, there's nothing for it to grip onto and turn.
I'm able to look straight to the bottom of the pipe (where it connects to the T connector), and there is nothing in there for a square tool to move. It looks like the original rough-in (made circa 1999) was not adjustable. Whereas the new models are adjustable.

James, looks like my (our) only option is to cut out the old setup and start with a new one. Here is the exact garden tub faucet I've got:

moen-eva-tub-05.jpg


http://www.moen.com/products/Eva/Eva_Brushed_nickel_twohandle_high_arc_roman_tub_faucet/T943BN

If you look at the site, it has a drop down menu on the right that lists all the compatible valves. They're about $100 for the valves (no including a new faucet), and there are a lot of different configurations. I'm pretty sure I'm going to give the Model 4792 a try.

moen-eva-tub-06.jpg


http://www.moen.com/products/Moen/Moen_Two_handle_roman_tub_valve_adjustable_12_CC_connection/4792

I'll have to either sweat the pipes together myself, or hire someone to do it for me... but it looks like this is going to be my only option on getting it right.

Also, I emailed Moen, and linked this post for them... so we will see what they have to say (hopefully receive a reply tomorrow from them).
 
Last edited by a moderator:

DIYVee

New Member
Messages
3
Reaction score
0
Points
1
Location
Colorado Springs
Almost 3 years too late here, but just found this post. Am hoping someone can help me, as I am in a similar boat.

Here is some extraneous dribble that may be helpful to someone and is pertinent to my issue/question...which I will get to, shortly.

Sounds like the previous owners (of the OP's house) tried to replace an older, "Garden Tub" Moen fixture with a newer, "Roman Tub" fixture. I thought I could do the same until I did some research. This Moen page had a lot of great information:

https://solutions.moen.com/Article_Library/Can_I_Replace_My_Roman_Tub_Trim?#Step_Two-Will_My_Handles_Fit.3F

Step One-Will the Spout Fit?
"If your fixture looks like either model below and the spout reach is less than 8", you have a Garden Tub. It is not compatible and will not connect to our new Moen Roman Tub trim styles."


Right out the gate, I was shut down. My spout is 9.5", but the reach is ~7.5" (see the diagram on the web page).

Being in denial (and a tad desperate), I continued to read further. I read that the older Moen Garden types, had a shorter spout shank, too short for the newer Moen Roman tub fixtures:

"If the spout shank measures under 1 ⅜”- No new spouts will not be compatible. The entire valve would need to be replaced in order to use any new Moen Roman Tub trim."

Strike 2. My spout shank (akin to the OP) was just under 1". There is a delightful chart at the bottom of the web page with the models and the required spout shank dimensions...all incompatible with my setup. :(

My issue is, I have been unable to find what I can replace my 1995, Moen (Chateau, I think) Garden Tub spout with (I have the handles covered). My tub is encased in tile and there is no access panel to the valve assembly underneath.

YourID, what did you finally come up with?
Does anyone have any ideas (aside from packing it full of plumbers putty or caulk ;) )?
Any modification kits or compatible spout makes and models?
Could a plumber add an extension?

Considering plating the old one to match the new handles (expensive). Anyone had any plating done on bath fixtures? Any dos and don'ts on that?

Any advice would be helpful. Here is a pic of my current spout.
 

Attachments

  • 1995 Gold Faucet2.jpg
    1995 Gold Faucet2.jpg
    56.8 KB · Views: 380

Mike Linning

New Member
Messages
6
Reaction score
0
Points
1
Location
chicago il
Hi,

I have the same exact setup as you (Garden Tub) and I believe my Chateau with crystal handles was from 1999. My wife wants to change the trim to Bronze Oil rub which we started to do on all the other faucets/showers already. Now I am stuck on handling the Garden Spout, the handles can be replaced with any modern Moen handles if you get an $11 adapter kit. I talked to Moen on several phone calls and read all the same literature that you have. It seems the spout length is unfortunately our problem.

I started looking into powder coating the spout to match some bronze oil handles I could pick up, but the handles are like $50+, Moen said I could get a loyalty discount of 30% though. In talking to the power coating places (plating?) the color match might be harder and they suggest I just get the cheapest chrome handles I like and they would paint all 3 pieces for an easier match. I've been now trying to locate something on Ebay and Facebook Market place to probably go this route. Our spout isn't really current looking, but we hardly use our tub so its mainly cosmetic to match the rest of the fixtures. I originally thought of just priming/spraying the spout myself, but think I might spend a few bucks to have it professionally done where it won't wear off either if someone decides to use it eventually. I've gotten quotes around the $50-$100 range so far, but the cheapest one is an hour away, might try shipping there/back if practical or just go local place. I also went to a plumbing supply place and they said some people will get a machine shop to shave off the bottom a 1/4", but not sure how that will look and sit flush.

Let me know if you got any other new ideas since your post!

Mike


Almost 3 years too late here, but just found this post. Am hoping someone can help me, as I am in a similar boat.

Here is some extraneous dribble that may be helpful to someone and is pertinent to my issue/question...which I will get to, shortly.

Sounds like the previous owners (of the OP's house) tried to replace an older, "Garden Tub" Moen fixture with a newer, "Roman Tub" fixture. I thought I could do the same until I did some research. This Moen page had a lot of great information:

https://solutions.moen.com/Article_Library/Can_I_Replace_My_Roman_Tub_Trim?#Step_Two-Will_My_Handles_Fit.3F

Step One-Will the Spout Fit?
"If your fixture looks like either model below and the spout reach is less than 8", you have a Garden Tub. It is not compatible and will not connect to our new Moen Roman Tub trim styles."


Right out the gate, I was shut down. My spout is 9.5", but the reach is ~7.5" (see the diagram on the web page).

Being in denial (and a tad desperate), I continued to read further. I read that the older Moen Garden types, had a shorter spout shank, too short for the newer Moen Roman tub fixtures:

"If the spout shank measures under 1 ⅜”- No new spouts will not be compatible. The entire valve would need to be replaced in order to use any new Moen Roman Tub trim."

Strike 2. My spout shank (akin to the OP) was just under 1". There is a delightful chart at the bottom of the web page with the models and the required spout shank dimensions...all incompatible with my setup. :(

My issue is, I have been unable to find what I can replace my 1995, Moen (Chateau, I think) Garden Tub spout with (I have the handles covered). My tub is encased in tile and there is no access panel to the valve assembly underneath.

YourID, what did you finally come up with?
Does anyone have any ideas (aside from packing it full of plumbers putty or caulk ;) )?
Any modification kits or compatible spout makes and models?
Could a plumber add an extension?

Considering plating the old one to match the new handles (expensive). Anyone had any plating done on bath fixtures? Any dos and don'ts on that?

Any advice would be helpful. Here is a pic of my current spout.

index.php
 
Last edited by a moderator:

DIYVee

New Member
Messages
3
Reaction score
0
Points
1
Location
Colorado Springs
Hi,

I have the same exact setup as you (Garden Tub) and I believe my Chateau with crystal handles was from 1999. My wife wants to change the trim to Bronze Oil rub which we started to do on all the other faucets/showers already. Now I am stuck on handling the Garden Spout, the handles can be replaced with any modern Moen handles if you get an $11 adapter kit. I talked to Moen on several phone calls and read all the same literature that you have. It seems the spout length is unfortunately our problem.

I started looking into powder coating the spout to match some bronze oil handles I could pick up, but the handles are like $50+, Moen said I could get a loyalty discount of 30% though. In talking to the power coating places (plating?) the color match might be harder and they suggest I just get the cheapest chrome handles I like and they would paint all 3 pieces for an easier match. I've been now trying to locate something on Ebay and Facebook Market place to probably go this route. Our spout isn't really current looking, but we hardly use our tub so its mainly cosmetic to match the rest of the fixtures. I originally thought of just priming/spraying the spout myself, but think I might spend a few bucks to have it professionally done where it won't wear off either if someone decides to use it eventually. I've gotten quotes around the $50-$100 range so far, but the cheapest one is an hour away, might try shipping there/back if practical or just go local place. I also went to a plumbing supply place and they said some people will get a machine shop to shave off the bottom a 1/4", but not sure how that will look and sit flush.

Let me know if you got any other new ideas since your post!

Mike
Unfortunately, no...I have not resolved my spout issue yet. I installed the handles with the adapter kit that you mentioned (pic #1) and I found a metal plating shop to ship my gold spout to, to make it polished nickel, est $150. Did not think about having a metal shop shave off the bottom of the new matching spout. May try that route (I already own the new spout so...), but due to the design of the spout and handles, trimming the bottom of the spout wouldn't look the best (pic #2) and mine (Wynford) would need 1/2" removed. Will talk to a machine shop and see what they say. Even so, it would probably look better than my old spout and a likely mismatch in the nickel finish color (after the plating). I don't know...ugh.

Not sure why Moen didn't come up with a single new model to accommodate this issue, given that many people with this type of valve and shank height have tubs encased in tile. I mean, they came up with an adapter for the old Chateau handles. New plumbing codes, I assume.

This one spout is getting expensive and quite time consuming, not to mention the nagging headache I get every time I glance at my tub. ;) Hope it will look decent in the end. Moving ahead with the other sections of the bathroom so, I can accomplish something. :D

Let us know how yours turns out and post pics please.
- Valerie
 

Attachments

  • New Handles Installed.jpg
    New Handles Installed.jpg
    47.9 KB · Views: 272
  • New Faucet.jpg
    New Faucet.jpg
    65.9 KB · Views: 259
Last edited:

Mike Linning

New Member
Messages
6
Reaction score
0
Points
1
Location
chicago il
Yeah, Moen should have made 1 basic model to retrofit for people like us...guess we're supposed to wait until shiny brass comes back in style again?

I noticed your shank a little more banged up. I can see where the improperly mounted new faucet was (red arrow) versus the original mount (green arrow).

I agree the base of spout will be different after machining than the handles, but I doubt if anyone will notice.


Unfortunately, no...I have not resolved my spout issue yet. I installed the handles with the adapter kit that you mentioned (pic #1) and I found a metal plating shop to ship my gold spout to, to make it polished nickel, est $150. Did not think about having a metal shop shave off the bottom of the new matching spout. May try that route (I already own the new spout so...), but due to the design of the spout and handles, trimming the bottom of the spout wouldn't look the best (pic #2) and mine (Wynford) would need 1/2" removed. Will talk to a machine shop and see what they say. Even so, it would probably look better than my old spout and a likely mismatch in the nickel finish color (after the plating). I don't know...ugh.

Not sure why Moen didn't come up with a single new model to accommodate this issue, given that many people with this type of valve and shank height have tubs encased in tile. I mean, they came up with an adapter for the old Chateau handles. New plumbing codes, I assume.

This one spout is getting expensive and quite time consuming, not to mention the nagging headache I get every time I glance at my tub. ;) Hope it will look decent in the end. Moving ahead with the other sections of the bathroom so, I can accomplish something. :D

Let us know how yours turns out and post pics please.
- Valerie
 

Attachments

  • shank.jpg
    shank.jpg
    25.4 KB · Views: 260

Mike Linning

New Member
Messages
6
Reaction score
0
Points
1
Location
chicago il
I have some updates to how I successfully retro-fitted my Moen faucet into something more current. In my case I went from the Chateau with Crystal handle and replaced with the Eva faucet system. I acquired the Eva faucet "lightly used" online in a brushed nickel finish and the goal was to get it installed with an bronze oil rubbed finish.

As DIYVee has referenced previously above, getting newer handles to fit on the old system is fairly easy to do by acquiring a retrofit kit which was $13 at Amazon https://www.amazon.com/Moen-106378-...=1&keywords=106378&qid=1614012824&s=hi&sr=1-1 . No instructions in the package but after studying the parts closely and some videos online you can figure out how to replace your components. Some parts were duplicates of existing for me and I just replaced even though the old ones were in good shape still. Also check out trento's post at: https://terrylove.com/forums/index....-tub-trim-replacement-help.73919/#post-662514 . So that was easy enough, but next challenge was going to be the faucet.

As Moen will outline on their website, the issue is going to be the shorter spout shanks on these valves installed pre-2008. As shown in the pictures my spout was approximately 1" tall. Inside each faucet is a rubber o-ring which has to be sealed on the shank to prevent leaks. If you can't get this o-ring on the shank snugly then you are going to have leaks. Applying caulk is not going to solve the problem, it might at best slow the leak down a bit. The leak is only going to happen when running the water, but still that's not really ideal install here. In addition to the leak, you may not be able to apply the "set screw" very firmly on the spout shank which runs a bigger risk of the faucet coming off the shank inadvertently and then you have a much bigger problem besides a "leak".

When I examined my Eva faucet and did some measurements, I found that I was going to have to shave off about 1/4" of the base to allow it to fit on the shank better. I was hunting around for a local powder coating shop which was going to be my solution for coating the new faucet with a Bronze Oil Rub Finish. I was lucky to learn that the same shop also did machining. The shop very quickly was able to shave off the first 1/4" of the base and then I tested it out for leaks, it worked perfectly the first time! The only issue I had was that it wasn't sitting flush on the tub deck, this made it look like it was floating if you got really close up to look at it. I was also preferring to make it flush so it would have more stability since the gooseneck was much taller/longer than the old faucet. After examination, I discovered that the gap was due to the base resting on the 1/8" plate at the base of the spout shank. The old faucet actually had a recessed edge to account for this, so I went back to the machine shop to have him reduce the inside of the faucet (red circle section) an additional 1/8" which eliminated the gap, provided more stability and more insurance that the o-ring would be further down on the spout shank.

Once everything fit nicely, the next step was to have it powder coated of which I selected a color from sample swatches from this site, https://www.prismaticpowders.com/shop/powder-coating-colors/UMB-1326/soft-rubbed-bronze which the company suggested I browse thru. Another issue I was having in my shower was an existing grab bar which was white and any replacement models I found were going to require new mounting holes in the tile which posed a risk to tiles cracking/breaking I preferred not to deal with. So I also had them powdercoat the grab bar (from white) and the old faucet (from brass) to have as a backup as well so they would all match exactly. Part of the process is baking the items in a "kiln" which required me to remove all plastic/rubber o-ring parts beforehand which was not too difficult to do. These all turned great and are a much more durable finish than spray painting on my own.

The place that I used to do the powder coating and machining was located in Crystal Lake, IL which was local to me https://www.calcocoatings.com/. Hopefully there are other places in your areas, but when I mentioned other having my issues they said send them along as they would be glad to help perhaps thru shipping the parts as needed. I worked with Dave Ryman dryman@calcocutaways.com and be sure to tell him I sent you via this forum. So how much did this all cost me? I spent about $200 total which including purchase of the Eva faucet system, the Moen handle retrofit kit, the machining of the faucet and the powder coating of all the pieces. By far a deal compared to the alternatives!

Attaching several pictures to highlight my journey here in the hopes it may help others of you in tackling this issue. If you have any questions feel free to ask here or email me privately.

Good luck to all!
 

Attachments

  • 20200313_084041.jpg
    20200313_084041.jpg
    39.5 KB · Views: 281
  • 20210204_074213.jpg
    20210204_074213.jpg
    50.7 KB · Views: 269
  • oring.jpg
    oring.jpg
    53.2 KB · Views: 271
  • 1stfit.jpg
    1stfit.jpg
    41.9 KB · Views: 260
  • 2ndfit.jpg
    2ndfit.jpg
    43.9 KB · Views: 262
  • 20210203_211227.jpg
    20210203_211227.jpg
    33 KB · Views: 256
  • 20210218_125914.jpg
    20210218_125914.jpg
    41.5 KB · Views: 298
  • 20210218_205201.jpg
    20210218_205201.jpg
    35.8 KB · Views: 261
  • 20210218_211215.jpg
    20210218_211215.jpg
    43.6 KB · Views: 247
  • 20210218_212742.jpg
    20210218_212742.jpg
    38.7 KB · Views: 256
Last edited:

DIYVee

New Member
Messages
3
Reaction score
0
Points
1
Location
Colorado Springs
Nice job, looks great! And thank you for all of the information. Definitely a few of us in this situation. I have to do a double take, every time I see a picture of someone's jetted tub, Chateau gold spout, and acrylic knobs, as the picture looks like I took it of my tub.

Couple questions for you, Mike:
Wynford spout says I need (minimum) 1 1/2" spout shank height, your Eva spout (says minimum), 1 3/8". We both have an existing 1" shank height.

Q1: Do you remember what the measurements were for the Chateau spout O-ring and the Eva O-ring (pre mods)?

I measure 1" to 1 1/32" from the flush bottom of the Wynford spout to the bottom of the interior, rubber, o-ring (1st pic). If I shave off 1/2" as the Moen page implies (min shank height of 1 1/2"), then the set screw is compromised (pic 2).

Q2: Given your measurements, do you think I could get away with shaving off 1/4"? I probably can't go beyond 5/16".

I am asking because I cannot take off my gold spout, just yet, to measure and I want to have "an idea" if machining the new spout is futile.

- Vee
 

Attachments

  • Wynford ORing.jpg
    Wynford ORing.jpg
    61.3 KB · Views: 258
  • Wynford SetScrew.jpg
    Wynford SetScrew.jpg
    99.5 KB · Views: 245
Last edited:

Mike Linning

New Member
Messages
6
Reaction score
0
Points
1
Location
chicago il
Nice job, looks great! And thank you for all of the information. Definitely a few of us in this situation. I have to do a double take, every time I see a picture of someone's jetted tub, Chateau gold spout, and acrylic knobs, as the picture looks like I took it of my tub.

Couple questions for you, Mike:
Wynford spout says I need (minimum) 1 1/2" spout shank height, your Eva spout (says minimum), 1 3/8". We both have an existing 1" shank height.

Q1: Do you remember what the measurements were for the Chateau spout O-ring and the Eva O-ring (pre mods)?

I measure 1" to 1 1/32" from the flush bottom of the Wynford spout to the bottom of the interior, rubber, o-ring (1st pic). If I shave off 1/2" as the Moen page implies (min shank height of 1 1/2"), then the set screw is compromised (pic 2).

Q2: Given your measurements, do you think I could get away with shaving off 1/4"? I probably can't go beyond 5/16".

I am asking because I cannot take off my gold spout, just yet, to measure and I want to have "an idea" if machining the new spout is futile.

- Vee

Vee,

These are good questions and as I wrote my summary, I wished I had captured better how much was actually shaved off. I know for sure I didn't take off anything near 1/2" at all as I would have the same problem as you describe with the set screw. The way I determined the initial amount was thru a couple of measurements which I will try to explain. When I asked the machine shop as to their recollection they stated...we brought the outside down to the same level as the inside (best guess about .2") then the inside down the extra .1".

It looks like between our two faucets we do have a difference of 1/8" minimum shank length, but hopefully in reality we don't really need that much either. What's not 100% clear from your measurement in pic 1, is are you measuring from the resting point or the outer edge that will rest on the tub itself? When I measured my Eva from the bottom of the o-ring to the resting edge after machining I ended up with about 21/32" or just over 5/8" leaving plenty of allowance for the set screw.

First off, when Moen when says a "minimum" height I think they are being conservative and I don't think it has to be as high as they say. The key here is to get some of the rubber o-ring seated firmly on the spout shank with the more the better. I think I was targeting to get it so that the top edge of the o-ring was sealed on the shank at a minimum. Anything more just probably adds more stability to the mounting aspects. Your Wynford faucet doesn't look at tall as my Eva is either so that's a plus.

So like you were doing in your measurements, I estimated the distance from the top of the o-ring (bottom when upside down measuring) to the edge where it will be "resting" on the spout shank base. See the first two pictures. I did the same measurements on the existing faucet and calculated the difference that this would need to come down.

The other way to compare the difference between the current faucet and the new faucet is to check out the marks left on the spout shank when tightened firmly by both units and compare the difference here. Hopefully the new faucet also makes a mark on the shank someplace. You don't want to overtighten this to damage the shank! You may have several markings already there to make it harder to judge, but I suggest two things. First use some steel wool to clean off the shank as much as possible or attach the faucets backwards or to the side temporarily so that you can get some fresh markings where there are none. Start with a light tightening, check for a mark and if not there go a little further. You could also try dabbing some chalk or dab of vaseline on the end of the set screw that will make a mark with just a surface touch. My next picture shows the two marks when I did this. You could also try to estimate the distance between the o-ring and set screw such that based on the screw mark height on the shank, do you think the o-ring will be sitting on the spout shank as well? This will be an easier measurement because both are on the same "plane" within the tube opening. Measuring my old brass one shows about 5/8" from top of ring to the mounting base just below the set screw.

If I recall correctly, the shank markings difference was greater than measuring the o-ring difference so I started with the smaller amount first since I could always go further as needed. As long as we're not leaking and the faucet is fairly secure, the o-ring measurements should suffice.

I was prepared for multiple trips of machining, but was very happy that it worked on the first attempt. I think it was about 1/4" at most on the first trip. The second trip we just did the inner base so it would rest flush with the tub on the outer edge which was just 1/10" of an inch more. I added a pic that showed the before and after bottom with the set screw, it definitely is less than 1/2". You could also measure your distance between the two bases for another figure.

Sorry to provide so many choices here, again I wished I knew for sure what amount was removed here! Given both of our newer faucets fit the new valve shanks I have to believe they are both similarly designed on the bottom as well.

Hope this helps and Good luck!
 

Attachments

  • resting.jpg
    resting.jpg
    30.2 KB · Views: 254
  • resting2.jpg
    resting2.jpg
    53.2 KB · Views: 236
  • shankmark.jpg
    shankmark.jpg
    25.7 KB · Views: 272
  • 1stcut.jpg
    1stcut.jpg
    51.7 KB · Views: 236
  • ba.jpg
    ba.jpg
    40.7 KB · Views: 264
Last edited:
Top
Hey, wait a minute.

This is awkward, but...

It looks like you're using an ad blocker. We get it, but (1) terrylove.com can't live without ads, and (2) ad blockers can cause issues with videos and comments. If you'd like to support the site, please allow ads.

If any particular ad is your REASON for blocking ads, please let us know. We might be able to do something about it. Thanks.
I've Disabled AdBlock    No Thanks