I Need to Vent

Users who are viewing this thread

Thomas K

Member
Messages
353
Reaction score
16
Points
18
Location
Opelika, al
I'm sorry, I've lost the train of discussion about the wall, are you talking about having 7" depth of wall framing? (2) 2x4s next to each other, 3-1/2" + 3-1/2"? Why would you do that?

Cheers, Wayne

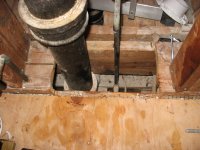
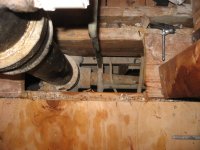
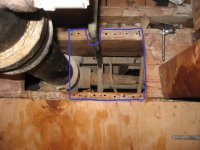
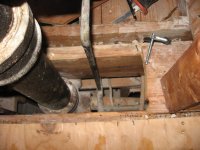
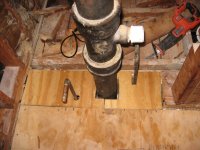
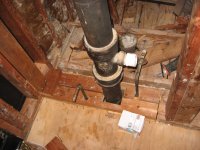
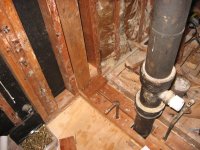
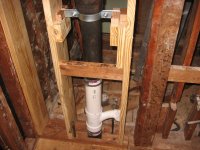
Because only the area in the last photograph is not that way. They built a 7" wall there to center that cast iron stack in. If you look closely at the last photos I posted, most of that wet wall is. I was looking at that pipe when I removed it; plumber pushed it over because it wouldn't clear stud. I just figured if I add a couple more feet to that framing, I'd be able to notch between both 2 x 4's and not drill a 2" hole into one 2 x 4". If I am not making sense, I can post another drawing.

I know. I'm wordy in my posts. I write horror stories in my spare (what spare?) time.
 

wwhitney

In the Trades
Messages
6,556
Reaction score
1,841
Points
113
Location
Berkeley, CA
So just to double check, in the very first picture in the thread, what is the exact bottom plate width, say to the nearest 1/8"? And across that width, where is the center line of the san-tee opening to the cast iron stack?

Cheers, Wayne
 

Thomas K

Member
Messages
353
Reaction score
16
Points
18
Location
Opelika, al
So just to double check, in the very first picture in the thread, what is the exact bottom plate width, say to the nearest 1/8"? And across that width, where is the center line of the san-tee opening to the cast iron stack?

Cheers, Wayne

To the best of my knowledge, Wayne, exact bottom plate width is 7", due to two 2 x 4" runs. I haven't actually measured width. I am not at that house right now, but if I remember correctly, san tee opening is almost exactly in the middle of the two 2 x 4" wall runs. You can't see it in the photos, but the original builders notched 2 x 4"s in each wall to clear original galvanized drain pipe.

If it weren't for that 4" pipe, I probably wouldn't need that second wall in smaller bathroom. But then I'd have to fit a 1 1/2" pipe through a 2 x 4 wall, or just replace entire wall there with 2 x 6. Right up to the pocket door framing I was discussing earlier.

On another note, I was going to replace the stud where the pipe nearest the stack exits the wall, the one the plumber cut out. And move the stud over enough for pipe to clear there since it is lined up with where sink trap will go.
 
Last edited:

wwhitney

In the Trades
Messages
6,556
Reaction score
1,841
Points
113
Location
Berkeley, CA
I suggest checking the old framing, sometimes it is wider than modern, so a 2x4 could be 3-5/8" or 3-3/4".

You can fit a 1-1/2" pipe through a non-load bearing 2x4 stud, it just requires accurate drilling. A 2 " hole will fit the pipe, and the allowable hole size is 60%, or 2.1". You need to be dead center, which gives you 3/4" edge distance; the minimum edge distance allowed is 5/8".

I suggest that's what you do in the part of the wall that is a single 2x4 wall near the upstream sink. That of course doesn't line up with the cast iron san-tee. (1-3/4" off according to your information.) So I see two options:

1) Replace the double 2x4 wall with a 2x6 wall. Then you could angle the holes away from the double sink to achieve the 1-3/4" offset over the full horizontal length. But you might have to relocate the water supplies, and it may be more reframing than you want to do. Depends on whether you value the 1-1/2" you'd gain in the other bathroom.

2) Stick with the double 2x4 wall. Then the allowable notch depth for non-bearing studs is 40% of the width, or 1.4". So your 1-1/2" pipe has to be either dead center on one stud, or right at edge of one stud. You can transition from one location to the other with a 1-3/4" offset made from 22.5 or 45 degree fittings. If you think you might someday want to remove the farther bathroom's 2x4 wall and reclaim the space when you replace the cast iron stack, put the offset in the stud bay closest to the cast iron.

Cheers, Wayne
 

Thomas K

Member
Messages
353
Reaction score
16
Points
18
Location
Opelika, al
Option 2 sounds like the best approach. If I were going to replace the cast iron stack, I'd do it now. I'm 56, and in 20 years I won't be able to do it. I do have some 22.5 degree fittings in a box, so lining up pipe with the single 2 x 4" wall might not be that difficult. It is also code that you can cut a hole big enough for 1.5" drain pipe in a 2 x 4" load-bearing wall, as long as you add an additional stud for support, and not more than two studs.
 

Thomas K

Member
Messages
353
Reaction score
16
Points
18
Location
Opelika, al
Mr. Big Dummy removed some of the badly notched studs to replace them this afternoon , and the floor plate had been notched so badly and drilled through that it broke out. I evened area up with Sawzall, but can't think of any way to fix this but to add blocking to area, 3/4" plywood over that, and partial floor plate to have something to screw new studs to. Entire floor run is sitting on 3/4" boards between floor joists.
 

Attachments

  • IMG_1801.JPG
    IMG_1801.JPG
    100.1 KB · Views: 133
  • IMG_1802.JPG
    IMG_1802.JPG
    89.9 KB · Views: 129

James Henry

In the Trades
Messages
1,577
Reaction score
403
Points
83
Location
Billings, Montana.
Mr. Big Dummy removed some of the badly notched studs to replace them this afternoon , and the floor plate had been notched so badly and drilled through that it broke out. I evened area up with Sawzall, but can't think of any way to fix this but to add blocking to area, 3/4" plywood over that, and partial floor plate to have something to screw new studs to. Entire floor run is sitting on 3/4" boards between floor joists.
cut and notch a piece of 3/4" plywood to fill the area between the joist's and screw it down, then cut another piece of 3/4" plywood the same way and screw that one on top of the first one. install a riser clamp on the pipe.
https://www.supplyhouse.com/Bluefin...MI64aP_unQ7AIVVgiICR3KWgEYEAQYASABEgJ9wfD_BwE
 

Thomas K

Member
Messages
353
Reaction score
16
Points
18
Location
Opelika, al
cut and notch a piece of 3/4" plywood to fill the area between the joist's and screw it down, then cut another piece of 3/4" plywood the same way and screw that one on top of the first one. install a riser clamp on the pipe.
https://www.supplyhouse.com/Bluefin...MI64aP_unQ7AIVVgiICR3KWgEYEAQYASABEgJ9wfD_BwE

Thanks, James! I have two riser clamps on hand. Slight problem. floor plate sits on top of 3/4" boards, so for it to be even with rest, I would have to have
3/4" + 1 1/2" . Two sheets of plywood is only 1 1/2". Unless you mean cutting the studs 3/4" longer and attaching them directly to the installed plywood. Is that what you mean? I don't need to add small pieces of 2 x 4" there?

Everybody on here is going to shoot me, too, because I said I wasn't going to cut that cast iron, but I am going to attempt it. If I have to replace all those bad studs, I am going to have a new 2" drainpipe, and a plumber told me the existing cast iron tee is wrong. I have a quality Sawzall blade and a cast iron blade for my angle grinder, so I should be able to do it.

I'm thinking I will have to cut the plywood in two pieces to wrap around the 4" pipe, correct? Lay the first pieces across the floor joists. Should the second pieces lay the opposite way across the first pieces, or the same way?
 
Last edited:

Thomas K

Member
Messages
353
Reaction score
16
Points
18
Location
Opelika, al
I thought you meant cover the entire area, even around the pipe, but you mean just stack plywood until it matches the top of the floor plate adjoining it and attach new studs to the plywood in the area where they were before, which I marked.

I'm assuming since I haven't installed any subfloor in adjoining bathroom, I need go only half a joist width with the new plate there.
 
Last edited:

wwhitney

In the Trades
Messages
6,556
Reaction score
1,841
Points
113
Location
Berkeley, CA
You will need to seal off the joist bay from the wall stud cavities (firestopping). So your first layer of plywood should be two pieces cut to fit around the cast iron stack and cover the joist bay as completely as you can. Above that you just need a bottom plate where the studs go, it doesn't have to be tight to the stack. You could use two layers of 3/4" plywood or two side by side 2x4 plates. I favor side by side 2x4s for consistency, but six of one half a dozen of the other. Before you close up the wall, any holes in the bottom plates (and top plates) need to get a firestopping material, e.g. the orange foam.

Also, it may be useful to install the replacement studs and the horizontal pipe at the same time. You can carefully drill the studs before installation, slide the pipe into the holes, persuade the studs into place, and toe nail off the studs. Where you're notching the studs instead of drilling them, you can obviously install one set of studs, then the pipe, then the other set of studs.

If you want a really nice notch, you can screw a piece of scrap 2x2 along side the location of the notch (keeping the screws out of the way), and then use your hole saw to cut them both. You end up with a semi-circular notch in your stud.

(Some of the synergies of being both the carpenter and the plumber.)

Cheers, Wayne
 

Thomas K

Member
Messages
353
Reaction score
16
Points
18
Location
Opelika, al
Wayne, I know I said just last night I was not going to try to cut that cast iron, but I want to attempt it. Not all of it, mind you, just enough to install a 4 x 4 x 2" combo wye and 45 degree elbow lower in stack along with 2" drain pipe. I have the next two days off, so will be working on that, likely using the double fixture tee setup. I will cover the area around pipe completely with 3/4" plywood, screw it in, and top with screwed-in section of 2 x 4" floor plate. Then install the new studs there and hang stack from riser clamp secured to wood blocking screwed to studs. I will dry fit layout before drilling or notching anything. I am planning on centering 2" pipe between both walls, notching 2 x 4s around it 1 1/4" each. I still think I will have to use 22 degree fittings to center 1 1/2" right pipe in last two studs, which will be replaced.

I like your idea of notching or drilling each stud before installation, and attaching a piece of wood to studs to do so. As for replacing that stud where left pipe exits wall, I will have to either move new stud 1 1/2" to right, or move pipe itself to the right.
 

Attachments

  • fitting.jpg
    fitting.jpg
    2.1 KB · Views: 126
Last edited:

wwhitney

In the Trades
Messages
6,556
Reaction score
1,841
Points
113
Location
Berkeley, CA
If it's easier for you, you can use a 4" x 2" san-tee instead of a combo. Either one works, since the stack is not the vent. And if you put your combo san-tee low enough, you can have your sink san-tees vertical instead of 45 off vertical.

Also, I don't really see the upside to using 2" for any of it, but perhaps that's because I've never had to rod a 1-1/2" drain.

Cheers, Wayne
 

Thomas K

Member
Messages
353
Reaction score
16
Points
18
Location
Opelika, al
Make sure you leave room for a riser clamp.

I plan to install one clamp on on top of the top plate, and another directly under a
cast iron hub about a foot over where I plan to cut. I will post photos of work done today.

I won't glue anything before posting pictures here.
 
Last edited:

Thomas K

Member
Messages
353
Reaction score
16
Points
18
Location
Opelika, al
I worked on this all afternoon. Took a closer look at repair area and saw that builders cut too much out of subfloor when they prepped small
bathroom for concrete in floor. There was only about a quarter inch of subfloor sitting on edge of joist below floor plates, which was unsafe. I removed all studs in that area, and screwed in new 3/4" plywood. Then I fabricated new floor plate pieces out of some of the studs I removed and fastened them with strong tie #9 screws. I believe it'd almost be just as easy to install a 2 x 6" wall, but I am not an engineer and don't want to compromise structural integrity.

I don't know if placing a step on the floor plates like I did in last photo is okay or not. Studs I removed there were in good shape but slightly too short after floor repair, so I cut them to fit step.

I never even got around to the pipe.
 

Attachments

  • IMG_1808.JPG
    IMG_1808.JPG
    94.6 KB · Views: 136
  • IMG_1809.JPG
    IMG_1809.JPG
    88.8 KB · Views: 128
  • IMG_1810.JPG
    IMG_1810.JPG
    98 KB · Views: 130
  • IMG_1811.JPG
    IMG_1811.JPG
    98.5 KB · Views: 136
  • IMG_1812.JPG
    IMG_1812.JPG
    110.5 KB · Views: 130
Last edited:

Thomas K

Member
Messages
353
Reaction score
16
Points
18
Location
Opelika, al
"I don't wanna be a mechanic any more. I want to be a plumber. Who do I talk to?"
 

Attachments

  • IMG_1813.JPG
    IMG_1813.JPG
    99.5 KB · Views: 121

Thomas K

Member
Messages
353
Reaction score
16
Points
18
Location
Opelika, al
What the heck is that photo of the combo? Nice support on the cast iron tho.
I decided since I was going to replace some studs, I'd go with 2 x 8s. I had to put them in original positions, 16" OC, and that's where they ended up. I had to add 4" PVC there to make up for where I cut the other fitting out. With Diablo blade, I made careful bottom cut in less than a minute. Must have dulled blade because upper cut took 5 minutes. You guys were right about fitting those shielded hub couplers, though. I had to use silicone spray and a lot of folding to get upper coupling to fit on cast iron.

Stack kept trying to shift around, too. So I used Liquid Nails to glue some stops around it to stabilize it. Used Strong Tie #9 screws and Liquid Nails to secure riser clamp mounts.

Combo outlet is just close to stud. I will have to be careful drilling hole for pipe. I stuffed it with rag to avoid sewer gas.

After today's little caper, I have considerably more respect for plumbers.
 
Last edited:

Tuttles Revenge

In the Trades
Messages
4,175
Reaction score
1,439
Points
113
I'm a little sad I havent been following this epic thread very closely. Glad you supported that stack. A guy I used to work with didn't and it crushed someone on his jobsite.
 
Top
Hey, wait a minute.

This is awkward, but...

It looks like you're using an ad blocker. We get it, but (1) terrylove.com can't live without ads, and (2) ad blockers can cause issues with videos and comments. If you'd like to support the site, please allow ads.

If any particular ad is your REASON for blocking ads, please let us know. We might be able to do something about it. Thanks.
I've Disabled AdBlock    No Thanks