American Standard Push-Pull Shower Valve

Users who are viewing this thread

Mr_David

New Member
Messages
2
Reaction score
0
Points
1
Location
Santee,Calif
Great info. I rebuilt one or two of these several years ago. Just came across one today. Going to replace it with Moen Positemp tomorrow.

08F37360-A617-4561-8551-E7EEFA7439BA.jpeg
3F998EA0-D0C6-4B32-B59D-7BBD78183A1D.jpeg
 

Dppatel

New Member
Messages
1
Reaction score
1
Points
1
Location
New York
Looks like DANCO Brand makes a "rebuld kit" for the inner working of the valve.
Not too bad a price.
Here is link to Home Depot. Looks like it is a special order.

https://www.homedepot.com/p/DANCO-R...tandard-Tub-and-Shower-Faucet-80713/202070992
Thanks BrentAudi. I tried the rebuild kit you put in home Depot link for my American Standard Faucet. It was leaking for last 3 years but I was able to repair the leak after a few trial and errors. I had a leak only on hot water and I just repaired that side. Key was to open the top nut (using adjustable flat headed wrench) and the bottom hexagonal nut with 5/16" socket wrench. It took a lot of effort to open the bottom hexagonal threaded nut though. I had to use long handle wrench to use leverage. I removed the filter strainer, spring, vertical stem and the hexagonal nut underneath. Thanks for the help and thanks to admin putting picture of their old faucet which made me stop on this forum at first place.

IMG_20190512_150317025.jpg


IMG_20190512_150317025.jpg
IMG_20190512_152510859.jpg
 

Attachments

  • IMG_20190512_152533634.jpg
    IMG_20190512_152533634.jpg
    49.8 KB · Views: 494

Nicolas Baudin

New Member
Messages
1
Reaction score
1
Points
1
Location
Anchorage
Hi guys. I hope you can help me. My bathtub started leaking and I also have one of these bad boys in there.
I replace all the parts from the rebuilt kit and it seems like :
1. It's still kinda leaking hot water from the spigot
2. When I open the water I have cold water flowing but when I turn the handle there is barely any pressure for the hot water going through.

I tried to change the cold water spring for the other side and it didn't change anything. I'm getting super frustrated with that thing.

Any ideas or help?
Also, how tight should all the screws be against the seals?

Thanks for any input

Nico
 

msoengineer

New Member
Messages
5
Reaction score
1
Points
1
Location
Illinois
Hi guys. I hope you can help me. My bathtub started leaking and I also have one of these bad boys in there.
I replace all the parts from the rebuilt kit and it seems like :
1. It's still kinda leaking hot water from the spigot
2. When I open the water I have cold water flowing but when I turn the handle there is barely any pressure for the hot water going through.

I tried to change the cold water spring for the other side and it didn't change anything. I'm getting super frustrated with that thing.

Any ideas or help?
Also, how tight should all the screws be against the seals?

Thanks for any input

Nico

Super late reply, but here's what's wrong:

1. Check your seats inside the valve. You remove those with a 5/16 Allen key. A rebuild kit should have those. Maybe the gasket/o-ring broke? The spindle sits on those seats and that's how the water turns off. Sometimes the springs aren't sitting right either and so they won't push the stems back down against the seat. The spring tension is very finicky to say the least with these kits...I think the tolerances have gotten too sloppy as these kits have been made year after year.

2. The lack of water pressure is due to the springs, the tension might be too much. I discovered that the spring was binding up against the inside walls of the valve on the hot side in mine. I ended up having to swap the valve caps on top and then I swapped the stems and springs from hot to cold and that seemed to be the trick.

These valves end up wearing out on the hot side always because the heat reacts with the brass faster than on the cold side. Thanks Heat!

Danco has stopped making their kits and you won't be able to find one anymore. Sexauer also has a kit P/N: AS-17 , but good luck finding their kits.

Also to note, the original design had little baskets as screens to keep debris out. These new kits use a cone shaped spring, instead, to mimic something similar but it will allow debris to pass through. As mentioned earlier, a major design flaw in this system are the seats and spring issues on original components, The cam could also wear out against the main post. My little basket broke on the hot water side thus allowing too much play between the spring and the valve screw cap and so a drip was formed.

For anyone stumbles across this in the future, be warned that these kits are using seats that are 0.010" longer/taller than the original seats and you might experience the same hot water issue because the stems end up sitting higher. The key is the springs and making sure that they are pushed down onto the nipple of the stems.

The other thing that you need to pay close attention to is the "V-packing" rings that go on the shaft. My guess is that there's two different size diameter shafts depending on if you have the round handle / knob versus the t-handle. It would seem that the t-handle is smaller diameter(?). I ended up having to reuse my old packing rings when I rebuilt the valve. The ones in the kit I ordered were too small. These V-packing rings keep the water from pouring out the front of the eustachian tube when you turn the valve on. BTW, the eustachian tube is threaded and can be removed, and should be removed to access the main valve body to clean out the v-packings and re-silicone them.

I ordered my kit from faucet shark, but Chicągo faucets also has these. I imagine as time goes on, parts are going to become harder and harder to source. Thankfully if you poke around plumbing supply places they still may have parts.

Make sure to use silicone grease on all the metal to metal areas to assure smooth movement- the cam and shaft area is key. Inside the hollow tube where the Cam sticks into the back-side of the valve body/guide post, and on the shaft itself in the middle section. This will assure smooth push-pull action. Can't hurt to silicone grease all the threads too...for future service.
 

Attachments

  • n1030 diagram.png
    n1030 diagram.png
    163.7 KB · Views: 427
  • n1030 parts list 760pixels.png
    n1030 parts list 760pixels.png
    160.6 KB · Views: 423
Last edited by a moderator:

Carolina guy

New Member
Messages
1
Reaction score
0
Points
1
Location
Cherryville, NC
I have one of these AS push pull faucets in my mother's bath tub and the hot water has quit working except for a tiny stream of water. Is it possible that the hot side spring has weakened? When the house was re-piped some years back, the galvanized risers were not replaced because the front and back of the bath tub wall is covered in ceramic tile. I realize that the hot water pipe could be corroded shut. Before I saw out 1960 tile and wire lath, I want your opinion whether you think I might rebuild it.
 

msoengineer

New Member
Messages
5
Reaction score
1
Points
1
Location
Illinois
I have one of these AS push pull faucets in my mother's bath tub and the hot water has quit working except for a tiny stream of water. Is it possible that the hot side spring has weakened? When the house was re-piped some years back, the galvanized risers were not replaced because the front and back of the bath tub wall is covered in ceramic tile. I realize that the hot water pipe could be corroded shut. Before I saw out 1960 tile and wire lath, I want your opinion whether you think I might rebuild it.


If the springs weaken you end up with leaks and not pressure loss; so, this is the opposite, something is causing too much tension on the stems preventing them from tilting open enough to allow adequate water flow. Most likely the spring inside is bound up on the ridges of the valve body somewhere or there is some debris stuck inside the valve body. You'll have to take it all apart and look at the spring to know for sure. If it has never been rebuilt, there will be two mesh baskets inside of the valve body and they too may be clogged from mineral deposits. These baskets rarely survive this long, but again a broken basket would lead to a leak and not total lack of pressure. If the valve was rebuilt, it likely has the cone shaped springs and those, for sure, can get hung up on the sharp burs/edges inside the valve body.

I suggest taking one side apart, at a time, to look things over. This way you keep your hot components separated from the cold components during re-assembly; otherwise, make sure to note where you took things out of and where they go back. Looking at the valve from the front, left is hot, right is cold- normal plumbing convention. Make sure the springs snap over the little nipple that is on the stem. This will help keep the spring in the same place and under the same tension. Also to note, if you take apart the seals using a 5/16" allen wrench, make sure to give a final, HARD, 1/8 turn to the seats so they don't turn loose or have a micro-sized opening/crack for a tiny drip of water to occur when the valve is turned off during normal use.

I would make sure you have a rebuild kit first (P/N 3492-0700) before you undertake these repairs ($15-$20). It's very easy for the three face-interface gaskets between the two valve bodies to pop off inside the wall forever being lost. I used a piece of cardboard inside the wall to assure that if anything dropped it would be caught on the cardboard. Dry rot of the gaskets is also very likely, especially the valve caps. so new ones are a must. Also, you will need some plumbing lubricating silicone to grease up all moving parts of the valve. Mainly inside the cam & shaft hole, on the guide post, and inside the valve body where the cam & shaft pass through. This will assure smooth operation. It wouldn't hurt to grease all the threads too for future serviceability.
 
Last edited:

msoengineer

New Member
Messages
5
Reaction score
1
Points
1
Location
Illinois
Hi Kids, it's professor thermal expansion, (linearly) here to give you some more hints...

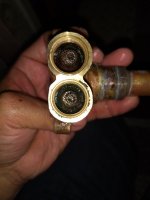
So, after about one week of functioning valves, I succumbed to the dreaded no hot water issue.... This time I put my physics minor to use and thought long and hard. Actually, mostly, dropping F-bombs under my breath while crouching in the tub having taken apart this valve for like the 10th time now. I sat on my office chair, toilet, and thought things through really, really, hard. As I sat on the throne, I started to compare my new replacement kit parts against my formerly rebuilt, long ago by the previous owner, valve and its parts. Then I noticed something insignificantly major, the springs....I looked at the old spring that worked flawlessly, likely for decades, and compared it against my new springs. The new springs were 1/8"-1/4" shorter than the old springs. Then I thought about this some more and about thermal expansion.... a spring will expand linearly along its coil/twist/length.

So what professor, why does that matter?

Ah grasshopper.... so, if you have the original springs you'll see how narrow they are...this was to allow them to be "tippy" and also to fit inside the debris basket within each valve chamber. Someone long ago decided that a conical spring was the solution for replacement parts and got rid of that pesky debris basket...maybe they contributed to noise??? Back to the point...

So the new kit springs are conical in shape making them "more" stable vs the original narrow springs... think pyramid shape grasshopper...now imagine you have a taller pyramid and a shorter pyramid, but both have the same base size- Q: Which one is more "tippy" if the base size of the pyramid stays the same but the height is changed? A: The taller one becomes more prone to being tipped over easily....

So, the issue is two fold, all these new kits use shorter springs, and thermal expansion causes these springs to further "grow" in length adding more tension within that valve chamber and it makes them even less "tippy" thus not allowing the stems to pivot open "fully" and results in a trickle of water. If you crank only the hot water you will observe the water stream will go from full flow, to a lower flow, to the eventual trickle or even no flow situation.

OK professor, thanks for that explanation, but what the "F" do I do now?!

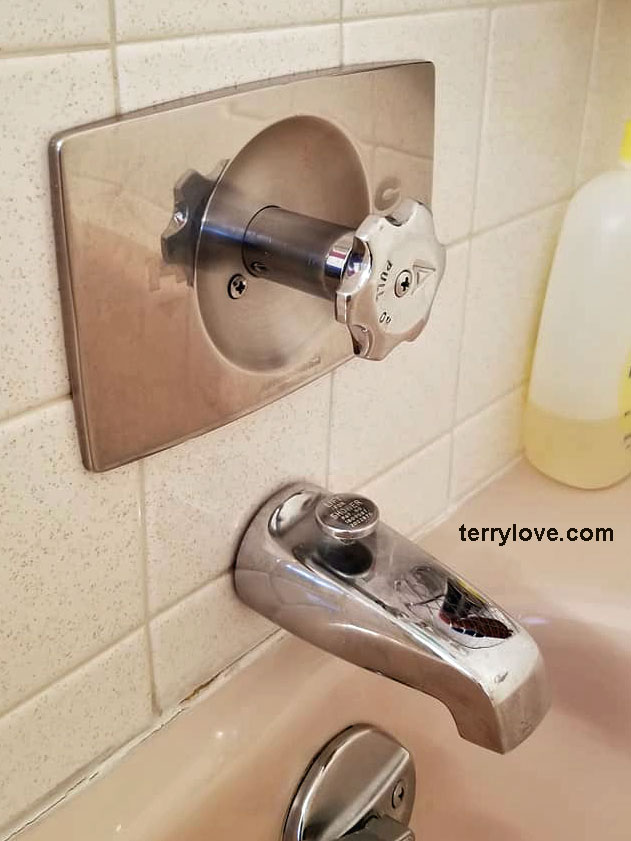
So, the solution is to look at your new springs. You will see that last two wide layers of spring are most likely sandwiched together and touching. You must separate that sandwiched layer on the widest part of the cone of the spring. This means you will need to stretch out that last layer so there is a gap that mirrors all the other layers and their gap thus making the spring sit about 1/8" taller than how it came from the factory. This will make the "base" of that cone which sits at the top of the valve and touches the valve caps more tippy. The springs sit "upsidedown" when installed. The narrow part of the spring fits over the little nipple on the stem and the wide part of the spring touches the cap of the valve body.

Now, time will tell if my minor in physics, my analysis of this issue, and the spring extension solution turns out to yield another decade of flawless use of these shower valves. PLEASE PLUMBING GODS, PLEASE! Good grief Charlie brown...these old faucets have a cute, and simple, design; but, rely heavily on proper clearances of that dumb cone spring to work right in both preventing a leak at the seats and to assure they tip open properly.

If all else fails, or your parts have excessive wear and tear and you don't want to continue this madness, I have a solution for you. While searching around google it led me to another post on this forum that discussed a company:

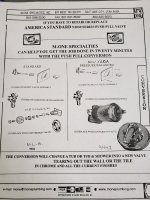
M-One Specialties, Inc. http://www.moneplumbing.com/repair.asp

974 West 100 South
Salt Lake City, UT 84104

Phone: (801) 596-2500
Toll Free: (800) 525-9223

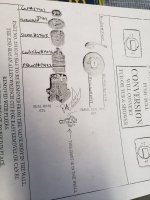
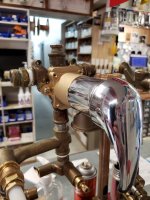
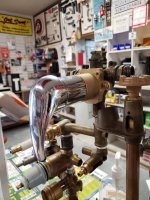
The former owner, he passed away and now his employees run it, of M-One developed a drop in valve body that fits directly onto the old back manifold that's in your wall. This means it's plug and play ready and all you have to do is loosen the brass bolts on each side of that valve body, unscrew the old guide post, and drop in the new replacement valve body. Long and short, there is a new version 2.0 of this design, under the new ownership of M-one , that just came out and is not shown on their site, but it IS available and it's using a design which makes it ADA compliant while still using the old rear manifold! The new valve body, PN 9442, is about $120 + S&H. It's using a readily available Chinese, "knock-off," valve which is used on 20+ commercially available faucets today...so part availability should not be an issue moving forward! It operates by twisting it "on" from cold to hot and it's a pressure balanced valve to assure scalding protection. It's got an offset handle so it will be different in appearance from the original round or T-handle you have. The kit will include all the parts you need including a new trim kit front so it all matches nicely. Give M-one a call and hopefully move on from this dinosaur with many years of trouble free use while keeping the old guts! (Though your pipes might be an issue too, especially if using old galvanized steel)

Hope I helped you out! And, no, I'm no plumber... just handy and stubborn to see it through to the end...
 

Attachments

  • Pg1.jpg
    Pg1.jpg
    106.8 KB · Views: 390
  • Pg2.jpg
    Pg2.jpg
    91.2 KB · Views: 387
  • New valve body pic1.jpg
    New valve body pic1.jpg
    97.8 KB · Views: 376
  • New valve body pic2.jpg
    New valve body pic2.jpg
    105.7 KB · Views: 390
Last edited:
Top
Hey, wait a minute.

This is awkward, but...

It looks like you're using an ad blocker. We get it, but (1) terrylove.com can't live without ads, and (2) ad blockers can cause issues with videos and comments. If you'd like to support the site, please allow ads.

If any particular ad is your REASON for blocking ads, please let us know. We might be able to do something about it. Thanks.
I've Disabled AdBlock    No Thanks