1st shower valve stem repair -- access question

Users who are viewing this thread

Phil P.

New Member
Messages
26
Reaction score
0
Points
1
Location
Arlington, Virginia
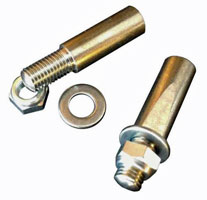
So I'm working on a shower that won't fully turn off (drips from shower head). It's original valve from 1970 home. I turned off water and carefully disassembled, but to be honest not sure what I have. I was able to unthread/remove valve from hot side, but it didn't seem to come all the way out. I've watched a few DIY youtubes on valve repair (washer/seat).

I don't see where I can use the large valve/socket wrench to unscrew it. My hunch is it is not accessible because tiles cover access. It that's case, no problem I can carefully trim tile back to access it, I just don't want to start cutting away unless that's the case.

1) Should I start cutting back tile?
2) Also, what do you think is chance there is a stop back there if I cut the tile back far enough?
3) is it readily apparent to you pros what brand valve this is?

Here's a pic of what I can see, plus the items that I removed (and re-installed). Any advice appreciated.

Thanks Phil
IMG_0122.JPG IMG_0129.JPG IMG_0123.JPG IMG_0127.JPG
 

Terry

The Plumbing Wizard
Staff member
Messages
29,942
Reaction score
3,459
Points
113
Location
Bothell, Washington
Website
terrylove.com
I don't know the brand, but for enlarging the hole around the stem, I sometimes take a flat blade screw driver and hammer and start tapping the edge of the tile out. With the blade near the edge it takes almost no force. Just small little taps will chip the tile back further.
 

Phil P.

New Member
Messages
26
Reaction score
0
Points
1
Location
Arlington, Virginia
Thanks for the advice Terry -- I had planned on oscillating tool with abrasive blade but I bet your gentle chipping technique will be better and less messy.

Of course there is a nice tiled bath tub surround on the reverse wall so peeking through drywall isn't an option in this case.

I'll let you all know what I find in there and how it turns out. Phil
 

hj

Master Plumber
Messages
33,603
Reaction score
1,042
Points
113
Location
Cave Creek, Arizona
Website
www.terrylove.com
It is an American Standard Colony faucet. The "retainer" is the only thing holding the stem in place other than some washers. Screw it back on to the stem, then pull the whole thing out as a single unit. If it is a 3 valve unit the diverter can be a real pain to remove and can take HOURS using a variety of tools to free it up.
 

Phil P.

New Member
Messages
26
Reaction score
0
Points
1
Location
Arlington, Virginia
Thank you Terry and HJ!
I successfully replaced both valves stems in this shower today without any difficulty.
  • using the screwdriver to chip away tile worked perfect -- provided just enough room and minimal destruction.
  • with HJ's identification I simply googled around and found a rebuild kit online (Danco 9DD0039614) for about $50 that had everything -- new trim, valves, seats and most importantly a heavy duty steel special wrench to remove the stems -- without that wrench I never would have been able to get the cold valve out. The socket-set style aren't used for this valve I learned.
  • the seat wrench I got at HD didn't seem to fit, but after using a tooth brush to clean out housing and peeking in with flashlight I think seats looked OK.
  • anyway .. broke them out with that wrench, pulled out valve, lubed up the new ones and it's working great -- good flow, smooth operation and no drips.
  • I attached some pics to show the end result and the wrench that came with the kit.
I was standing by to have water shut off for hours and make a couple trips to plumbing supply house and potentially chop out the old valve and replace it altogether, but all went smooth. It took about 30 minutes. Thanks again for the help gentlemen :)

IMG_0143.JPG IMG_0145.JPG IMG_0140.JPG .
 

Terry

The Plumbing Wizard
Staff member
Messages
29,942
Reaction score
3,459
Points
113
Location
Bothell, Washington
Website
terrylove.com
Thank you Terry and HJ!
I successfully replaced both valves stems in this shower today without any difficulty.
  • using the screwdriver to chip away tile worked perfect -- provided just enough room and minimal destruction.
When I was working in a bicycle shop with owners from England, I learned about using more hand tools. My previous shops would use a wheel grinders to adjust the taper on cotter pins that held the crank arms on. It was always a little dicey using the round grinders to make a flat on the cotter pin. And then I worked for an ex Boeing engineer and he was using a vice and a flat file. Way quicker and a much better flat surface for the cotter pin.

cotter-pins.jpg


Then I started plumbing, and the self feed drill bits were being sent out for sharpening with someone using a grinder. A couple times of that and the bits were toast. I decided to pick up some files, a flat and a triangle and started to hand file my bits. I then decided that I should angle the teeth inward to the center. The bits new at that time were cut straight across, but that didn't make sense to me. My bits were cutting way better than new now. A fellow plumber gave me his old 3-9/16" bit that had be ruined by the guy doing the grinder on it. I took his bit, and using my hand file technique made it better than new. He was a bit stunned to see me peeling off strips of wood and zipping through floor joists with it.
Sometimes the hand tool way is the best way.

I'm glad you got that rebuilt. It should be good for years and years now. :)
 
Last edited:
Top
Hey, wait a minute.

This is awkward, but...

It looks like you're using an ad blocker. We get it, but (1) terrylove.com can't live without ads, and (2) ad blockers can cause issues with videos and comments. If you'd like to support the site, please allow ads.

If any particular ad is your REASON for blocking ads, please let us know. We might be able to do something about it. Thanks.
I've Disabled AdBlock    No Thanks