Master Suite Bath Drain Advice - Tub and Bath Separate

Users who are viewing this thread

WoodchuckDIY

New Member
Messages
6
Reaction score
0
Points
1
Location
Utah
Hello All!

I've been perusing the forums (and much of the web for that matter) without finding details on the proper way to vent a stand alone shower and stand alone tub into the same drain line. In addition to this, open to any feedback/concerns/advice on my general plans for the relocation of fixtures in my 2nd floor master bath.

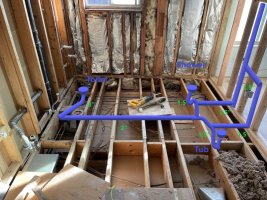
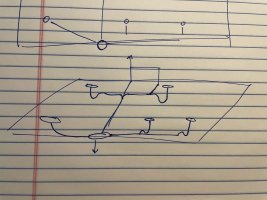
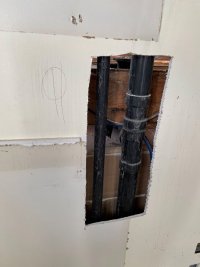
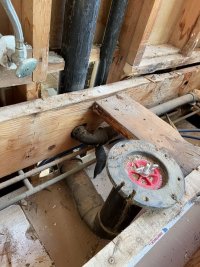
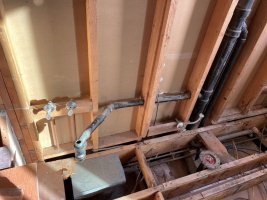
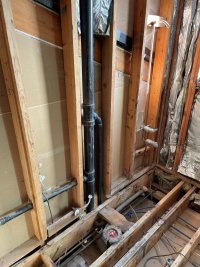
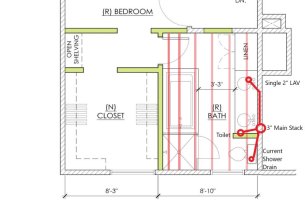
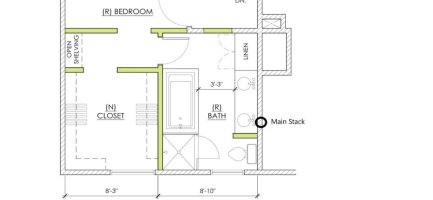
Attached I've included a few images of the plans for the bathroom, a rough sketch of my plans for drain locations along with photos of the space with flooring pulled up. Detailed written outline of what I plan to do below:

Currently the main stack runs on the East wall of the bathroom. Pre-remodel everything vents through this stack (single sink, toilet and shower/tub combo). The plan is to remove and replace the currently used portion of the main stack to allow for new fittings for the toilet and the separate standing shower and stand alone tub. I plan to reuse the current drain from the sink for a dual vanity (adding in two p traps, one per sink).

Next the toilet will be shifted from it's current location ~12" off the main stack to the corner of the room. To do this I'll plan to use 3'" for the length with near identical fittings (just a longer run).

The shower and bath will now sit on the West wall (this is where my main questions lie). I plan to use 1.5" to drain from both the shower and from the tub to a central drain pipe (2") that will run the 8 feet across the room to the main stack maintaining a 1/8" drop per foot over this spacing. In order for me to avoid backups into the shower I plan to install 1.5" venting between each fixture (tub and shower) and the 2" run to the main line. The run from the bath will go up above the high water line (54" to be safe) then horizontal across the wall to meet the vent from the shower which will then go up to the attic and follow the ceiling line then vent via a connection to the main stack.

Does the above make sense? Anything jumping out as concerning? I believe I've covered my bases but would love some feedback.

Cheers!
 

Attachments

  • Master Bath Drain Diagram2.jpg
    Master Bath Drain Diagram2.jpg
    138.1 KB · Views: 736
  • IMG_84402.jpg
    IMG_84402.jpg
    78.7 KB · Views: 470
  • IMG_84492.jpg
    IMG_84492.jpg
    54 KB · Views: 346
  • IMG_84502.jpg
    IMG_84502.jpg
    132 KB · Views: 337
  • IMG_84522.jpg
    IMG_84522.jpg
    96.3 KB · Views: 355
  • IMG_84532.jpg
    IMG_84532.jpg
    119 KB · Views: 425

wwhitney

In the Trades
Messages
6,556
Reaction score
1,841
Points
113
Location
Berkeley, CA
No walls within the area pictured? A small (12" long) wall between the shower and WC or alongside the tub might simplify your venting.

The main problem with what you show is that a dry vent can not be horizontal until at least 6" above the flood rim of the fixture. So what you would need to do is route either the tub or the shower drain alongside the wall with the vent to allow for a vertical (at least 45 degrees above level) vent takeoff into the wall. Only one has to be routed that way, it can wet vent the other and the WC.

The wet vent, meaning the drain starting at the point where the dry vent comes off, needs to be 2", so I would suggest just making both the tub and shower traps 2". Or if you prefer to keep the tub trap 1-1/2", dry vent the shower and make the shower trap 2".

Cheers, Wayne
 

WoodchuckDIY

New Member
Messages
6
Reaction score
0
Points
1
Location
Utah
@wwhitney good call out.

Currently planning to separate the two lavs and the toilet with a wall.

Given that I cannot do a horizontal run to vent the shower and tub, are you saying a single short wall with a vertical 2" run of ~12" then over to the West wall and up would be sufficient venting for both the tub and the shower?

I'll plan on 2" then for both the shower and the tub - my understanding was that most tubs and showers specifically fit a 1.5" drain, is this not the case? Or would I be making a change from 1.5" immediately to 2" at the drain for each?
 

wwhitney

In the Trades
Messages
6,556
Reaction score
1,841
Points
113
Location
Berkeley, CA
How about a floor plan, with the existing stack, the direction of the joists, and the fixture locations? I take it nothing drains into the stack from a floor above, is something being revented to the stack from the other side of the wall?

My not-too-extensive experience is that shower drains are 2", and tub and waste overflows are 1.5". So for the shower do everything in 2". For tub, you could use a 1.5" trap and 1.5" trap arm, or you could use a bushing on the inlet for a 2" trap and trap arm. These traps and waste and overflow are going to be inaccessible, correct? Then the traps and waste and overflow should all be solvent weld, no slip joints.

Cheers, Wayne
 

WoodchuckDIY

New Member
Messages
6
Reaction score
0
Points
1
Location
Utah
@wwhitney Floor plan attached with Joist and current drain locations.

Nothing venting into the stack from above (attic space then roof). The washer vents into the main stack 54 inches above the bathroom floor line (as seen in the last photo of my first post).

I can redraw my "planned" drains for the new layout on the same floor plan if helpful.

Thank you for your help thus far!
 

Attachments

  • Current Drain Locations .jpg
    Current Drain Locations .jpg
    57.9 KB · Views: 436

wwhitney

In the Trades
Messages
6,556
Reaction score
1,841
Points
113
Location
Berkeley, CA
Would be easier to draw on without the existing drains other than the stack.

Is that a drop in tub, that sits on 4 framed knee walls? If so, how high is the knee wall between the tub and the shower, compared to the shower threshold? Then are you going to waterproof the shower side of that, and have glass on top?

Your shower dry vent can either be in that knee wall, if it is tall enough (should be), or be in the wall between the lav and WC, if that is close enough (should be).

Cheers, Wayne
 

WoodchuckDIY

New Member
Messages
6
Reaction score
0
Points
1
Location
Utah
Attached a "blank" floor plan with just the main stack location.

We'd love to do a stand alone center drain tub (wife is fairly set on this) - unless there's a serious reason not to.

Sounds like venting the shower in the wall between the lav and wc is the thing to do then.
 

Attachments

  • Floor Plan w Main Stack.jpg
    Floor Plan w Main Stack.jpg
    30 KB · Views: 500

wwhitney

In the Trades
Messages
6,556
Reaction score
1,841
Points
113
Location
Berkeley, CA
OK, so as Utah uses the IPC, you could do something like the drawing below. Blue is 2" and Red is 3".

This layout takes advantage of the IPC allowance for common venting, which allows two trap arms to combine before they reach a shared dry vent takeoff. Each trap arm has to comply with the usual rules on trap to vent distance as if the other trap were not there. In this case, a 2" trap arm may fall at most 2" before the vent takeoff, and has to fall at least 1/4" per foot. So if the fall is exactly 1/4" per foot, it can be up to 8' long. The use of the 2" trap on the tub is to allow that extra 2' of trap arm length; you can adapt from the usual 1-1/2" to 2" at the trap inlet.

So you need to confirm that the distance from each trap to the vent in the WC/lav separation wall does not exceed 8'. If that wall is not a full height wall, it would suffice for it to be about 12" taller than the tub--that would let the vent go horizontal at least 6" above the tub flood rim, to get into the wall with the main stack.

Cheers, Wayne

P.S. Other approaches to venting the tub and shower would be (a) bring one of the drains alongside the left wall (starting it off running away from the stack) to pull a dry vent off there, then that drain can wet vent the other ; (b) add a wing wall at the top left of the shower, so it has 1.5 sides of glass instead of 2 sides of glass, and put the dry vent in (a) there, which avoids the backtracking on the drain; or (c) bring one of the lav drains out towards the tub/shower to all it to wet vent the tub shower.

Floor Plan w Main Stack.jpg
 

WoodchuckDIY

New Member
Messages
6
Reaction score
0
Points
1
Location
Utah
@wwhitney this is fantastic! I think your main recommendation will work perfectly for us. Doing some measurements this morning confirms I should be able to go with your recommendation (confirmed trap fall distance).

Here's my plan of attack based on your note along with planned fittings, please let me know if you have any concerns:

1. Determine exact location for wall between WC and LAV.
2. Determine length of 2" needed between 3" WC drain and shower.
3. Shower: Add 2" p trap and needed 2" length to then two 45 degree elbows to meet the above 2" drain.
4. Tub: 1.5" to 2" inlet then p trap. Add in 45 elbow then tie into my shared 2" drain with a wye after the shower.
5. Once arriving at the wall between the WC and LAV add a sanitary tee to vent.
6. Determine tie in location for 2" shared run to 3" toilet drain - based on location for the 3" toilet drain in order to use a 2" to 3" wye (correct?).
7. Cut existing stack removing old tub drain and toilet drain. Add in new 3" tee for shared 3" drain.
8. Vent: In shared WC / LAV wall run vertical from sanitary tee up at least 6" past the tub flood rim then I can put in a 90 to the wall sharing the main. Can I then do another 90 to tie into the main stack horizontally to vent? Or do I need to tie in at an angle (like my current dryer vent via a wye?

Also, I assume I'm able to use flex couplings between floor joists on the 2" shared drain (as I can't fit a full piece of pipe between joists). Can I do the same when modifying the main stack? One flex coupling above and one below the new piece?

Thank you again for all of the information thus far. I'll need to figure out a way to buy you a beer!

Cheers
 
Last edited:

wwhitney

In the Trades
Messages
6,556
Reaction score
1,841
Points
113
Location
Berkeley, CA
Comments (ask again if they don't answer all your questions):

3) Or a LT90, I drew it as two 45s to emphasize that a quarter bend is not allowed for horizontal to horizontal drainage.

4) One potential issue is coordinating the two p-trap heights and the requirement that holes in your joists be 2" clear from the top and bottom edges. The p-traps have to aligned so that when the trap arms reach the wye at 1/4" per foot fall, they are at the same elevation.

5) If you have room, a combo is better than a san-tee on its back, but the IPC does allow a san-tee on its back.

6) The shower/tub drain and WC drain should join in a 3x3x2 or 3x2x3 wye which is horizontal (both inlets about 2% slope)

7) The stack connection can be a san-tee or combo. San-tee is more compact.

8) For vents 6" above the flood rim level, you can use quarter bends to turn (or vent 90s, if space is really tight, but as they are more expensive than quarter bends, stick with quarter bends for the usual case). Sure, use a quarter to turn from hoirzontal in the WC/lav wall to horizontal in the stack wall. Then you can hit the stack with an upside down san-tee.

You haven't discussed how you are going to run the drains and vent for the double lav, as the stack is going to drain and vent them, it would be best (required?) for the shower/tub vent to connect to the stack at least 6" above the lav flood rim.

Cheers, Wayne
 

Jeff H Young

In the Trades
Messages
8,876
Reaction score
2,212
Points
113
Location
92346
The way its drawn there is no wall between the shower and tub very common on new construction with fiberglass that's how my house was and he been asked not a fun job to plumb but probably going to have to bring vent up under tub and cheat a bit on the horizontal rule not the first time it been done
 

WoodchuckDIY

New Member
Messages
6
Reaction score
0
Points
1
Location
Utah
@wwhitney got it! The only unanswered question above was around using flex couplings.

I assume I'm able to use flex couplings between floor joists on the 2" shared drain (as I can't fit a full piece of pipe between joists). Can I do the same when modifying the main stack? One flex coupling above and one below the new piece?

Regarding venting the sink. I didn’t think I needed to given the proximity to the main stack. How and where should I tie that existing run into the stack for venting then? (Pictures of current LAV run in my first post).

Thanks again for your responsiveness and help.
 

wwhitney

In the Trades
Messages
6,556
Reaction score
1,841
Points
113
Location
Berkeley, CA
I assume I'm able to use flex couplings between floor joists on the 2" shared drain (as I can't fit a full piece of pipe between joists).
First, the only flexible couplings you can use above ground are the shielded rubber couplings, such as Fernco Proflex or Mission BandSeal.

Second, I think the standard thing to do is drill a series of holes in line (with the proper slope), maybe 2-3/4" diameter for 2" pipe (2-3/8" OD), find your widest joist bay, and install a series of pieces of that length, with solvent weld couplings between them.

Can I do the same when modifying the main stack? One flex coupling above and one below the new piece?

Yes, and to install between the fixed ends of the upper and lower parts of the stack, you slide the shield out of the way and roll the rubber portion back on itself. You want your insert assembly to be about 3/8" shorter than the free space between fixed ends: 1/8" for the thickness of the stop on each rubber coupling, and 1/8" for play.

Regarding venting the sink. I didn’t think I needed to given the proximity to the main stack. How and where should I tie that existing run into the stack for venting then? (Pictures of current LAV run in my first post).
If both lav trap arms (including the part outside the wall) would be less than 6', and the stack is dry with no drainage from a story above, you could again use common venting to run both lav trap arms to a single san-tee on the stack. You'd use a horizontal combo for the stub-out for the lav closer to the stack.

Cheers, Wayne
 
Top
Hey, wait a minute.

This is awkward, but...

It looks like you're using an ad blocker. We get it, but (1) terrylove.com can't live without ads, and (2) ad blockers can cause issues with videos and comments. If you'd like to support the site, please allow ads.

If any particular ad is your REASON for blocking ads, please let us know. We might be able to do something about it. Thanks.
I've Disabled AdBlock    No Thanks