How to properly install this hose bib?

Users who are viewing this thread

GA_

New Member
Messages
14
Reaction score
1
Points
3
Location
Georgia
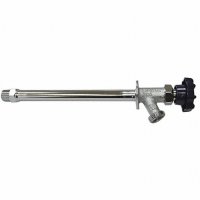
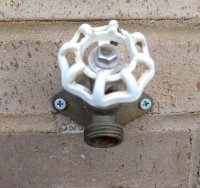
They left my exterior hose bibs in new construction unfastened and with mortar all over the handle. For various reasons I am NOT going to call the original contractor.

1. What is the best way to get the mortar off the handles without damaging the thing or causing a water leak?
Should I try to knock it off by tapping it, or should I try to remove and replace the handle? If the latter, is there a link to some instructions? Any suggestions welcome.

2. How do I properly secure the thing to the wall so it does not turn/twist?
First, what size fasteners do you normally use to fasten these?
It looks like it is made of bronze; bronze fasteners would avoid dissimilar metals but I think they would deform before going into the brick.
I could use stainless steel tapcons, which I know would go into the brick, but then I've got dissimilar metals touching. Would neoprene washers be sufficient to avoid that?
Is there a better solution to fasten this?

I don't have access to the back side without ripping out drywall, which I strongly prefer NOT to do. Ignore the terrible brick work please. It is a very sore subject.

Thanks in advance for your advice.

Hose bib.JPG
 

Reach4

Well-Known Member
Messages
38,884
Reaction score
4,434
Points
113
Location
IL
I would try prying/picking it off with a small flat screwdriver bigger than a jeweler's screwdriver.
 

GA_

New Member
Messages
14
Reaction score
1
Points
3
Location
Georgia
Thank you both for your advice.

Can anyone tell from looking at this if the handle is square or round stem? I'd like to have the replacement handles in hand when I do this.

I have tried to knock the mortar off and became concerned I would damage something, so I will try to remove the handle. Looks like on this one I will need to knock off some more mortar to even be able to remove the handle.

Process:
Shut off water to the hose bib.
Fasten the thing to the brick with stainless steel tapcons (could still use advice on size)
Knock off enough mortar to get to nut
Remove nut, which will allow me to remove handle
Replace with new handle, reinstall nut
Turn water back on
Repeat for each hose bib

Corrections, advice or other comments welcome.
 

Reach4

Well-Known Member
Messages
38,884
Reaction score
4,434
Points
113
Location
IL
After removing the first handle, you should be able to put it back, with or without screw. After you remove the first handle, you could see what you want to buy more of. If you worry about being able to put the same handle back, you could buy more than one type of handle.

If you can read what is on the handle now, you might be able to find out in advance.
 

Sarg

Enjoy Learning
Messages
228
Reaction score
51
Points
28
Location
Upstate New York
If I were in your situation ..... #1 option - replace those bibs with the frostless sillcock ( because of the freezing down south) or option #2 - replace them all with ball valves. A compression bib will eventually start leaking .... They always do over time.
 

Attachments

  • Frostless.jpg
    Frostless.jpg
    15.1 KB · Views: 219

PlumbNuts

SC Licensed Plumbing Contractor
Messages
251
Reaction score
83
Points
28
Location
Fort Mill,SC
Website
riverviewplumbingrepair.com
The handle will come off without having to shut off all water (just make sure hose-bib is closed).
Take one handle off and take it with you to the plumbing supplier of your choice and match it up. (a lot of the handles are interchangeable across brands)
For fasteners I would use 1/4" x 1 1/2" stainless tapcons. (with your tapcon masonary bit you should be able to drill through the holes that are on the hose-bib, even if you have to enlarge the hole just a little) I replace a lot of hose-bibs and this is how I do them.
 

GA_

New Member
Messages
14
Reaction score
1
Points
3
Location
Georgia
Thank you all. Very grateful for the help. Will post updates on how it goes. Hopefully the stainless tapcons I have are 1/4 as my local HD/Lowe's don't sell the stainless ones so I would have to special order.

Suggestion from a non-plumbing professional: Ask the homeowner what type of hose bib they want - I would gladly have paid an upcharge for a freeze proof (although I think code ought to require that), quarter turn hose bib, or maybe even an Aquor, if only I had known.

@Sarg I agree with you, but unfortunately replacing the hose bib with a non freeze would require cutting into the gyp to access, and that is not happening right now. It is very disappointing that they used such cheap material, but that is on both the plumber and the GC. Even 25 year old tract built houses have freeze proof hose bibs, so while I am surprised they used this type, in the overall context of everything it is par for the course. I learned I have to spec EVERY LITTLE DETAIL or they will use the cheapest available, and do illogical things. At least I can turn off the supply to the hose bibs from inside - this one is under the upstairs bath sink - turn it off, go outside and open the valve to drain it. Also, it is in a very well sealed and insulated wall, but that means the outer portion is susceptible to freeze because there is no warm air leaking out at the penetration.
 

PlumbNuts

SC Licensed Plumbing Contractor
Messages
251
Reaction score
83
Points
28
Location
Fort Mill,SC
Website
riverviewplumbingrepair.com
Suggestion from a non-plumbing professional: Ask the homeowner what type of hose bib they want - I would gladly have paid an upcharge for a freeze proof (although I think code ought to require that), quarter turn hose bib, or maybe even an Aquor, if only I had known.

New residential plumbing contractors (Not Me) bid to recieve contracts to install the plumbing for the builders. To be able to compete they provide some of the cheapest materials available. The builders know this.
As a Plumbing Professional I would advise the potential homebuyer to make sure to let the Builder know what is acceptable, the unfortunate part is that most homebuyers do not know (until it is too late).
 

GA_

New Member
Messages
14
Reaction score
1
Points
3
Location
Georgia
New residential plumbing contractors (Not Me) bid to recieve contracts to install the plumbing for the builders. To be able to compete they provide some of the cheapest materials available. The builders know this.
As a Plumbing Professional I would advise the potential homebuyer to make sure to let the Builder know what is acceptable, the unfortunate part is that most homebuyers do not know (until it is too late).

Agree with the above for a spec build. However, this was a custom build, with a cost plus contract.

It never once occurred to me they would build it cheaper than the typical in the area for the spec build houses. It was just a bad situation all the way around - the builder only focused on the details he wanted to focus on. The proper way to do this would have been to communicate the details of the plumbing install upfront, and either have me agree or agree on increased cost. I doubt builder was even aware of the details himself until I challenged him. Either builder or plumber could have communicated. The only things discussed upfront were the materials (selected Pex Uponor) the type of water heater, and recirc vs homerun system. Issues that should be discussed on a custom build:

1. If you have a manifold, each homerun should have a valve at the manifold, and the manifold should be installed so that it is accessible, not in a location that requires removal of the water heater on one side, or the shower wall on the other side, to access it. (I really wanted a recirc system, with a pump that ran for a set time then auto shut off, triggered by turning on a bathroom or laundry room light, or hitting a foot switch at the kitchen sink. He refused to even consider that.). It never occurred to me a manifold would not have valves at each pipe because every single instance I saw online had valves.
2. Location of rough in for toilets - coming up through the floor results in more maintenance for the homeowner. Restroom rough in's should come out of the wall, either high enough for the escutcheon to clear the base, or low enough for the escutcheon to be entirely over the base.
3. Type of termination at stop valves - does plumber use a pex to copper fitting then install a stop valve, or does plumber install stop valve right into Pex? Latter requires the homeowner to either procure a Pex expander to replace the stop valve or call for service if they require replacement.
4. Type of stop valves - quarter turn or the ones that seem to go more than 360?
5. Type of shower valves - realized there is a type that has only temperature control, and another type that has both temp and flow control. I'm hoping this might be something I can change out later if we decide without tearing out that wall (Delta brand).
6. Type of hose bibs
7. Type of tub stopper. We selected fixtures that have the type where you flip a lever and the stop goes up and down, but they apparently did not rough in for those and so did not install. It is a little twist thing we really don't like. Looking to change that (may be a new post in a few months).
8. Coordinate location of, and details of service entrances. These are both in stupid locations for future replacement (very close to underground electrical - I would have moved them to the middle of the yard, but they wanted to use one trench), and they are in stupid locations in the crawl - as soon as you enter the 36"+ high crawl you have to crawl over a sanitary pipe that then takes a deep dive down to your right. It could have taken the deep dive 2' to the left and make the entrance to the crawl more navigable. The main water shut off is off in a corner, behind the sanitary you have to crawl over, even though part of the pipe is accessible about 2' past the crawl door. I might have another shut off installed one day so I can use the corner of the crawl for storage, access the shut off quickly from the door, and even install a smart home shut off.

Sorry - this post got way past the exterior hose bib - LOL
 

PlumbNuts

SC Licensed Plumbing Contractor
Messages
251
Reaction score
83
Points
28
Location
Fort Mill,SC
Website
riverviewplumbingrepair.com
I really do feel for you; No one would anticipate the need for having another plumber double check the work that is being done on a custom built home but that is what it sounds like you needed.
Hmmm, Maybe I can start a new service,,,,, Plumbing Advisor has a nice ring.
 

GA_

New Member
Messages
14
Reaction score
1
Points
3
Location
Georgia
Thanks so much to all of you, I successfully fixed this!

Some info: A 3/16" Tapcon bit fits in the existing holes. A 1/4" bit did not.
Used 2.5" screws and drive them straight - hopefully enough to get a good grip, but short enough to avoid the PEX pipe even if it bends on the other side of the brick.
I did not need to remove the handle. Once the thing was secured, I used a tool I inherited from a relative that looks sort of like a dull chisel, along with a hammer and knocked off the mortar!

THANK YOU !!!!!!!
 

Attachments

  • 210 Hose Bib repaired.JPG
    210 Hose Bib repaired.JPG
    46.8 KB · Views: 182
Top
Hey, wait a minute.

This is awkward, but...

It looks like you're using an ad blocker. We get it, but (1) terrylove.com can't live without ads, and (2) ad blockers can cause issues with videos and comments. If you'd like to support the site, please allow ads.

If any particular ad is your REASON for blocking ads, please let us know. We might be able to do something about it. Thanks.
I've Disabled AdBlock    No Thanks