Kids Bathroom Toilet No Water After Flushing

Users who are viewing this thread

Super_19

Member
Messages
32
Reaction score
0
Points
6
Location
Florida
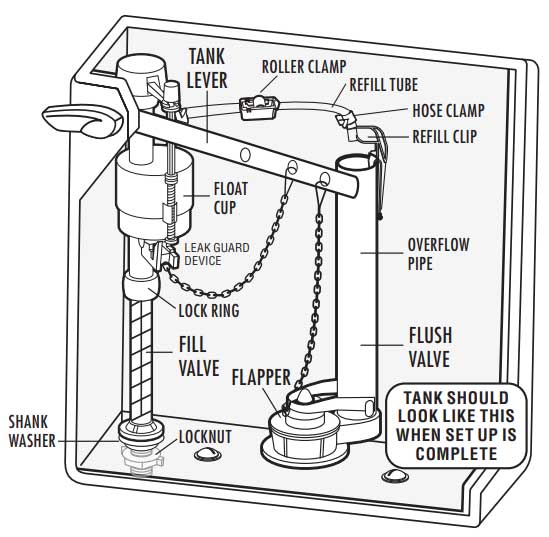
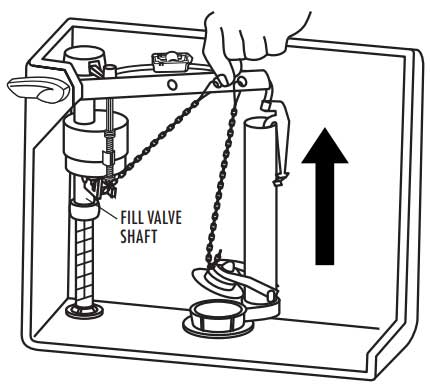
Hello All. Got a problem with my kids' bathroom toilet. After they flush, no water fills up the tank. I have to remove the lid and sorta tug on the chain that goes to the float to release the float. Then the float drops and water begins to fill the tank.

There's two chains, one going to the float and the other going to the flapper. I've attached a picture showing the part I'm referring to that keeps getting stuck in the up position and not dropping down when the kids flush the toilet.

Is it just a matter of replacing the fill valve? Or is my problem elsewhere? Thank you all.

toiletflushvalve.JPG
 

Reach4

Well-Known Member
Messages
38,880
Reaction score
4,433
Points
113
Location
IL
Is it just a matter of replacing the fill valve?
Yes.

Usually when you replace a fill valve, you usually replace the supply line. You consider whether the stop valve should be replaced, while you are at it.
 

Sarg

Enjoy Learning
Messages
228
Reaction score
51
Points
28
Location
Upstate New York
That is a Fluidmaster fill valve and is what I currently use. A couple things I've learned ........ Be aware the "top" of the unit disconnects from the stationary pipe that is connected to the tank & supply line.
In the middle of the pipe notice the plastic "keeper" ring that holds the two pcs. together. You just move the keeper ring up and the top portion with the moveable float will pull / slide right off. I just change the top of my units ... only takes a couple minutes.
Also be aware they have several different units ... depending if you have a restricted flow toilet i.e. the 1.28 gpm toilet or the older 3.5 gallon tank units.
The 400CR Fluidmaster is for the older tanks (3.5).
There are also multiple YouTubes on how to clean these valves.
 
Last edited:

Super_19

Member
Messages
32
Reaction score
0
Points
6
Location
Florida
That is a Fluidmaster fill valve and is what I currently use. A couple things I've learned ........ Be aware the "top" of the unit disconnects from the stationary pipe that is connected to the tank & supply line.
In the middle of the pipe notice the plastic "keeper" ring that holds the two pcs. together. You just move the keeper ring up and the top portion with the moveable float will pull / slide right off. I just change the top of my units ... only takes a couple minutes.
Also be aware they have several different units ... depending if you have a restricted flow toilet i.e. the 1.28 gpm toilet or the older 3.5 gallon tank units.
The 400CR Fluidmaster is for the older tanks (3.5).
There are also multiple YouTubes on how to clean these valves.

Thanks for the explanation
 

Reach4

Well-Known Member
Messages
38,880
Reaction score
4,433
Points
113
Location
IL
How about a photo of that chain that is not going to the flapper or flush valve? If you have a second chain in the tank, somebody added it as a non-standard thing, probably working around a problem. New fill valve would be worthwhile. Korky 528MP has an adjustable refill. https://www.homedepot.com/p/Fluidma...2-in-Flapper-Repair-Kit-402CARHRP14/206825432 includes a fill valve with an adjustable refill plus a 2-inch flapper. There is a similar kit for 3-inch flappers.

Adjustable refill lets you adjust so the refill maxes out just when the fill valve shuts off.

fluidmaster-400a-whole-tank-fill-valve-how-to.png


Stop valve is the shut-off valve at the wall.


EDIT: good call on the Leak Sentry!
 
Last edited:

Jadnashua

Retired Defense Industry Engineer xxx
Messages
32,770
Reaction score
1,190
Points
113
Location
New England
Does the float actually get stuck in the up position? Inside of that top portion, there's a seal. Depending on your water, that seal might get stiff, and not allow the lever arm to move easily. The seal is a few bucks, and available lots of places.


Terry

The Plumbing Wizard
Staff member
Messages
29,942
Reaction score
3,459
Points
113
Location
Bothell, Washington
Website
terrylove.com
You might have a Fluidmaster 400LS leak Sentry fill valve.

fluidmaster-400ls.jpg


fluidmaster-400ls-installation-01.jpg


Flapper Chain Hook-up
Turn off water and ensure flapper chain is set correctly: lift tank lever all the way up inside tank. Hold tank lever there. Pull flapper chain tight so the flapper is lifted as high as it can go and attach chain to hole in lever directly above flapper. Make sure flapper chain is straight. Make sure flapper is closed on seat. If not, you may need to lengthen the flapper chain by a link or two to allow flapper to close and seal tank.


Leak Guard Chain Hook-up
Lift tank lever all the way up inside tank and hold it there. Pull Leak Guard chain until it lifts the float cup all the way up the fill valve shaft. Then connect chain & clip with no slack in chain to the tank lever. NOTE: Do not cross Leak Guard chain and flapper chain. If lever has only one hole, then attach to same hole. Testing Leak Guard Turn on water. Let tank fill up and stop. Simulate a leak by slightly lifting flapper chain only to allow 3” or 4” of water to slowly drain from tank. Fill valve should not turn on, but remain locked and stay off. If test fails go to Troubleshooting section. Make sure chain is free, not tangled or caught.

fluidmaster-400ls-installation-02.jpg
 
Last edited:
Top
Hey, wait a minute.

This is awkward, but...

It looks like you're using an ad blocker. We get it, but (1) terrylove.com can't live without ads, and (2) ad blockers can cause issues with videos and comments. If you'd like to support the site, please allow ads.

If any particular ad is your REASON for blocking ads, please let us know. We might be able to do something about it. Thanks.
I've Disabled AdBlock    No Thanks