Advice removing and installing a 3 inch tee in tight quarters.

Users who are viewing this thread

Opie

New Member
Messages
11
Reaction score
2
Points
3
Location
Maryland
Hi all,

New here but I've gotten some great advice in the past searching threads. I haven't been able to locate a similar issue yet so I created an account.

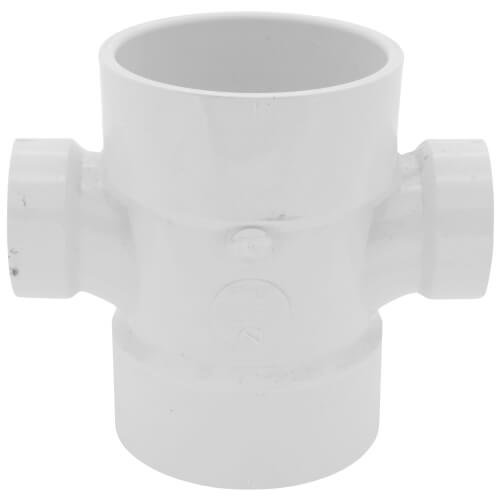
I'm hoping for some advice removing a tee currently in place and installing a new 3 x1.5 double Sanitary Tee. This is the main vent on our house (single story ranch), the 2 inch pipe on the left is a vent for a basement rough in that ties in to main vent 40 or so inches above the floor. The work is for a new double vanity.

With the tight fit of the current Tee is there any cutting options besides a wire cutter/string or a multi tool? I'd prefer to keep the drywall on the other side hole free. I'm assuming there is no support the top section of pipe and I'll need a riser clamp in the attic and the bottom portion in the basement will need a strap or similar.

To install the new double tee what is the preferred method: to glue stubs into the new fitting then use banded couplings or glue PVC slip couplings over the new stubs and vent pipe (if they fit)? Or some other super easy option I don't know about?

Is there any issue with the 2nd drain stub out on the left being placed in-between the 3 inch stack and the 2 inch vent or to rephrase is there a minimum length the pipe needs to be going to the double tee. There is roughly 5 inches between these pipes.

Thank you for any advice. Not a pro so if anything doesn't make sense please let me know.

IMG_20201111_190138240.jpg IMG_20201111_185942203.jpg IMG_20201114_234005962.jpg
 
Last edited by a moderator:

Reach4

Well-Known Member
Messages
38,858
Reaction score
4,428
Points
113
Location
IL
You could put a 1.5 inch santee facing out. Join the vent at least 6 inches above the flood level of the sink. Use 45 and wye to join drainage.

img_4.jpg
 

Opie

New Member
Messages
11
Reaction score
2
Points
3
Location
Maryland
p429-337-3.jpg

Reach,
Thanks for the idea. I purchased a tee like this. Is this piece not correct for my project?

Because this is our main vent I'm expecting no wiggle so if I followed your advice I would have to make 4 cuts then glue in 4 stub pipe pieces to get the 45 and the wye in. Then I'd need 4 banded couplings or 4 slip couplings or similar. Seems like alot more cutting and gluing for the same result. Hope I don't sound combative just trying to learn. Thanks for the response.

*Edit: same result provided I can get away with a 2-3" pipe between the tee and a 45.
 

DIYorBust

Active Member
Messages
749
Reaction score
94
Points
28
Location
Long Island, New York
You can do this job without special tools in any number of ways. A cable saw should do the job if other cutters won't fit. I wouldn't think twice about making four cuts or buying a different fitting if it made my life easier, but whatever works for you seems fine.
 

wwhitney

In the Trades
Messages
6,556
Reaction score
1,841
Points
113
Location
Berkeley, CA
I'm a bit unclear on the double sanitary tee vs double fixture fitting issue in the context of lavatory drains. But there's no 3x3x1-1/2x1-1/2 double fixture fitting in Charlotte's catalog, so the double sanitary tee may be the only option there.

You can put a street long turn 90 in the left hand inlet on the double sanitary tee if that puts your wall entry where you want it.

If you want to go with Reach4's idea, you still only need two rubber couplings. You'd just cut out a taller section of the 3" pipe, and put one rubber coupling above the vent wye and one below the drain wye.

Cheers, Wayne
 

Reach4

Well-Known Member
Messages
38,858
Reaction score
4,428
Points
113
Location
IL
If you went with the double santee, I would put a cleanout above the santee.

If you went with my sketch, I was picturing you pulling the two plates over the trap arm. Then after cuts, you could pull away the existing santee with pipes, and put it back.
 

Opie

New Member
Messages
11
Reaction score
2
Points
3
Location
Maryland
DIY- I had a bit of a brain fart there it could be only two cuts in wall either way. But I agree and I'd rather do it right. I'm trying my best to avoid cutting more drywall, I've been doing to much recently and I hate it lol. How would you cut the pipe in this situation?

Wwhitney- I also could not find a double fixture tee 3x1.5 there was also some concern it may not fit with the stud right there. Long turn 90 is a good idea. It would just get a slight pitch to the tee correct?

Reach-
I understand now ,my brain wasn't following. I'd probably have to cut the trap arm to get the tee out but that will need done anyway. Dumb question but the clean out above is just to have more room to direct a snake or similar if it's ever needed?

So however it's assembled are the banded couplings preferred above and below the fitting(s) over using pvc coupling?

Thank you guys for the help this is my first work with 3 inch pipe and I want to make sure I get it right.
 

Reach4

Well-Known Member
Messages
38,858
Reaction score
4,428
Points
113
Location
IL
I understand now ,my brain wasn't following. I'd probably have to cut the trap arm to get the tee out but that will need done anyway. Dumb question but the clean out above is just to have more room to direct a snake or similar if it's ever needed?
It is to admit a bigger snake, and yes, to get it going the right way. If you try snaking from either side of a double santee, the snake will go straight across.

https://www.supplyhouse.com/Spears-P429-337-3-x-1-1-2-PVC-DWV-Double-Sanitary-Tee if you wanted that.

I hesitate to ask, but you call that big pipe a main vent. What else does it vent besides the lavatories? Toilet and shower and tub is the answer we would prefer. Does it carry drainage from above too?
 

Opie

New Member
Messages
11
Reaction score
2
Points
3
Location
Maryland
I hesitate to ask, but you call that big pipe a main vent. What else does it vent besides the lavatories? Toilet and shower and tub is the answer we would prefer. Does it carry drainage from above too?
Thanks for the link that is the fitting I ordered a few days ago.

The only thing vented on this pipe is the toilet and vanity. The pipe is horizontal below the subfloor. The shower also drains to this pipe but has its own vent. I guess main vent isn't the right term. I have always called it that because it is at the end of the main drain pipe in the house. I'm currently at work but I can try to get some pictures tonight for clarity.

Are shielded couplings similar to this ok to use in this situation. I am beginning to think they are not ideal for this project.
1056-33rc-3.jpg


Thank you for all the help and insight.
 

Reach4

Well-Known Member
Messages
38,858
Reaction score
4,428
Points
113
Location
IL
The only thing vented on this pipe is the toilet and vanity. The pipe is horizontal below the subfloor. The shower also drains to this pipe but has its own vent. I guess main vent isn't the right term. I have always called it that because it is at the end of the main drain pipe in the house. I'm currently at work but I can try to get some pictures tonight for clarity.
In that case, you could reduce to 2 inch below the upper 3-inch and the bottom 3-inch. That would give more room.

Shielded coupler is close enough to ideal. Dish soap is commonly used to lube for easier sliding of rubber on pvc.
 

Opie

New Member
Messages
11
Reaction score
2
Points
3
Location
Maryland
In that case, you could reduce to 2 inch below the upper 3-inch and the bottom 3-inch. That would give more room.

Shielded coupler is close enough to ideal. Dish soap is commonly used to lube for easier sliding of rubber on pvc.

I think I'm going to try to keep it 3 inches to start but it's nice to know reducing it could be an option if it's a pain. I may rethink the shielded couplings. All the thinner no hub couplings with 4 clamps seem to be primarily for cast iron. I'm out of my element in the coupling world. Thanks again for your help
 

Reach4

Well-Known Member
Messages
38,858
Reaction score
4,428
Points
113
Location
IL
I think I'm going to try to keep it 3 inches to start but it's nice to know reducing it could be an option if it's a pain. I may rethink the shielded couplings. All the thinner no hub couplings with 4 clamps seem to be primarily for cast iron.
Check https://www.fernco.com/plumbing/shielded-couplings/proflex-couplings

It is not the easiest page to use initially, but once you follow it, you will find there are a lot of them. "PL" stands for plastic, which can be normal PVC or ABS. You really don't need the heavy duty ones with 4 clamps.

FYI, tighten the screws to 5 ft-lb (60 in-lb). You are unlikely to over-tighten with a nutdriver, but it would be easy to overdo it with a ratchet.
 

Opie

New Member
Messages
11
Reaction score
2
Points
3
Location
Maryland
Hi Everyone

I hope everyone had a great holiday. So I finally have an update if there is interest. Life got in the way a bit and in unusual order we decided to do the flooring first. Getting the riser clamp in the attic was the biggest challenge but once in everything else was pretty straight forward. I cut the pipe with a multi tool and the last little bit on the finished drywall side I used nylon string. It was my first time using string to cut pvc and it worked surprisingly well.


With the pipes positioned the way they are in the wall I was not confident I could get a repair coupling installed with no leaks. I opted for rubber couplings on both sides.


The couplings were ordered from Amazon under the brand and part # Supply Giant 37522CS. Turns they were just Everflow 15300cs. The Amazon listing says they are for cast iron and pvc. I'm hoping that is the case and there is no issue. I ordered a few different ferncos that were too thick and called them for some direction with no luck. Staying below the width of the tee fitting was my biggest concern.


Once all the plumbing is complete I think I am going to install the vanity against the open wall and check for leaks for a while then slide the vanity out and patch the hole once everything checks out. I do not think there will be any issues with these couplings but there is always a possibility.


I did not get pictures of installing these couplings but I'll try to explain what I did. I am no plumber so follow this at your own risk. And if this is common knowledge please ignore lol. I removed the steel shields and installed just the rubber piece first. I slide the rubber piece onto the pipes in the wall as far as they would would go (these couplings have a rubber shoulder right in the middle) Once the pipe bottoms out at the shoulder half way into the fitting you fold over the remaining side of the rubber fitting not on the pipe and roll the rubber up on the pipe until the shoulder is exposed on the bottom of the pipe. It's a bit challenging at first but goes quick once you figure it out. Once the replacement fitting is measured to length and glued you set it in place and roll the rubber back down onto the new pipe, you should now have roughly 1.5 inches of coupling rubber on the original pipe and new pipe. From there the shields are run around the back of the fitting and pipe straps tightened to 60-80 inch/lbs


Now I have a few dumb questions if anyone is still with me. This may be a bit nitpicky but I'd like to know common practice. Should the hub of an elbow be behind the drywall with just a stub pipe coming though? If I use the long sweep street 90 the hub will be out past the drywall (unless I flip it and glue in a little piece of pipe so the hub is on the side of the new Tee fitting) The regular street 90s hub would fall behind the drywall.


And more importantly to get the drain slope if I'm using just a 90 coming off the Tee fitting do I get the required drain slope by angling the stub out pipe with a slight pitch?


I have not glued the pipes/ elbows on either side of the Tee fitting yet I just wanted to be sure I'm doing it the standard way.


Also I decided to skip a large clean out above the fitting. To use it in the future I would need to cut the drywall anyway. And I'd prefer to not have another fitting hump in the visible drywall. Maybe a mistake but it's of my own doing. Maybe I will add clean outs on the stub outs if I have space.


Next step after the drains is the water. I planned to do copper but with all the angles to avoid the vent and drain in the basement I've rethought that plan. I think I'm going to try pex for the first time.


This was a longer post than I intended thanks for reading. It may take a while but i will post updates until its done incase someone is in a similar situation.

IMG_20201211_171412565.jpg IMG_20201213_173413053.jpg IMG_20201213_173349018.jpg IMG_20201213_173446783.jpg


Thanks all for the help. Have a Happy New Year
 

Opie

New Member
Messages
11
Reaction score
2
Points
3
Location
Maryland
Apologies for the book.... I may have had a few to many before posting.

Tl dr Is there any issue getting the drain slope on the stub out on the short side?
 

Aaroninnh

Member
Messages
146
Reaction score
20
Points
18
Location
NH
Apologies for the book.... I may have had a few to many before posting.

Tl dr Is there any issue getting the drain slope on the stub out on the short side?

Very slight angle will do it. Its only 1/4" per foot needed.
 

wwhitney

In the Trades
Messages
6,556
Reaction score
1,841
Points
113
Location
Berkeley, CA
A few comments:

Those couplings are no hub couplings intended for cast iron to cast iron (and you got the extra heavy version with two band clamps on each side). In 3", cast iron is a smaller outer diameter (3.35") than plastic schedule 40 (3.5"). So they are not quite the right size, perhaps you had a little trouble getting them on. The proper coupling to use is a Fernco 3005-33 or Mission P-300. I imagine there's a good chance your couplings would work fine, but I can't really say.

On the cleanout, below the san-tee would have been fine, and could be hidden if there's a vanity cabinet for the sinks.

On the bends, the IPC actually allows you to use either sweep (for a fixture drain of 2" or less). But the long turn seems like a better idea. If you have a vanity in front, the hub sticking out of the wall won't show and would be fine.

For the slope on the bends, stick an unglued temporary section of pipe into the end of the bend pointing into the room. Then when you glue the bend to the san-tee, make sure that pipe section has the proper slope.

Cheers, Wayne
 

Opie

New Member
Messages
11
Reaction score
2
Points
3
Location
Maryland
Very slight angle will do it. Its only 1/4" per foot needed.


A few comments:


Those couplings are no hub couplings intended for cast iron to cast iron (and you got the extra heavy version with two band clamps on each side). In 3", cast iron is a smaller outer diameter (3.35") than plastic schedule 40 (3.5"). So they are not quite the right size, perhaps you had a little trouble getting them on. The proper coupling to use is a Fernco 3005-33 or Mission P-300. I imagine there's a good chance your couplings would work fine, but I can't really say.


On the cleanout, below the san-tee would have been fine, and could be hidden if there's a vanity cabinet for the sinks.


On the bends, the IPC actually allows you to use either sweep (for a fixture drain of 2" or less). But the long turn seems like a better idea. If you have a vanity in front, the hub sticking out of the wall won't show and would be fine.


For the slope on the bends, stick an unglued temporary section of pipe into the end of the bend pointing into the room. Then when you glue the bend to the san-tee, make sure that pipe section has the proper slope.


Cheers, Wayne


Thank you guys for the responses.

With the elbow going right to the tee I kept wondering if the elbow should be slightly angled to have a slight pitch going to the tee in addition to the stub out pitch. It didn't make much sense, so I thought I should ask for some clarification. So the pitch of the stub out is enough for adequate drainage?

I debated cutting a short pipe to put between the tee and elbow then have the street end come through the wall and glue the trap adapter to that. Not sure if it'd be long enough but it may look a bit cleaner.

I think you are right about the couplings. The Amazon listing made it seem like they were for cast iron and/or pvc. I guess that was just Supply Giants stock number, had they listed the actual part number I probably wouldn't have ordered them.

My Home Depot was out of the 3005-33 when I was looking so bought a P1056-33RC knowing it probably wouldn't work. It was much to thick to fit in the wall, I think 4.25". I liked the idea of the 4 clamps for whatever reason so the Amazon listing seemed great when I found it.

The rubber actually slid on the pvc fairly easily. Folding over the loose rubber so I could get the tee in was the trickier part and that was mostly because of the finished drywall side. But even that wasn't to bad. I wish I would have taken a few pictures. I'm pretty happy with the way everything fit together with these couplings so I think I'll try them out.

I'm out of my element with the couplings and there are a bunch to choose from. If it's not to big an ask would you mind explaining the difference between the no hub couplings and any type used for both cl/pvc? I've tried in vain to Google an answer.

The P1056-33RC list plastic, cast iron, steel and lead and it was just perfectly smooth inside.

The no hub Everflow has little ridges and seems like it would seal better. It looks similar to the inside of the fernco 3005-33 from the pictures I've seen. Maybe the fernco is thicker?

The vanity has fairly small openings and will be right against the wall so I just wrote off the clean out. I should have bought one and double checked if it could work. There is a clean out a foot and a half or so below the fitting on the end of the horizontal section of the 3 inch pipe.

Thanks again for the knowledge. My overthinking is slowing this project down.
 

Aaroninnh

Member
Messages
146
Reaction score
20
Points
18
Location
NH
Thank you guys for the responses.

With the elbow going right to the tee I kept wondering if the elbow should be slightly angled to have a slight pitch going to the tee in addition to the stub out pitch. It didn't make much sense, so I thought I should ask for some clarification. So the pitch of the stub out is enough for adequate drainage?

No, what wwhitney suggested is while you are gluing that 90 into the Santee, to have a scrap/temporary piece of pipe dry stuck into the end of the 90. You can then use that as a gauge either by eye, or with a level, to know how much to pitch that 90 up during the gluing process to get your 1/4" per foot.
 

wwhitney

In the Trades
Messages
6,556
Reaction score
1,841
Points
113
Location
Berkeley, CA
With the elbow going right to the tee I kept wondering if the elbow should be slightly angled to have a slight pitch going to the tee in addition to the stub out pitch.
Yes, ideally it would, but you don't really have any control over that. Either the san-tee has a little pitch cast into it (so it is 91 degrees instead of 90 degrees), or it doesn't. I've been meaning to check the next time I have one in my hands.

I debated cutting a short pipe to put between the tee and elbow then have the street end come through the wall and glue the trap adapter to that. Not sure if it'd be long enough but it may look a bit cleaner.
Trap adapters are available in both spigot and hub versions (street and regular), so there's no advantage from that point of view.

Cheers, Wayne
 

Opie

New Member
Messages
11
Reaction score
2
Points
3
Location
Maryland
No, what wwhitney suggested is while you are gluing that 90 into the Santee, to have a scrap/temporary piece of pipe dry stuck into the end of the 90. You can then use that as a gauge either by eye, or with a level, to know how much to pitch that 90 up during the gluing process to get your 1/4" per foot.

Aaron
Thanks for the reply. Did understand Wayne's directions. My thought was if I should try to angle the elbow a bit so it had a slight pitch going to the tee much like the drain pipe on the right has a pitch going to the fitting. I should have been more clear.

Yes, ideally it would, but you don't really have any control over that. Either the san-tee has a little pitch cast into it (so it is 91 degrees instead of 90 degrees), or it doesn't. I've been meaning to check the next time I have one in my hands.


Trap adapters are available in both spigot and hub versions (street and regular), so there's no advantage from that point of view.

Cheers, Wayne

Wayne,
It appears the tee does have a slight pitch for each side. This drawing doesn't provide a huge amount of detail. Thanks for the direction.
Spears_Mfg_3791-528.jpg


A little pipe between the tee and elbow would also give me alittle more to work with setting the slope to the tee. But it looks like it's not necessary. I will work on labeling my photos with letters or planes of reference next time. I'm not doing so great with words! Thanks again
 
Top
Hey, wait a minute.

This is awkward, but...

It looks like you're using an ad blocker. We get it, but (1) terrylove.com can't live without ads, and (2) ad blockers can cause issues with videos and comments. If you'd like to support the site, please allow ads.

If any particular ad is your REASON for blocking ads, please let us know. We might be able to do something about it. Thanks.
I've Disabled AdBlock    No Thanks