You are using an out of date browser. It may not display this or other websites correctly.
You should upgrade or use an alternative browser.
You should upgrade or use an alternative browser.
Does it pass!!!
- Thread starter Michael Bender
- Start date
Users who are viewing this thread
Total: 2 (members: 0, guests: 2)
In that situation I bring up two lines in the wall, with a wye for the shower. Each fixture would get it's own santee on the vertical for venting and those revented at 42" above the floor.
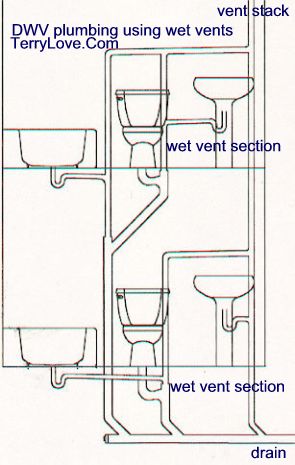
Santee over the toilet for the shower makes it wet vented.
Santee over the toilet for the shower makes it wet vented.
Last edited:
Sponsor
Paid Advertisement
wwhitney
In the Trades
FWIW, the base 2015/2018 IPC would allow the configuration shown in the OP (which the UPC does not allow). However, up.codes shows that NC has amended the IPC to remove that allowance:
https://up.codes/viewer/north_carolina/ipc-2015/chapter/9/vents#911
(NC) 911.2: Where the fixture drains being common vented connect at the same level, the vent connection shall be at the interconnection of the fixture drains.
If you can lower the toilet line, you can put a street 2" san-tee (for the shower) into a bushing on the top of a 3" san-tee (for the toilet), and you'd have a very short vertical wet vent or 911.3 common vent connected at different levels.
Cheers, Wayne
James Henry
In the Trades
Use a side inlet Santee.
Maybe this illustrated in the attached sketch, or using 3" PVC DWV Sanitary Tee w/ 2" Left or Right Side Inlet?(NC) 911.2: Where the fixture drains being common vented connect at the same level, the vent connection shall be at the interconnection of the fixture drains.


Attachments

wwhitney
In the Trades
I was looking at those in the Charlotte Plastic catalog, and it looks like they don't have any sweep to the side inlet. That would make them unsuitable for use in drains, which makes me wonder why they make so many different variations on the idea.Use a side inlet Santee.
The one exception was Charlotte part 449, called "Sanitary Tee with 2” Left Hand Sanitary Inlet on Center" (emphasis mine), but that's only available in 2", not 3x3x3x2.
Cheers, Wayne
James Henry
In the Trades
I believe your mistaken.I was looking at those in the Charlotte Plastic catalog, and it looks like they don't have any sweep to the side inlet. That would make them unsuitable for use in drains, which makes me wonder why they make so many different variations on the idea.
The one exception was Charlotte part 449, called "Sanitary Tee with 2” Left Hand Sanitary Inlet on Center" (emphasis mine), but that's only available in 2", not 3x3x3x2.
Cheers, Wayne
wwhitney
In the Trades
wwhitney
In the Trades
I'd be happy to be mistaken, as that would provide more options. Mistaken about the sweep present on the fittings, or mistaken about the need for the side inlet to have sweep?I believe your mistaken.
Cheers, Wayne
James Henry
In the Trades
A santee cannot be laid on it's side and a vent cannot take off horizontally less than 6 inches above the flood level rim of a fixture. Therefore the side inlet is for a drain.
wwhitney
In the Trades
I did a little more research on this. IAPMO suggests the fittings are made in both styles, "straight pattern" side inlet and "drainage pattern" side inlet (see the bottom right entry in Figure 310.1), and agrees the straight pattern can't be used for drainage under the UPC at least:
http://forms.iapmo.org/email_marketing/codespotlight/2017/Jun15.htm
Charlotte's catalog doesn't provide enough dimensional data to distinguish between the two possibilities, and it certainly looks like a straight pattern to me (except for the one item labeled as having a "sanitary inlet"). But Nibco's catalog shows that they make them in drainage pattern:
https://catalog.nibco.com/item/pvc-dwv-fittings/4872-hub-tee-with-90-right-inlet-pvc/k500350
(The 3D model is particularly clear).
So a 3x3x3x2 sanitary tee with drainage pattern side inlet is a good option for the OP, if coming in at 90 degrees apart instead of 45 degrees apart works.
Cheers, Wayne
Michael Bender
New Member
Thank you very much for your time and suggestions. I can't connect them with one of those multi-port fittings, unfortunately. I have to run the 3" waste pipe through a triple beam and the engineer only approved 1 hole to support the 3" pipe. And the wall right behind the toilet and shower is also landlocked on all sides by a triple truss I can't modify.
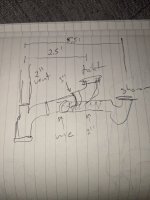
I can go down into the wall underneath and probably connect with a wye in there on the vertical but might have a hard time venting each separate. Attached is an image with the constraints identified. And another attempt at something I think I could do that incorporated Terry's feedback in the first response.
How can I vent the shower in the attached image? I've shown it with a rolled wye, but is there an easier way? Is the way I've shown ok?
Attachments
No need to vent separately.I can go down into the wall underneath and probably connect with a wye in there on the vertical but might have a hard time venting each separate.
I don't know about horizontal dry venting. Horizontal wet venting from the lavatory might work better, since rules for wet vents are often more permissive than for dry vents..How can I vent the shower in the attached image? I've shown it with a rolled wye, but is there an easier way? Is the way I've shown ok?
FYI, red line is horizontal, in the same plane as the shower trap arm.
Last edited:
wwhitney
In the Trades
I see 3 possible options, none of which bring any drains through the LVL:
(1) Wet vent from lavatory as Reach4 suggests: Stick the vanity san-tee in the wall to the left of the vanity, you'll have to either run the trap arm around the corner inside the walls, or enter the vanity from the left side. 1-1/2" dry vent going up from san-tee. 1-1/2" drain jogs left in the wall to get on the toilet side of the "triple truss", then enters the floor system and proceeds parallel to the joists towards shower. Turns perpendicular to the joists towards the toilet, hits a flat 2" wye to pick up the shower drain (wet vent), continues to hit a flat 3" wye to pick up the toilet drain (wet vent), turns down into laundry room wall before the LVL.
(2) Double san-tee: This would work if you can place a double san-tee against the LVL and then get a 1-1/2" vent from the san-tee up into the wall above the LVL without encroaching into the room. Not possible if the wall is 2x4 directly over double 1-3/4" LVLs; if the face of the wall framing is offset 1" to 2" towards the toilet, should be doable.
(3) Dry vent the shower, wet vent the toilet. Shower venting is as you've drawn. 2" shower drain proceeds perpendicular to joists to hit 3" wye to pick up the toilet (wet vent). 3" drain turns down into the laundry room wall before hitting the LVL.
Cheers, Wayne
Michael Bender
New Member
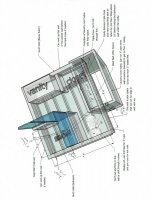
Ok, here is what I think I can do with your feedback wwhitney and Reach4. Thanks.
I wasn't able to get the lav drain over and past the triple truss, door framing was in the way. So I have to plumb that separate from shower and toilet. I have that coming down and tieing into the laundry drain on floor 2. I figure since I vent it right away I can tie it in under the venting of the laundry drain. Is this correct?
The shower and toilet I think I've configured as suggested. I need to come through the double LVL to get the vertical vent for the toilet behind the room walls and it's approved by structural so no big deal.
Can I tie all the venting together like that and only make one new hole? There are actually two vents running up from the floors below, but I don't think I can tie into those right? Maybe if they are dry vents I can?
Do you notice anything incorrect or anything I can do to optimize this?
Attachments
wwhitney
In the Trades
Just to be 100% clear, the king stud for the door framing overlaps the triple truss? There's no room for a 1-1/2" vertical pipe to the right of the king stud and to the left of the triple truss?I wasn't able to get the lav drain over and past the triple truss, door framing was in the way.
[Edit: if it's a non load bearing wall, if the king stud is just next to the triple truss without overlapping, I think you could drill a 2" hole through the bottom of those studs at a 45 degree angle without ill effect. But it looks like there's a joist under the wall, so that might be too much of an obstruction.]
You can combine two drains, each of which has already been vented.So I have to plumb that separate from shower and toilet. I have that coming down and tieing into the laundry drain on floor 2. I figure since I vent it right away I can tie it in under the venting of the laundry drain. Is this correct?
The whole upside of wet venting is that you don't need that additional "vertical vent for the toilet". The shower dry vent is the vent for both the shower and the toilet. So you it looks like you don't need to go through the double LVL.The shower and toilet I think I've configured as suggested. I need to come through the double LVL to get the vertical vent for the toilet behind the room walls and it's approved by structural so no big deal.
Any vent pipes that are dry (no drainage coming down into them) can be combined once they are 6" above the flood rim of all the associated fixtures.Can I tie all the venting together like that and only make one new hole? There are actually two vents running up from the floors below, but I don't think I can tie into those right? Maybe if they are dry vents I can?
Cheers, Wayne
Last edited:
Michael Bender
New Member
Thanks Wayne. Certianly not load bearing. I think the drawing is slight off where it shows the truss and vanity. I could probably drill in 45, but also don't have much issue running it down to tie in with laundry. Feels easier actually.
Glad that the shower vent can handle the toilet. I thought there was some strange rule about that, but it feels like it should be fine to me. I'll send this drawing (minus the toilet vent) over to my inspector to make sure he is ok with it.
As for 6" above, how about the 2nd floor fixtures. If they tie into the vent stack on the 2nd floor 6" above the flood rim of the 2nd floor fixutres, but not 6" above the third floor, does that matter?
wwhitney
In the Trades
Sure. The advantage of running it to hit the shower drain is that then you could eliminate the shower vent as well, so the toilet, shower and vanity are all vented by the one vanity vent.I could probably drill in 45, but also don't have much issue running it down to tie in with laundry. Feels easier actually.
But it you'd rather stick with two vents (vanity and shower) and run the lav drain the way you show it, that's fine too.
For any joint in the vent, you just look at the fixtures being vented by the vents being joined. The 3rd floor fixtures don't matter, until you want to join their vents with your main vent; then that joint has to be 6" above the 3rd floor flood rim level.As for 6" above, how about the 2nd floor fixtures. If they tie into the vent stack on the 2nd floor 6" above the flood rim of the 2nd floor fixutres, but not 6" above the third floor, does that matter?
Cheers, Wayne
Michael Bender
New Member
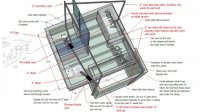
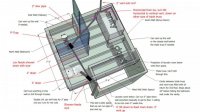
Ok, last one Wayne. I promise. I really appreciate the help. If I can squeeze the drain onto the other side of that triple truss, does the attached image accurately reflect your thinking? Are the distances to the vent an issue? I added approximate run lengths to the drawing in purple. The red text describes plumbing, the black text is the room constraints.
Attachments
wwhitney
In the Trades
That's the idea, with several notes below. Either that configuration or your previous configuration will work. [And in both cases, you don't need a vent taken off where the 3" drain turns down into the laundry wall, so hopefully that means you don't have to go through the LVL.]
The advantage of the latest configuration is that it (1) eliminates an additional vent and (2) avoids the issue of whether it is OK under the IPC for the shower dry vent to go horizontal below 6" above the flood rim level (UPC has an explicit allowance for structural obstructions, IPC does not to my knowledge).
Comments on the last diagram:
1) The lav drain and vent can be 1-1/2" until the wye with the shower drain, but 2" is also OK.
2) I would run all the drains parallel or perpendicular to the joists, rather than on the diagonals shown.
3) So starting at the laundry room wall just before the LVL, and proceeding upstream, I'd suggest: 3" vertical drain in laundry wall, 3" medium turn 90 in floor joists to turn perpendicular to joists, 3" pipe, 3" wye to pick up toilet drain via side branch, 2" bushing, 2" pipe, 2" wye to pick up shower drain via side branch, 1-1/2" bushing, 1-1/2" pipe to last joist bay, 1-1/2" LT 90, 1-1/2" pipe towards lav.
4) All wet vent diagrams using the lav I've seen have a san-tee at the lav for the vent take-off. I'm not 100% convinced that's required (versus allowing a horizontal lav drain segment downstream of the vent take-off), but many say it is required. So what I would suggest to get the san-tee as far towards the back of the lav is for the lav drain to penetrate the wall plate at a 45 degree angle in the plane of the wall, then downstream a LT 90 to get horizontal perpendicular to the joists, and another LT 90 to go parallel to the joists. Upstream, proceed at the 45 degree angle to hit a street 45 in a san-tee.
5) Under the IPC, for a 1-1/2" trap arm, total fall is limited to 1-1/2", with a minimum slope of 1/4" per foot. That means the trap arm length is limited to 6', which is achievable only with a slope of exactly 1/4" per foot. So if it would not make the trap arm too long, and you have the space with respect to the doorway and the triple truss, a simpler arrangement is just to penetrate the wall plate vertically and go straight up to a san-tee.
Cheers, Wayne
Similar threads
- Replies
- 3
- Views
- 324
- Replies
- 4
- Views
- 345
- Replies
- 6
- Views
- 635