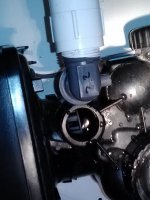
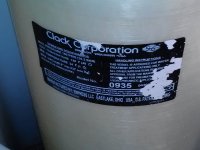
As you mentioned 'resin' and 'regenerates', I expect that this is a water softener as opposed to another type of water treatment device. WS-1 is a Clack control valve model which maybe used on various back washing water treatment devices containing different medias.
When did you install the unit and how do you know media continues to be discharged?
Although I would expect you would have mentioned it, is there any resin in your house plumbing or plugging your faucet aerators? This will occur with a broken bottom distributor (screen device at the bottom of the center tube) or a broken center tube. It can also occur if the softener is plumbed backwards and there is an occasion of high water flow.
Gravel is highly recommended as it sits below the resin, keeping the resin raised above the bottom distributor and aids in distributing water flow throughout the resin tank. Some online distributors do not include gravel as this adds to shipping costs, allowing them to undercut other online distributors by a few dollars.
Check your plumbing connections to ensure the softener inlet and outlet are connected as intended. I believe on the WS-1, the inlet is on the right when you are standing in front of the valve, facing it.
A few questions:
- Well or municipal water supply?
- Softener capacity?
- Tank size?
- Type of resin - Regular or Fine Mesh?
- How much of the media tank did the resin fill? There should be empty space above the resin for the resin to expand into.
- What is your water pressure?
- How did you initially fill the tank with water after installation? Water should be restricted to a slow stream with the control valve in the backwash position, thereby pushing trapped air out of the tank to the drain and allowing the slow moving water to saturate the resin.
- What is the Drain Line Flow Control (DLFC) rating? There should be a label on the valve, close to where the drain line connects. The DLFC is a flow restriction button which restricts the backwash from lifting the resin too much to cause it to be flushed to drain but allows enough flow to expand the resin to wash debris out from the resin. The DLFC rating can vary depending on factors including the resin tank diameter and water temperature.
Edited to add: If you have a non-jacketed tank, depending on the tank colour, you maybe able to see the level of resin remaining in the tank by shining a light from behind the tank.