You are using an out of date browser. It may not display this or other websites correctly.
You should upgrade or use an alternative browser.
You should upgrade or use an alternative browser.
Why is this PRV valve foaming at the mouth?
- Thread starter Anon125
- Start date
Users who are viewing this thread
Total: 2 (members: 0, guests: 2)
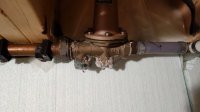
It looks to be a leak on your PRV (pressure reducing valve)
A rebuild kit may fix it, or perhaps install a new PRV.
A rebuild kit may fix it, or perhaps install a new PRV.
Sponsor
Paid Advertisement
Dj2
In the Trades
I think I see a crack at the brass body. I'd replace the valve.
Gary Swart
In the Trades
Replace the PRV.
Anon125
Member
Thanks all
why are there 2 "large 6 sided bolt heads" on the bottom.
what do they do.
why are there 2 "large 6 sided bolt heads" on the bottom.
what do they do.
Jadnashua
Retired Defense Industry Engineer xxx
They allow access to wear items so that they can be replaced. They do make rebuild kits, but the cost and labor to do that makes it often more effective to just replace the whole thing, as then, you'd have a new warranty, and hopefully, one that is more likely to work right for awhile.
Anon125
Member
thanks.
what hours of time does it take to replace one?
same for gas water heater
what hours of time does it take to replace one?
same for gas water heater
Jadnashua
Retired Defense Industry Engineer xxx
It looks like you have fairly easy access to the PRV, and with the pex on one side, it should be quite fast to replace it. Unless you get exactly the same model (and even then, they could change over the years), the new one may be slightly different in overall length, so I'd probably just cut the pex off at the far right and run a new piece the proper length. You may or may not be able to reuse the coupling at the left-hand side. If not, that would need to be unsoldered and a new one installed. All in all, a good plumber could probably finish it easily in less than an hour...a DIY'er probably longer. Note, I'm not in the business, that that is just my guess.
It's way too hard to say how long it would take to replace a WH without seeing what there is to work with. IN some places, they require it to be hard piped, in others, it must have flexible hoses, and in your area, you may be required to have earthquake straps to keep it from bouncing around or falling over. THen, the height may differ, and if it's gas, there may need to be some rework of the flue. Too hard to give any fixed number here. If you can turn off and drain the WH before the plumber gets there, that can save some labor time of futzing around waiting.
It's way too hard to say how long it would take to replace a WH without seeing what there is to work with. IN some places, they require it to be hard piped, in others, it must have flexible hoses, and in your area, you may be required to have earthquake straps to keep it from bouncing around or falling over. THen, the height may differ, and if it's gas, there may need to be some rework of the flue. Too hard to give any fixed number here. If you can turn off and drain the WH before the plumber gets there, that can save some labor time of futzing around waiting.
Anon125
Member
thanks
Dj2
In the Trades
Do you even know what's involved in your water heater change over?
- Empty the old tank. Some tanks take FOREVER to empty. If you hire a plumber, the clock will be ticking.
- removing old heater and dispose.
- removing old water supply, gas and vent connectors.
- replace gas shut off and gas flex line (where applicable),
- deliver a new heater.
- Install it in place. Install straps (where applicable).
- Install all new connectors. Connect the vent. Check shut off valve. Install a T&P 3/4" copper drain line to the OUTSIDE.
- Fill the tank and fire it up.
Start to finish - for a straight forward job without any alterations or modifications - about 3-4 hours. Inexperienced DIY even longer.
Your set up/access could be different, and may require more labor/materials.
Anon125
Member
I was looking for how long it would take to change just the anode and the leaky water valve
thanks
thanks
It took me many hours to change the anode taking into account going to buy the cheapest 1/2 inch air powered torque wrench, having that break, drive an hour to the store, return for credit and getting the next step up 5/8 wrench and a set of sockets, drive back. That bigger wrench barely had the power to break the anode free. Water heater was about 9 years old at the time. The anode removed was pretty much the steel core rod, and some oxide lumps stuck to it, by the time I pulled it.I was looking for how long it would take to change just the anode and the leaky water valve
I put in a powered anode instead of a conventional anode to avoid the chemical reaction that can produce sulfur smells. I used only an estimated 10 ft-lb with a hand wrench and one finger of force about 8 inches along the pipe to put that in. No leaks, and the torque was enough to cut through the Teflon tape to make good electrical contact. It would take a pro a few minutes once he has the parts in place if the torque wrench was capable. If the tank was not full of water, I don't know if a torque wrench would spin the tank or rip out pipes.
Anon125
Member
wow - who would have thought all that was involved!
thanks
thanks
Dj2
In the Trades
wow - who would have thought all that was involved!
thanks
Haha, next time a plumber hands you a bill, don't faint, you will know why it is so high.
Dj2
In the Trades
But back to the PRV: I know a person who tried to recondition his 15 year old PRV. So he learned how to do it, ran around looking for a kit, got one that was wrong, spent more time returning it and getting the right one.
Carefully installed it....and, it leaked.
Then he called me, and for $300 I replaced his old PRV with a new one. End of story.
If you add all his expenses and time wasted...he spent as much money as two PRVs.
Carefully installed it....and, it leaked.
Then he called me, and for $300 I replaced his old PRV with a new one. End of story.
If you add all his expenses and time wasted...he spent as much money as two PRVs.
Anon125
Member
plumber came and got some bleach and wiped of the condensation. seems fine.
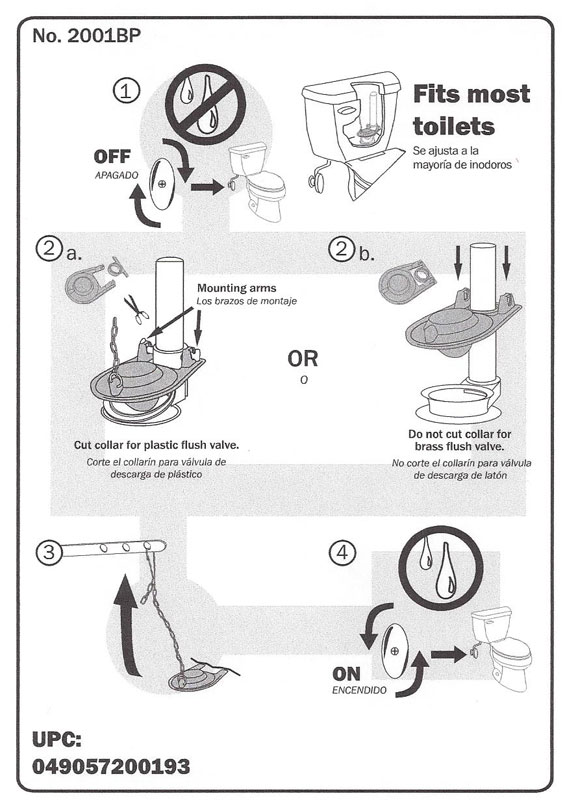
he also quickly replaces a toilet flapper .
too quickly.
how does one adjust the position/ chain?
the outside lever goes a loooong way before the valve opens
thanks
he also quickly replaces a toilet flapper .
too quickly.
how does one adjust the position/ chain?
the outside lever goes a loooong way before the valve opens
thanks
Leave some slack but not so much that the chain can slide under the flapper. Other than that, adjust to what feels better.how does one adjust the position/ chain?
the outside lever goes a loooong way before the valve opens
thanks
Besides the ability to tighten or loosen by connecting to different links, many lever arms have more than one attachment hole. Clipping to the far end gives more swing for a given amount of lever movement, but it requires more force. Clipping closer to the lever makes the push easier.
Anon125
Member
ThanksLeave some slack but not so much that the chain can slide under the flapper. Other than that, adjust to what feels better.
Besides the ability to tighten or loosen by connecting to different links, many lever arms have more than one attachment hole. Clipping to the far end gives more swing for a given amount of lever movement, but it requires more force. Clipping closer to the lever makes the push easier.
I will look for a diagram of the tank so I can further understand your helpful repy
See drawing #3 on https://terrylove.com/images/korky_trim_flapper.jpgI will look for a diagram of the tank so I can further understand your helpful repy
That chain can be clipped to whichever of the 3 holes in the arm works best -- usually the hole the closest to straight-up from the attachment point. Leave about 1 link of slack in the chain so there is no pull on the flapper unless you are operating the lever.
Anon125
Member
NOW I see. thanks very much
Similar threads
- Replies
- 4
- Views
- 306
- Replies
- 0
- Views
- 107
- Replies
- 10
- Views
- 293
- Replies
- 0
- Views
- 190