Water forming behind vapor barrier

Users who are viewing this thread

locus123

Member
Messages
38
Reaction score
1
Points
8
Location
Ontario
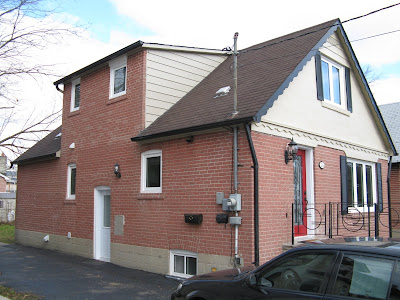
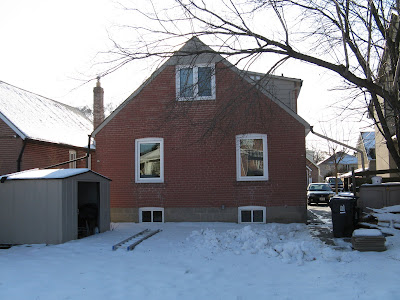
I've got an old double brick house in Toronto that was recently renovated (ie. new studs, insulation, vapor barrier, drywall). One wall, the East facing wall, has a significant amount of water on the outside of the vb at the base of the wall where the 2" or so of vb sticks out on to the floor. This same wall had some major masonary work done and there were a few leaks from shifted mortar joints that had to be fixed up (this was done in the fall).

I've taken off the bottom 2" or so of drywall, and I can see white mold/mildew growing. I've talked to a couple other contractors and we have a few opinions:

1) Water got in through the cracks in the brick in the fall/spring, and is stuck between the double brick. As the sun rises and beats down on that wall the water evaporates, makes it's way through the insulation, and condenses on the vapor barrier. The AC is on, so the house is cold right now, so the warm side is the outside.
2) The vb was installed wrong and moisture is leaking out the house and condensing on the warm side (outside) as it hits the insulation. Again, the AC is on, so there isn't much moisture in the house. Doubtful about this option.

Just due to the amount of water we see - in spots it has rolled away from the wall about a foot, wetting the plywood - I'm leaning towards the rainwater option, but I'm not sure. Keep in mind this doesn't happen when it rains, it's just started with the early summer heat. The roof has been checked and looks fine.

In order to cover all bases, I'm suggesting: re-mortar (tuckpoint) the outside wall to seal up any holes (there is no overhang on this wall, it's a flat roof, so when it rains with wind the wall takes a beating), take down the interior wall to the brick, rent a big dehumidifier for a week and try to suck out whatever is in the wall, then reinstall (if I can convince them to spray foam, all the better).

Does this sound like a good plan? Any other theories on where the water is coming from, or suggested remediation methods? I'm concerned that if we take down the wall we won't be able to find a source due to the double brick.
 

Dana

In the trades
Messages
7,889
Reaction score
509
Points
113
Location
01609
Masonry will wick water in- messing around with the pointing does next to nothing. Filling actual hole will do something, but probably not much. Do NOT fill any weep-holes at the bottom of the brick- they're designed to let condesation water out from behind the brick, and provide a small amount of ventilation. If anything, those could be expanded, and you may want to add some holes in the mortar at the uppermost course (providing there's at least SOME overhang) to allow the masonry cavity to thermosiphon, expelling moisture from vapor drives:

bscinfo_305_figure_02a.jpg


Moisture can load up in the studwall only during the winter months, when the outer portions of the studs are colder than the dewpoint of interior air (typically 0-5C, depending on interior temp & humidity.) Once it's over 5C outside, unless there is an exterior vapor retarder the assembly would be able to dry fairly readily toward the exterior. Conversely, during the warmer months moisture from vapor drives toward the interior can indeed be high enough that it's dew point is above the room (and vapor barrier) temp, even when the outdoor air dew points are much lower. The fact that the brick can store water, then release it rapidly when heated makes that difference.

Back-ventilating the brick reduces that drive considerably. There SHOULD be a cavity and drain-plane (felt/houswrap) between the studwall and the masonry to vent water vapor. If the repaired masonry didn't place the felt correctly, so that it directs condnesation coming down the drain-plane into the studwall cavity, or a section was missing so that the sometimes very-damp gap-air can get into the studwall wall cavity, OR the masonry is in direct contact with the drain-plane (no gap) in that section you can run into this.

If you're taking down the interior studwall & replacing it, put 1-2" of XPS (Extruded poly styrene) foam board on the exterior, 2 layers of felt, and leave at least 20mm of air between the felt & masonry. Seal the brick with silane or acrylic masonry sealer on both the interior & exterior sides while your at it, which will significantly reduce it's capillary draw from rain-wetting & dew events while leaving it vapor-permeable enough to dry (read the specs on whatever you use for vapor permeability- it's important! Most masonry sealeras are vapor permeable, but some, not so much...)

bscinfo_305_figure_03.jpg


If you experience condensation on the poly after that it means there is either a bulk-water leak somewhere (which you would probably have found when you took it apart), or there is air-leakage at some place along the poly.

Do NOT spray foam directly on the brick, or you'll have premature failure of the mortar (or even brick). It needs to be able to dry in both directions. Open cell foam is not an option, since it's highly permeable to water vapor (but not air), and you'd run into similar issues.

Read this: http://www.buildingscience.com/docu...agement-and-vapor-control/reservoir-claddings

Bear in mind, XPS is semi-impermeable- at thicknesses of greater than 2" you may end up with a vapor-trap if you have interior poly (required by code, in Canada). But at under 2", with taped/foamed/mastic-sealed seams to form an air-barrier it will reject most of the moisture drive that occurs when sun hits the damp brick, but is still permeable enough that the assembly can dry from minor wetting events. Don't use foil or poly faced goods on the exterior in your climate, or you WILL create moisture problems in the wall. (Exception: If the total R value of the exterior foam is ~60%+ of the total R-value you can skip the interior poly, and let the studs & sheathing dry toward the interior. The code requirement for 6-mil poly on the interior only makes sense for convnetional-traditional wall stackups, but in high performance buildings with a lot of exterior foam interior poly becomes detrimental to moisture control.)
 

locus123

Member
Messages
38
Reaction score
1
Points
8
Location
Ontario
Dana, that is a great post, thank you.

I went for a walk tonight, and for the first time I noticed that every other vertical mortar joint is open on most houses with exterior brick. I'm pretty sure our mason didn't leave those weeping holes (I'm travelling right now but will check when I get back).

Just so I get this right, I guess for older (80+ year old) double brick houses, they used the interior layer of brick as the pseudo drain-plane and the cavity between the two bricks as the ventilation. I know there is no felt or house wrap of any kind, as there would be no way to create a seal of any kind from top to bottom.

I'll take a look at the bottom course and ensure the weeping holes are there. I'm fairly certain there is room to breathe at the top, since the top course is missing and fascia with aluminium capping installed over it (not sealed tight, but it's there - and it's worked for the last 80 years).

Now I'm concerned about how well a job the mason did on the interior brick - if it's not sealed tight that's an easy way for the moisture to make it's way in. I remember him rushing through it and saying it didn't need to be parged.
 

Dana

In the trades
Messages
7,889
Reaction score
509
Points
113
Location
01609
The cavity between inner & outer wythes in double-brick construction IS a vapor retarder & rainscreen, just not a great one when you have wood and a strong vapor barrier on the interior. I have to apologize- 20mm & double-felt is probably overkill for the secondary cavity between the interior wythe and the studwall with foam & felt on the exterior- 1-layer of felt/housewrap & 6mm cavity is enough- somehow I reverted to brick-veneer mode in my thinking, even though you clearly stated "double-brick". Air tight & parged or not, the interior wythe will wick in any condensation that occurs in the cavity on the interior wythe, but that is a small fraction of the moisture experienced by the exterior wythe. Brick & mortar also pass water as vapor quite readily, even when air-tight, which is why it's important that the cavity between the bricks is ventilated, reducing the average vapor pressure. The interior wythe will moderate the peaks seen by the studwall somewhat, but it'll pass the daily average, if not the hourly average.

Defining the foam as the pressure boundary of the assmbly is key. A-tight methods on the foam areimportant to not short-circuit it's vapor retardency by air-transported moisture. That cavity air will be VERY humid some days, not so much others, but once past the foam & condensed, the moisture from those high humidity events takes it's time exiting the studwall since there the 6-mil poly has essentially zero drying capacity. Water gets into the assembly by a number of methods, but only exits via vapor diffusion, which is blocked on the interior, and impededed by the foam. The foam brings the moisture seen by the studwall down to the seasonal or annual average (which would be fairly dry for at least half the year in your location.)

Weep holes at the bottom of the exterior wythe tend to clog up with falling bits of cavity-side mortar/brick-spall over decades/centuries (or sooner, with moss or lichens) and are sometimes get blocked during re-pointing by less-experienced masons. Clearing them can sometimes done with compressed-air. Not all cavity-walls are built with top-venting holes, and some are open to the top, vented under the roof but drilling some into the vertical mortar at an angle such that it drains outward will improve it's drying capacity whether it's open at the top or not. With a sloped roof there is significant chimney-effect draw from the top and the attic ventilation takes care of it, but on flat roof like yours those forces aren't in play. It's also possible that the flat roof is unventilated- blocked by insulation etc. (or by design.) But if it's open on the exterior side it's well-vented- just be sure that the open top to the cavity well shielded from wind-driven rain to avoid soaking the inteior wythe. Brick can absorb a lot of bulk water and retain it for weeks/months.
 

Dana

In the trades
Messages
7,889
Reaction score
509
Points
113
Location
01609
If you're concerned about the studwall being too thick with an inch or more of exterior foam, cutting back to 1/4-1/2" XPS will still provide decent vapor-retardency. There is fan-fold 1/4" & 3/8" XPS product out there. I've grown perhaps too accustomed to going for higher-R on exterior foam (XPS is ~R5/inch- nearly the thermal performance of closed cell spray foam), which isn't a bad idea in your climate, but if your design goal is primarily vapor control you can get by with much less, filling out your R with less expensive goods.

But if you want the extra R, dropping your stud depth and going with thicker foam for the same wall thickness works. Dropping from 2x4s to 2x3s, to accommodate an inch of foam, or from 2x6 to 2x4 for more. Just keep the XPS to 2" or less so that it retains drying capacity.
 

locus123

Member
Messages
38
Reaction score
1
Points
8
Location
Ontario
I wasn't concerned about the extra inch, just trying to understand how older houses would have been designed to work. The only wall that is having problems is where the masonary work was done - the other walls are constructed the exact same way and have no condensation problems.

But to comment on that though, I was told that if you put XPS on the exterior walls for a second floor, or even a main floor, where the house is of old construction and the floor joists are built into the wall - ie. they sit on the interior brick - then water can condense on the exterior side of the XPS and run down the wall, then rot the studs. Same goes for spray foam. This only applies for joists that sit "in the wall". Does that make sense?
 

Dana

In the trades
Messages
7,889
Reaction score
509
Points
113
Location
01609
You may find this a relevant read.

Using 2lb SPF as a model (since it's vapor permeance is similar to XPS), with an inch or two of XPS between the brick and the wood, vapor drives into the studwall will be much attenuated, and if some amount of interior side vapor permeability is allowed, it'll dry toward the interior in summer, toward the eterior in winter. (Maybe an inch of XPS on either side of a Roxul studwall sandwich is called for?) Also note that the vapor drives from the exterior will differ by how much sun it gets- which may explain why your poly is dry in most places, but condensing moisture in another despite identical construction.

Doing the whole thing with rigid foam board (any type) with ~6mm of spacing from the masonry & foam-sealed at the edges & seams works. It can be mechanically constrained by furring long-screwed into the masonry, which also serve as a place for fastening the interior wallboard. It wouldn't need poly, but if the inspector insists on it, put it between the furring and the foam board, and you'll be done. EPS (beadboard) is the cheapest- it takes 5" to get to R20, but it'll outperform R20 Roxul in a studwall since there are no studs creating thermal short-circuits. With iso you can get to R20 in ~3" (and using foil-faced goods with FSK tape on the seams might satisfy the interior vapor barrier requirement.) The masonry might run slightly damper with the poly than without if you use EPS, but 5" of EPS is still sufficiently vapor-retardent to not create condensation issues on the interior side of the brick in winter even without poly, if the SPF in that study is any guide (which it would be.) It'll be more reliably air-tight if you use 2 layers and overlap the seams, taping or mastic-sealing the seams of the first layer before you apply the second. (Use generous blobs of foam-board adhesive to hold it to whatever you use for spacers before applying the second layer.) The stackup looks like:

Exterior air| outer wythe | cavity| inner wythe | 6mm gap | foam board | furring | gypsum | paint | interior air

This way all of the wood is in the same hygro-thermal environment as the room- it can't grow mold in winter OR summer.
 
Last edited:

Little Tim

New Member
Messages
6
Reaction score
0
Points
0
Location
Toronto, ON
I'm new to this forum and instead of creating a new thread I figured I'd follow up in here.

We're about to renovate the upstairs of our 1949 double-brick one and a half story house in Toronto:

IMG_2107.jpg


IMG_2230.jpg


We bought the house in 2009 and have already done a lot of work to it (new windows/doors, exterior foundation waterproofing, new bathrooms, new floors, new electrical etc). However, upstairs is very cold in winter and sizzling hot in summer and we're planning to rip out all the old plaster and insulate walls and sloped ceiling properly. I always figured the sloped ceiling would be the main challenge and spent most of my time researching what method to use for that. I'm planning on doing what proposed here: http://www.stevemaxwell.ca/result-web-content-display?p_p_id=3&p_p_lifecycle=0&p_p_state=normal&p_p_mode=view&_3_struts_action=%2Fsearch%2Fsearch&keyword=&_3_keywords=&groupId=22324&articleId=10332760.

Basically, that article talks about constructing rigid foam (I'll use XPS) baffles in each rafter bay for ventilation, then putting in batt insulation, vapour barrier and then another layer of rigid foam before drywalling. I'm a little concerned about possible double vapour barrier with this approach, because of the XPS foam baffle, but I think the XPS might be permeable enough to prevent any problems. However, any advice in this area would be appreciated.

Now, my main concern at the moment is how to properly insulate the walls upstairs - that would be the gables that you can see in the pictures above - in order to maintain the breathability (is that even a word?) of the double brick walls. This is what Dana suggested in the post above:
Exterior air| outer wythe | cavity| inner wythe | 6mm gap | foam board | furring | gypsum | paint | interior air

Questions:
1. How thick should the furring be?

2. Dana mentions "furring long-screwed into the masonry". How exactly is this done properly in order to maintain the 6mm air gap? I'm imagining that the foam board will just be screwed tight to the inner wythe, leaving no gap.

3. No poly vapour barrier? Should the foam board be made thick enough to act as a vapour barrier (2+ inches)?

4. Dana also mentioned "an inch of XPS on either side of a Roxul studwall sandwich." Would this be the way to go? Would I still need the 6mm air gap before the first foam board?

5. As can be seen in the picture, the front gable is stuccoed and painted. I assume that would change the breathing dynamics of that wall and would maybe allow me to insulate that wall more traditionally (stud wall, batt insulation, regular vapour barrier). Any thoughts?

6. When the walls are bare, I'll find out if the cavity between the inner and outer wythe vents into the attic or not. Regardless, I need to provide better venting for that cavity as there are no vent holes anywhere on the exterior right now. Should I drill holes in some of the vertical grout lines at the bottom of the walls? How should the holes be spaced? Are there some kind of fine netting or similar that can be installed in those holes to prevent critters from entering?

Starting renos in January, so any advice would be greatly appreciated!
 

Dana

In the trades
Messages
7,889
Reaction score
509
Points
113
Location
01609
Regarding 1 & 2: It makes a difference if this a cavity wall, with a space between inner & outer wythes vs. a solid brick setup. The cavity adds considerable drying capacity to the structure. If yes, the 6mm gap can be skipped, but having another 6mm cavity between the XPS and the masonry gives it another space to dry into doesn't hurt. (Ideally that would be vented to the exterior so that the air in that cavity tracks the dew point of the exterior air, purging any moisture that wicks in through the masonry.) If it's a solid brick wall, you can maintain a foam-brick cavity spacing with small blocks of 1/4" or 3/8" siding underlayment or some other non-wicking moisture tolerant material at every furring-screw location. The furring can be just about anything- standard 1x4s work, and are less likely to split than narrower goods.

Regarding #3, the function of the vapor barrier is to protect moisture susceptible materials exterior to the VB from water vapor diffusing in from the interior all winter, accumulating in the material. Brick is not a susceptible material- wood is. There's no need to go sub 1-perm with the foam, since the brick can take it. With the entire R value as rigid foam between the furring and the brick, the susceptible furring stays at the conditioned space temperature and humidity, and an interior vapor barrier would only serve to put the furring at risk from summertime moisture drives.

#4- the Roxul sandwich approach wouldn't exactly meet code, but it would work. With ANY amount of foam on the exterior side of the studwall as the exterior air barrier for the fiber insulation it would be moisture-safe even without an interior vapor barrier (other than latex paint), but R5+ would limit the number of frost/condensation hours to guarantee you literally NEVER had liquid moisture running down the interior face of the XPS. (It wouldn't meet code in Canada, where 6 mil poly is treated almost as a religion by some code-enforcers, but it would work, and work well.) The higher the exterior foam R (or really the ratio between R-foam and R-fiber) the fewer the condensing hours, and the more vapor-open the interior side can remain. If the studwall is 2x6 you'd probably want at least R7.5. Even with susceptible wooden sheathing on the exterior (rather than brick), you'd be moisture-safe with R7.5 on a 2x5 studwall, R11 on a 2x6, with NO interior vapor retarder other than standard latex paint. see: http://www.greenbuildingadvisor.com/book/export/html/18223 and http://www.buildingscience.com/documents/guides-and-manuals/irc-faqs/irc-faq-insulating-sheathing-vapor-retarder-requirements (Toronto is roughly the same climate as the cool edge of US zone 5 or the warm edge of zone 6).

5: Stucco (painted or otherwise) isn't very different from masonry from a moisture point of view- even painted it will absorb dew & rain moisture. If it's on wire lath directly on the stud, whatever you put in the cavity can't wick moisture in toward the interior. At a minimum put a cut'n'cobbled half-inch XPS (foam sealed where it meets the studs) between the wire lath and any fiber insulation. But since the stucco is not harmed by wintertime diffusion moisture from the interior you can skip the interior poly, just build air-tight and use a standard latex interior paint, and that would be PREFERABLE, since it allows the cavity to dry toward the interior mitigating the peak summertime vapor drives from sun-on-stucco, and you won't end up with the condensation issues experienced by locus123. If you want to avoid the argument with code-enforcers, use a variable-permeance product such as Certainteed MemBrain rather than poly, since it will be sub 1-perm and quite vapor retardent in the dry winter months, but becomes highly vapor open when the relative humidity in the cavity rises from summertime moisture drives.

If there is planking or plywood sheathing between the studs & stucco it's worth air-sealing the sheathing to the studs with caulking (acoustic sealant or similar) or 1-part foam before insulating, and here again variable-perm vapor barrier is far preferable to poly.

6: Let's wait and see what you find before drilling. The fact that there are not even weep holes at the bottom suggests that it's not a cavity wall, and drilling through a very THICK wall with multiple wythes that don't line up could make it more trouble than it's worth, and maybe 2-3cm of closed-cell spray foam on the interior face of the brick would make more sense.
 
Last edited:

Little Tim

New Member
Messages
6
Reaction score
0
Points
0
Location
Toronto, ON
Thank you for the quick reply!

I'm still learning about this, so I've read your post 5 times now to try and come up with some reasonable follow-up questions.

1. I was pretty sure that our walls were double brick with a cavity in between. That seems to have been the standard post-war building practice in Toronto, and I think our walls are more than 10 inches thick. However, I'll certainly do some double-checking since it will make a difference as to how I'll treat the insulation. I figured any original weep holes would have been filled in with some over-zealous re-pointing! I'm trying to avoid spray foam due to cost (did the entire basement with spray foam), so I'm leaning towards the approach you've outlined that includes a 6mm cavity between the inner brick face and the first layer of foam. As I understand it, that would make for the following layout:

Exterior air| outer wythe | inner wythe | 6mm gap | blocks of siding underlayment | foam board | furring | gypsum | paint | interior air

Would that be in line with the approach you have suggested?

2. When it comes to the Roxul sandwich approach, it sounds like that will make the wall very thick? At least 1.5" of XPS, 3.5-5.5" of Roxul and then another 1" of XPS before the drywall. That could be up to 8.5"! Compared to the 3/4" + plaster that is on there right now, that is a significant difference (let's just say that would have a very low WAF - wife approval factor...). Maybe I'm misunderstanding this, so please sort me out if that's the case. However, seems like you're suggesting that the foam against the masonry is the most important part, so would it be possible to do something simple like this:

Exterior air| outer wythe | inner wythe | 6mm gap | blocks of siding underlayment | 1" foam board | furring | 3.5" Roxul (in a 2x4 stud frame) | gypsum | paint | interior air

3. I really like the Certainteed MemBrain that you mentioned. About time someone came up with an alternative to just regular plastic (poly). I just need to find out if I can get it here in Toronto. Would you recommend using the Certainteed MemBrain for all the insulation approaches we have discussed, including the sloped ceiling?

4. When it comes to better ventilating the double brick wall. if there is a cavity, I assume it would be more straightforward to drill weep holes at the bottom. If not, what are my options?

Thanks a bunch for the advice!
 

Dana

In the trades
Messages
7,889
Reaction score
509
Points
113
Location
01609
That stackup looks right, except that the 6mm gap isn't a separate layer from the siding underlayment- it's the pieces of underlayment that are being used as a 6mm standoff. If the cavity between the wythes is 2.5cm or bigger you can skip the 6mm cavity altogether.

The Roxul- foam sandwich approach is an ill-considered thought by which you might appease the inspectors about not using interior poly. Putting all the foam to the exterior of the studs is superior. But this is where NRCC has traditionally been at variance with the IRC. In most of Canada (I haven't checked Ontario code recently) an interior vapor barrier is required unless there is sufficient exterior foam to keep the interior surface of the foam above the interior air dew point (~4C) at the outdoor heating design temperature (with a 20C interior temp) whereas other codes attempt to keep it above the dew point at the average winter temp, which is far less stringent, yet still protective of mold/rot issues. Furthermore, in this stackup there is no exterior wood sheathing that would be susceptible to condensing moisture- the foam & rock wool aren't affected by intermittent condensing events, but a huge air leak from the interior could arguably make the rock wool wet. Latex paint is only semi-permeable, the amount of moisture it lets into the cavity via vapor diffusion is minute compared to even a square cm of air leak, but with R5 foam exterior to the rock wool the assembly is resiliant to even minor air leaks.

MemBrain isn't necessary for an all-foam insulation approach, but is preferable to poly anywhere fiber insulation is used. Poly would make sense in a more extreme climate, but even in Winnepeg or Saskatoon the wood in the assembly will stay drier on average with a variable-permeance vapor retarder, particularly on brick structures.

Adding a weep hole into the cavity every half meter or so and corresponding vent hole under the eaves works pretty well. Using masonry sealer on the bricks also limits how rapidly they wick up rain & dew too.
 

Little Tim

New Member
Messages
6
Reaction score
0
Points
0
Location
Toronto, ON
Well, well, well, after all that we decided to go with all spray foam after all. When we did the demo we found that the rafters are just 2x4 and not 2x6 as we had expected. That would have left very little space for proper insulation with foam board or batts. Furring out was not an option due to limited headroom and small footprint generally. So, with a bit of a mad scramble I found a spray foam company that could do a job this week and they're actually at my house as I type. Since we were doing spray foam for the rafters we figured we might as well do it on the end walls as well. We ripped out the old furring that was nailed to the brick and framed up new end walls that are sitting about 1/2" away from the brick. That should ensure the brick gets completely covered with spray foam.

When it comes to the double wall brick question, I think you're right, it doesn't look like there's any cavity in between the wythes, or if there is one, it is very small. I could not see any gap at the top of the walls when we opened everything up.

So, thanks for all your help and input. I really appreciate it. I might still use the approach we discussed with foam board when I start doing the rooms on the first floor. I'll also try and update this thread with some pictures when I'm all done in the attic.
 
Top
Hey, wait a minute.

This is awkward, but...

It looks like you're using an ad blocker. We get it, but (1) terrylove.com can't live without ads, and (2) ad blockers can cause issues with videos and comments. If you'd like to support the site, please allow ads.

If any particular ad is your REASON for blocking ads, please let us know. We might be able to do something about it. Thanks.
I've Disabled AdBlock    No Thanks