Two leaks in Hardie Irrigation Valves

Users who are viewing this thread

Jvstevens

Member
Messages
73
Reaction score
2
Points
8
Location
California
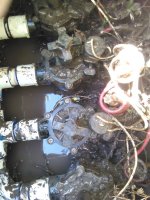
I have an irrigation valve box (containing 4 Hardie in-line valves) that has filled with water indicating a leak, so I bailed out the water and dug out the mud and have discovered two leak sources. The first one is leakage from around the stem of the flow control valve on valve #3. When I close the flow control valve, the leaking stops. The second leak is on valve #1, at the joint between the valve inlet port and the PVC male adapter. Just a small dribble (say a couple of drops per second) of water coming out of the gap between the two, as though the joint was not adequately tightened. It would be a nightmare to try to replace the valves, since space is so tight, so I'm determined to fix both leaks in-situ. I have attached a picture. The #1 valve is at the top.

Also, valve #3 does not turn on the water. It just seems to spit out air, but no water goes out the valve. I think the leak at the stem is related to this problem, but not totally sure.

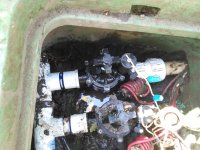
I'm not familiar with Hardie valves, but after a bit of searching, I think I have found the latest version of my valve. Its not an exact match, but very close. Hopefully someone with familiarity with Hardie can confirm. Here is a picture and parts breakdown:

https://www.irrigationdirect.com/pr...-repair-parts/hardie-100-series-1-1-12-valves
Leak #1: Looks to me like if I just replace the o-ring (item #2), that should cure the flow control valve stem leak, yes? Also, should the valve start working after that, or could it be another problem, like a bad diaphragm (item 12 in the link)?

Leak #2: What's the best way to plug up a leak like this? Apply sealant/epoxy around the joint (360 degrees)? What's the best epoxy/sealant to use? Or is there another solution?

Thanks in advance. All help is appreciated.
 

Attachments

  • 008.jpg
    008.jpg
    112.7 KB · Views: 653

Dj2

In the Trades
Messages
2,611
Reaction score
258
Points
83
Location
California
1. You can try the O ring, but if it continues leaking, replace the valve (cheaper than playing around with various parts without solving the leak). The valve should only work when it "gets" the order to open. If it leaks when you open the control, replace the valve (again, not worth the price of parts).

2. I never use sealants or glues in a situation like this. Rather, unscrew the valve, put at least 7 rounds of white Teflon tape on the male adapter and put the valve back on.

Something about plastic irrigation valves: they are not that dependable. Maybe this is a good opportunity to switch to brass (Champion valves). Another thing to consider: switch to a copper manifold water supply to the valves. Expensive investment? yes. Worth it? yes.
 

Flapper

Member
Messages
516
Reaction score
27
Points
18
Location
California
Leak 1 can be easily fixed by rebuilding the valve/replacing parts.
Leak 2 must be fixed by reconnecting the valve. Patching rarely works. It will leak and it would be more difficult to fix because you put epoxy putty and whatever crap on it.
Try to find out if you can unscrew the valve when you take the parts out; see if the height of the body will fit between the other valves. Otherwise you'll need to cut it and rig something up.
 

Flapper

Member
Messages
516
Reaction score
27
Points
18
Location
California
Fix leak 2 first; you'll probably replace the entire valve. If you get a picture of the whole box then we can figure out what you can do.
 

Flapper

Member
Messages
516
Reaction score
27
Points
18
Location
California
Something about plastic irrigation valves: they are not that dependable. Maybe this is a good opportunity to switch to brass (Champion valves). Another thing to consider: switch to a copper manifold water supply to the valves. Expensive investment? yes. Worth it? yes.
How is copper pipe and brass valves better? They're super expensive but they still have the rubber parts that go bad.
 

Jvstevens

Member
Messages
73
Reaction score
2
Points
8
Location
California
Leak 1 can be easily fixed by rebuilding the valve/replacing parts.
Leak 2 must be fixed by reconnecting the valve. Patching rarely works. It will leak and it would be more difficult to fix because you put epoxy putty and whatever crap on it.
Try to find out if you can unscrew the valve when you take the parts out; see if the height of the body will fit between the other valves. Otherwise you'll need to cut it and rig something up.

I agree about Leak 1. Do you think replacing the o-ring will solve the problem? Or should I order a new diaphragm?

As far as Leak 2, I agree that reconnecting the valve is the best way, and I would do that except that I don't think I could unthread it out. It would interfere with valve #2, as they're so close together. And there is not enough spare pipe at the inlet to slip on a new male adapter, if I were to cut it out. I would end up having to rebuild a whole new inlet manifold, I'm afraid. That's why I'm desperately trying to find a solution for patching the leak. Perhaps if I was able to apply some sort of epoxy patch, and could get it down to a very slow leak, it would eventually plug itself up completely with minerals, etc after a few weeks/months?
 

Flapper

Member
Messages
516
Reaction score
27
Points
18
Location
California
I agree about Leak 1. Do you think replacing the o-ring will solve the problem? Or should I order a new diaphragm?

As far as Leak 2, I agree that reconnecting the valve is the best way, and I would do that except that I don't think I could unthread it out. It would interfere with valve #2, as they're so close together. And there is not enough spare pipe at the inlet to slip on a new male adapter, if I were to cut it out. I would end up having to rebuild a whole new inlet manifold, I'm afraid. That's why I'm desperately trying to find a solution for patching the leak. Perhaps if I was able to apply some sort of epoxy patch, and could get it down to a very slow leak, it would eventually plug itself up completely with minerals, etc after a few weeks/months?

You do not have to rebuild the manifold. As long as you have pipe or pipe thread at both ends, that you can connect to, there is always a way.
If you have enough upward space, you can put an elbow and do your thing above.

The patch will not plug itself anytime soon, instead it will leak hundreds or thousands of gallons of water and cost you lots of $$$; you'd be better off hiring a professional to redo everything.
That's if it leaks; it may work but it's not very likely. But it would make it a whole lot more difficult to fix. That's why you shouldn't do it.
 

Flapper

Member
Messages
516
Reaction score
27
Points
18
Location
California
So what do you have there? I can see a tee, then a male adapter right after it, to the valve, but what's after the valve buried in the dirt? Can you get a better picture?

One method is to put a threaded tee on that male adapter, then put a nipple going upwards, threaded elbow, close nipple, valve, then elbow going back down and connecting to whatever is on the other side. You can also go diagonally for more pipe space.
If that fails, you can always use flexible connectors (water heater connectors).
Many ways to do it, you just need to figure something out, but it's not impossible.

I recently had to change a leaking pressure regulator and a broken filter in an irrigation box. I had to cut the filter to remove it. The body of the new filter was too big to screw in and the total length with a new regulator was different... so instead I got an all-in-one filter and regulator and finally solved it.
IMG_2251.jpg IMG_2252.jpg

As for patching... I had a failed solder project with two failed threaded connections and one failed solder joint... I patched the solder joint with silicone tape and hose clamps and that worked, but the threaded connections were harder; I tried tape and hose clamps first but it didn't work so then I tried epoxy putty which worked on the left side but not on the right side. I tried many times to patch it but couldn't stop the leak. Then the patched solder joint started leaking again.
I also thought it would build up mineral deposits and plug itself but nope that wouldn't happen any time soon.

IMG_1675 main valve.JPG IMG_1254 main valve.JPG IMG_1738 main valve.JPG
 
Last edited:

Jvstevens

Member
Messages
73
Reaction score
2
Points
8
Location
California
So what do you have there? I can see a tee, then a male adapter right after it, to the valve, but what's after the valve buried in the dirt? Can you get a better picture?

One method is to put a threaded tee on that male adapter, then put a nipple going upwards, threaded elbow, close nipple, valve, then elbow going back down and connecting to whatever is on the other side. You can also go diagonally for more pipe space.
If that fails, you can always use flexible connectors (water heater connectors).
Many ways to do it, you just need to figure something out, but it's not impossible.

I recently had to change a leaking pressure regulator and a broken filter in an irrigation box. The filter body was too large to unscrew and the drip tube was outside of the box; only the threads of the adapter were sticking in. It took a while but I finally figured it out.
View attachment 35644 View attachment 35643

I took that picture before I dug out the outlet end of the valve. Basically, its another male adapter screwed into the valve, followed by PVC pipe to the sprinklers. Very little PVC pipe is exposed at the outlet end, as its in an irrigation box. The lawn begins right at the outlet edge of the box. So, if I needed some exposed pipe to attach a repair coupling, I'd likely have to dig out a little bit of the lawn. Not the end of the world, but a pain nonetheless.
 

Flapper

Member
Messages
516
Reaction score
27
Points
18
Location
California
I took that picture before I dug out the outlet end of the valve. Basically, its another male adapter screwed into the valve, followed by PVC pipe to the sprinklers. Very little PVC pipe is exposed at the outlet end, as its in an irrigation box. The lawn begins right at the outlet edge of the box. So, if I needed some exposed pipe to attach a repair coupling, I'd likely have to dig out a little bit of the lawn. Not the end of the world, but a pain nonetheless.
Ok so how many inches of bare pipe do you have between the adapter and the wall of the box?
There are many ways to do it. Maybe use some unions. Maybe a slip coupling if there's space. Maybe use an Orbit PVC-Lock fitting. Or do it with elbows. But if all else fails, or you can't figure it out and/or want to get it finished, you can always use flexible connectors.
 

Jvstevens

Member
Messages
73
Reaction score
2
Points
8
Location
California
Ok so how many inches of bare pipe do you have between the adapter and the wall of the box?
There are many ways to do it. Maybe use some unions. Maybe a slip coupling if there's space. Maybe use an Orbit PVC-Lock fitting. Or do it with elbows. But if all else fails, or you can't figure it out and/or want to get it finished, you can always use flexible connectors.

I don't recall exactly how many inches of bare pipe there is. Maybe two at most? Anyway, thanks a lot for your tips and pictures, I think I can make it work without too much trouble. I will skip the epoxy/sealant idea afterall. I have tried that before myself on other projects, and was never able to get a really leakproof connection. I guess I always assumed someone had come up with a more reliable solution, but its still problematic I guess. They can put a man on the moon, but.....

ETA: I also just realized if there isn't clearance to unthread the valve, I can cut the valve at the inlet and outlet ports, then unscrew the cut pieces out of the male adapters and go from there. Course, that means buy a whole new inline valve, but they're relatively cheap these days.
 

Jvstevens

Member
Messages
73
Reaction score
2
Points
8
Location
California
Thought I would post an update. After I removed the bonnet from the leaky valve by unscrewing the six screws, and cut about 1/2" of the PVC pipe at the valve outlet I was able to unthread the valve from its inlet male adapter. There was just *barely* any clearance to the adjacent valve...and in fact it did slightly "kiss" the adjacent valve during the unthreading process. If it was even 1/8" closer, the repair would have gotten a LOT more complicated. Anyway, got it off, cleaned everything up, reapplied several layers of Teflon tape to the male adapter and screwed it back in. Then, I used a compression repair coupling with a 1" male adapter at one end to reconnect the outlet side of the valve to the PVC pipe. I had to cut a little bit of the green irrigation box and dig out some mud behind it to get enough clearance to install the repair coupling, but that was no big deal. Reinstalled the bonnet, turned the water back on, and... voila...no leaks! So glad I did it this way, rather than fuss with trying to stop the leak with glue, etc.

The problem with the #3 valve was a broken diaphragm stem. It came out in two pieces. I have a new diaphragm on order and it should arrive tomorrow. The guy at plumbing shop said the valve manufacturers are slowly doing away with selling parts for irrigation valves. Pretty soon you'll have to replace the entire valve to fix it!

Anyway, thanks to everyone for your help, especially flapper for his good advice. FYI, I've attached a picture of the repair.
 

Attachments

  • Hardie valve.jpg
    Hardie valve.jpg
    103.4 KB · Views: 896
Top
Hey, wait a minute.

This is awkward, but...

It looks like you're using an ad blocker. We get it, but (1) terrylove.com can't live without ads, and (2) ad blockers can cause issues with videos and comments. If you'd like to support the site, please allow ads.

If any particular ad is your REASON for blocking ads, please let us know. We might be able to do something about it. Thanks.
I've Disabled AdBlock    No Thanks