*^%$*% toilet phlange

Users who are viewing this thread

duct tape pro

New Member
Messages
31
Reaction score
0
Points
0
Location
Edmonchuk Alberta
In the midst of bathroom reno.

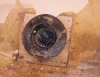
Finally got subfloor out except around phlange.

Unscrewed anchor screws for phlange and thought it would just lift out.

Noooo to easy... the whole pipe will move around about a inch or so up and down, but I can't see anything holding it.

I am starting to guess that this is glued in (pvc on pvc).
Is there an easy way to get this thing out without cutting through to beams and cutting from below?

Thx in adv.

J
 

hj

Master Plumber
Messages
33,603
Reaction score
1,042
Points
113
Location
Cave Creek, Arizona
Website
www.terrylove.com
Flange, not phlange

A plumber might be able to do it, but I would not give you the process because it takes as much experience as it does skill, and while you could read the instructions, you do not have the experience necessary to follow them to the letter. And it is possible that even a plumber would have a problem, but at least if he did he would know how to fix it.
 

duct tape pro

New Member
Messages
31
Reaction score
0
Points
0
Location
Edmonchuk Alberta
lino's up, here's a pix

suggestions on what to do? (pix attached)

After last post I pulled off lino from around phlange.
Found out there's a hunk of wood around the phlange rather than crappy particle board.

If final goal is for tile, and obviously now trying to use same phlange I'm looking for suggestions on how to proceed.
Wood is 1/2" thick.

Here's what I'm thinking so far so please correct obvius errors.

Screws holding phlange were slightly stripped. drill and put in plastic plugs in holes where screws were and re-seat.
Put 1/2" plywood over rest of floor to match height.
Lay over 1/8" cement panel to isolate floor for tiles and here's where I get stuck. Over the existing phlange? up to phlange?
For tiles I've read in another post to notch tiles to allow anchor screws through.

Help??!!


TIA,

J
 

Attachments

  • P1010148.JPG
    P1010148.JPG
    90.9 KB · Views: 883

Terry

The Plumbing Wizard
Staff member
Messages
29,942
Reaction score
3,459
Points
113
Location
Bothell, Washington
Website
terrylove.com
If you use the existing flange, you can drill some more holes through it and find solid wood beneath.

Or a repair flange over the top. Some of those have the screw holes outside the flange.

The flooring cut be cut around the flange, no flooring over the flange.

What you have is ABS, solvent glued together.
If you replace the flange, it would need to be cut with room for a coupling below, or to be split off, and removed.
Like hj says, this is something you can show someone, but not describe.
 

duct tape pro

New Member
Messages
31
Reaction score
0
Points
0
Location
Edmonchuk Alberta
HI,
Thx 4 reply.

I'll repeat in my own words to see how badly I screw this up.
Anchor existing phlange to the piece of wood that's there.

Put in 1/2" subfloor to match height of existing piece of wood around phlange.
Place 1/8" concrete as stable *platform* for the ceramic tile to go onto.

Lay in the tile and buy/install some sort of retro-fit phlange that will in some way go on top of the existing one.
(I'm assuming there's some varying designs of these at Home Depot or other such places).

If there's a better brand or design of retrofit phlange please let me know so I can buy the best that can be had.
(only want to do this stuff once. Always Quality over price for me.)

Thx again,

J
 

Jadnashua

Retired Defense Industry Engineer xxx
Messages
32,770
Reaction score
1,190
Points
113
Location
New England
I've not seen 1/8" cement board. Generally available in either 1/4" or 1/2". An alternative to cbu is a membrane such as Ditra from www.schluter.com. It is only about 1/8" thick.

Before you tile things, you really check to see if the floor joists are stiff enough to allow it to survive. Many people mistake the size of the room with the unsupported joist length - you need to know where load-bearing walls, rim joists, or beams are underneath the room you are going to tile, as the floow will deflect between those points, not just stop at the room walls.

When you install the second layer of ply, you want both sides C-grade or better (i.e., no D faces), and for it to have exterior rated glue. Install it offset from the first layer by about 1/4-span on the distance between the joists (nominally 4") so that the joints don't align with those below. Try to avoid screwing into the joists.
 

duct tape pro

New Member
Messages
31
Reaction score
0
Points
0
Location
Edmonchuk Alberta
Hi,
Deflecto says I'm good for tile but not stone. (whew!).

I meant to put 1/4...oops.

So new question then.

Assuming what I said about floor level then adding the secondary phlange to the first one, which is the better way to go, cement board or the schluter sheets for floor tile? (easier to use, or better sturdier results are my areas of interest.)

Thx again, gotta luv this place for info for us challenged folks.:D

J
 

Jadnashua

Retired Defense Industry Engineer xxx
Messages
32,770
Reaction score
1,190
Points
113
Location
New England
You can carry all the Ditra you need under one arm, don't need screws or tape for the seams, and it works better. Cuts easier (scissors or a sharp knife), and goes down quicker. It does cost more (not that much, especially for a small floor). Most HD's carry it in smaller rolls, about 60 sq ft if I remember correctly for about $60. tile stores will sell it in larger rolls, but a few might cut exactly what you need off of a roll, but most won't.
 

hj

Master Plumber
Messages
33,603
Reaction score
1,042
Points
113
Location
Cave Creek, Arizona
Website
www.terrylove.com
flange

You have the worst possible situation because you have a 3" pipe which precludes making an easy replacement, and an all plastic flange which appears to be about to crack. I would have a plumber replace it.
 

duct tape pro

New Member
Messages
31
Reaction score
0
Points
0
Location
Edmonchuk Alberta
update

HI,
Went to HD and picked up this flange gizmo (see pix) before hj's reply.

Q1. Is this what was mentioned earlier today?
It comes with 2" screws to anchor to the wood, T bolts and two thicknesses of quarter and half inch with a foam seal built into it.

Was also looking at the toilet I am wanting to put in afterwards. It says 12" rough in.
Q2 I am guessing that means 12" from wall to hole centre, correct?

It seems I can never get a simple repair job... I picked up a exhaust fan 9X9 only to find out my existing one was 8X8 after I took the cover off. HD has no 8X8 fans, so I guess I'll crawl into my very hot attic one of these days to cut a bigger hole for that too.

hj, it's really tough to get a plumber in our area to come out for little jobs as they're all busy building new houses where there's big $ at the moment in our area. I had a pipe spring a leak last winter in the basement, and wound up with some guy who'd been packing wrenches for about 6 months. In our area, if you have a pulse, you can get a very good paying job, just for showing up and breathing...sad but true.
:confused:
Q3. Does this kit good enough that I don't have to track down a plumber or . . . ?

From reading what's here and on the package, the flange height needs to be slightly higher than floors final height.
 

Attachments

  • P1010149.JPG
    P1010149.JPG
    88.6 KB · Views: 890

Cass

Plumber
Messages
5,947
Reaction score
7
Points
0
Location
Ohio
The flange normaly sits on and is anchored directly to the floor and subfloor.

12" rough in is 12" from finished wall to center of drain

Your spacer kit should get you high enough above floor for 1 wax ring to work right.

Use a good quality caulk like Phenoseal between the spacers and allow it to dry out well B 4 setting the toilet.
 
Last edited:

duct tape pro

New Member
Messages
31
Reaction score
0
Points
0
Location
Edmonchuk Alberta
Hi,
So will this <kit> work good enough I don't need a plumber to fix up the weak existing flange, or by putting this on top with 2" screws give it good enough strength that no plumber needed now or still needed?

TIA

J
 
Last edited:

Master Plumber Mark

Sensitivity trainer and plumber of mens souls
Messages
5,538
Reaction score
357
Points
83
Location
indianapolis indiana - land of the free, home of
Website
www.weilhammerplumbing.com
cut it out and start over

if the floor is solid and you ahve good wood
to bolt to , that spacer flange might work.....

if you are screwing down into crummey wood,
just forget about it...


if you can get under that area it might jsut be as easy
to cut off that pvc flange some-where down stream and
simply start over after you have repaired the wood floor

its your gamble on how well it bolts down and
how wobblew the final thing turns out
 

Dunbar Plumbing

Master Plumber
Messages
2,920
Reaction score
10
Points
0
Location
Northern Kentucky/Greater Cincinnati Area
Website
www.KoldBreeze.com
I never use spacers, that caulk can break down over time. Using wax between the spacers will work but I just blow off customers that want that fix; I tell them the only way I'm touching it is if I can bring it back to industry standard. No long bolts, no spacers, no double rings. Protects me down the road and I don't get the callback that it's leaking again.
 

duct tape pro

New Member
Messages
31
Reaction score
0
Points
0
Location
Edmonchuk Alberta
jadnashua said:
I've not seen 1/8" cement board. Generally available in either 1/4" or 1/2". An alternative to cbu is a membrane such as Ditra from www.schluter.com. It is only about 1/8" thick.

Before you tile things, you really check to see if the floor joists are stiff enough to allow it to survive. Many people mistake the size of the room with the unsupported joist length - you need to know where load-bearing walls, rim joists, or beams are underneath the room you are going to tile, as the floow will deflect between those points, not just stop at the room walls.

When you install the second layer of ply, you want both sides C-grade or better (i.e., no D faces), and for it to have exterior rated glue. Install it offset from the first layer by about 1/4-span on the distance between the joists (nominally 4") so that the joints don't align with those below. Try to avoid screwing into the joists.

Hi,
OK, not going with cement board then...

so went looking for 5/8 T&G C grade exterior glue and two H Depots in my area didn't have any today.

The closest thing they had in inventory was 5/8 T&G OSB ext. glue...

My original thought is that this is likely not good enough as substrate for what I want. But since I'm usually wrong I thought I'd ask here where someone can likely confirm that the OSB is or is not good enough for the subrate for tile.

As always, thx again in adv. Everybody's assistance is appreciated...

J:D
 

Geniescience

Homeowner
Messages
2,137
Reaction score
4
Points
0
Location
humid summers hot, humid winters cold
with membrane

you still need to cover it with 1/4" CBU, or 1/8" Ditra, or some other tile-ready membrane. Some membranes are only 1/16" thick, like "peel and stick" or a Noble product whose name i forget right now. (I get the impression you need to save on height, for your phlnage.) The membrane is to decouple the wood product from the tile cement. The wood product is to provide the strength between joists 16" OC.

Any 5/8" layer is too thin in almost every case-- should i reread the thread and find out whether you have another layer of ply already down? I think I read somewhere above that you have "wood 1/2" thick already. What is that wood? Or, were you planning on putting down two layers of 5/8" OSB? The best OSBs are as good as plywoods, for several purposes. I can't say for 100% certain that this OSB will work here. I'd feel comfortable using it only as the top layer (second of two layers) screwed into plywood screwed into joists :confused: . Stay tuned.

david
 
Last edited:

Jadnashua

Retired Defense Industry Engineer xxx
Messages
32,770
Reaction score
1,190
Points
113
Location
New England
The absolute minimum for ceramic tile that meets the specs is 5/8", but most people want more than the absolute minimum - this also assumes a perfect installation, which most people don't do (thus the slightly thicker stuff is preferred). If you are going with stone tile, then you always need a second layer, 3/8" is the minimum for a second layer. If you are going to go that thin on the subfloor (and more would be better), I highly recommend an antifracture membrane like Ditra rather than cbu on your floor.

Some people don't like osb, but if it is rated for a subfloor and you don't get it wet, it should meet the minimum...again, most people don't like the minimum when they are doing that much work - a little bit of margin is preferable. Also, watch your thinset as some aren't spec'ed for osb, while some are. Trying to make the two floors match height exactly should take a back seat to having an install that will last. A properly done transition isn't really a big deal.
 

duct tape pro

New Member
Messages
31
Reaction score
0
Points
0
Location
Edmonchuk Alberta
geniescience said:
you still need to cover it with 1/4" CBU, or 1/8" Ditra, or some other tile-ready membrane. Some membranes are only 1/16" thick, like "peel and stick" or a Noble product whose name i forget right now. (I get the impression you need to save on height, for your phlnage.) The membrane is to decouple the wood product from the tile cement. The wood product is to provide the strength between joists 16" OC.

Any 5/8" layer is too thin in almost every case-- should i reread the thread and find out whether you have another layer of ply already down? I think I read somewhere above that you have "wood 1/2" thick already. What is that wood? Or, were you planning on putting down two layers of 5/8" OSB? The best OSBs are as good as plywoods, for several purposes. I can't say for 100% certain that this OSB will work here. I'd feel comfortable using it only as the top layer (second of two layers) screwed into plywood screwed into joists :confused: . Stay tuned.

david
There is already 1/2 " fir plywood under that which I'm wanting to put in.

That would make my total thickness 1 1/8" thick. Yes it's the flange that things are trying to revolve around.
When tiling, I shouldn't run tile right up to tub or walls correct? I should leave 1/8" from all walls and fill with caulking so there is no pressure points?
Just wondering on that...
TIA
J
 
Last edited:
Top
Hey, wait a minute.

This is awkward, but...

It looks like you're using an ad blocker. We get it, but (1) terrylove.com can't live without ads, and (2) ad blockers can cause issues with videos and comments. If you'd like to support the site, please allow ads.

If any particular ad is your REASON for blocking ads, please let us know. We might be able to do something about it. Thanks.
I've Disabled AdBlock    No Thanks