Stevemac00
New Member
I started a thread several months ago https://terrylove.com/forums/index.php?threads/whats-wrong-with-this-in-wall-geberit-and-duravit-toilet-install.60631/
Terry said no problem but it took months of debate in other threads, plumbers and inspectors before we could cut the pipe. I found a master plumber who understood what I wanted and he and I knocked out the DWV in only four hours.
I wanted to give a shout of thanks for all the responders here who provided the thought-provoking discussions and share some photos in the event someone encounters a similar issue.
This is a very small bathroom (about 8' x 5' plus an original 3' x 3' closet shower). But now we have more function and more room.
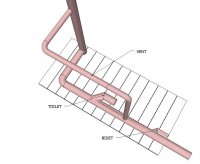 This is the plan which finally got approved except the wyes are horizontal instead of vertical. The vent was required between the bidet and toilet. The lav stayed on a separate drain above the toilet/bidet.
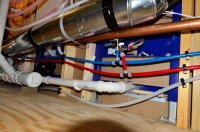 We even got a clean out in the deal. The slope is correct and the street sanitary tee around the corner ended up with the street end right down on the floor (wall plate was cut out and strong-tied) so essentially there was no room to spare. (You can see a lot of clutter because there's a radiant heating manifold and A/C ducts but this is a knee-wall attic with no traffic.)
I couldn't get a Geberit Bidet carrier except for a special order and it was around $600. I bought another Geberit Toilet carrier and used it instead. The mounting holes are the same but unfortunately the bidet drain goes right into the support brace for the bottom of the bidet. (The bidet carrier has an adjustable support but the toilet is fixed.) This was easily fixed with a little "cut-n-splice" as seen in this close up photo.
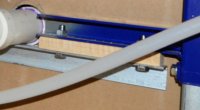 I cut the support and added a galvanized angle steel of 1/8" thickness by using a wood spacer. I cut threads into the Geberit carrier and added second lock nuts on top. (The white line is a hot water circulator dedicated return.)
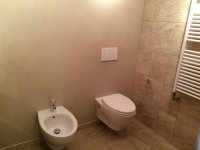
Here's the finished project. We now have more function, additional space and a larger walk-in shower.
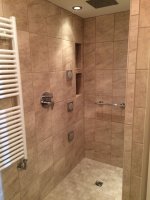
Another note. The tile installer used very small amount of thin-set over Kerdi which messed up my body spray drop-ell mount depths. As I've found on many threads this is a common problem and there's only about 3/32" depth adjustment by over-tightening (it's easier to manage too much depth by using thread string and dope). http://custommold.com/index.php to the rescue. I had custom length brass nipples next day for not much more than stock 1/2" increment nipples. (Cost was about $8 each plus UPS shipping.)
Happy Bath Remodeling (but hope I never do it again)
Terry said no problem but it took months of debate in other threads, plumbers and inspectors before we could cut the pipe. I found a master plumber who understood what I wanted and he and I knocked out the DWV in only four hours.
I wanted to give a shout of thanks for all the responders here who provided the thought-provoking discussions and share some photos in the event someone encounters a similar issue.
This is a very small bathroom (about 8' x 5' plus an original 3' x 3' closet shower). But now we have more function and more room.
 This is the plan which finally got approved except the wyes are horizontal instead of vertical. The vent was required between the bidet and toilet. The lav stayed on a separate drain above the toilet/bidet.
 We even got a clean out in the deal. The slope is correct and the street sanitary tee around the corner ended up with the street end right down on the floor (wall plate was cut out and strong-tied) so essentially there was no room to spare. (You can see a lot of clutter because there's a radiant heating manifold and A/C ducts but this is a knee-wall attic with no traffic.)
I couldn't get a Geberit Bidet carrier except for a special order and it was around $600. I bought another Geberit Toilet carrier and used it instead. The mounting holes are the same but unfortunately the bidet drain goes right into the support brace for the bottom of the bidet. (The bidet carrier has an adjustable support but the toilet is fixed.) This was easily fixed with a little "cut-n-splice" as seen in this close up photo.
 I cut the support and added a galvanized angle steel of 1/8" thickness by using a wood spacer. I cut threads into the Geberit carrier and added second lock nuts on top. (The white line is a hot water circulator dedicated return.)
Here's the finished project. We now have more function, additional space and a larger walk-in shower.


Another note. The tile installer used very small amount of thin-set over Kerdi which messed up my body spray drop-ell mount depths. As I've found on many threads this is a common problem and there's only about 3/32" depth adjustment by over-tightening (it's easier to manage too much depth by using thread string and dope). http://custommold.com/index.php to the rescue. I had custom length brass nipples next day for not much more than stock 1/2" increment nipples. (Cost was about $8 each plus UPS shipping.)
Happy Bath Remodeling (but hope I never do it again)
Last edited by a moderator:
