Shower Valve Options?

Users who are viewing this thread

Yukoner777

Member
Messages
44
Reaction score
0
Points
6
Location
Whitehorse, Yukon
Hi there
After having the plumbing roughed in for fourteen years, I'm finally going to finish the ensuite bathroom. It will have a 4' x 4' shower. Originally it was going to be bigger, with dual showers. But now I plan to have an 8" or 10" rain head and a slide bar mounted shower sprayer.

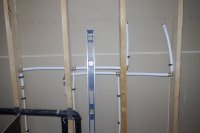
So I've got two 1/2" hot and two 1/2" cold pex lines for the shower. Recently, I teed them so that I now have one 3/4" hot and one 3/4" cold pex line. [see pic]

I thought that I'd use a 3/4" valve for temp control, but from what I've found, the 3/4" valves only have inlets and outlets for metal pipe [IPS on the Moen ExactTemp 3/4" Thermostatic Valve]. Is there a way for me to use the pex pipe on a 3/4" valve?

Alternatively, would it be better for me to utilize all four 1/2" pex lines by having a separate valve for the rain shower head and a separate one for the sprayer?

I'd also like to have volume controls for both heads.

Thanks
Ross
 

Attachments

  • _IGP9174.JPG
    _IGP9174.JPG
    42.4 KB · Views: 1,792

CountryBumkin

Active Member
Messages
915
Reaction score
70
Points
28
Location
Orlando, FL

Yukoner777

Member
Messages
44
Reaction score
0
Points
6
Location
Whitehorse, Yukon
Thanks, CountryBumpkin. First, in case it wasn't painfully obvious, I'm completely new to doing any plumbing except for a few drains. So thanks in advance for any help.

Was it necessary/advantageous to tee the two existing pairs of 1/2" pex lines into 3/4", or should I have just teed them to 1/2"? I'd have lots of water volume behind the 1/2" lines anyway.

Are there valves (temp, flow, and transfer) available that use pex connections, rather than NPT or CC?

I'm also trying to figure out how everything will flow and fit together. If I used the Moen valves, I'm assuming the following:
The first item will be the 3/4" thermostatic valve, with hot and cold lines as input and the mixed temp as output, right. I'd have to use a PEX to NPT fitting on each input.

Next I'd have the volume control valve(s) to control the pressure coming out of whichever head(s) selected. Since this is also NPT, I'd have to run some kind of threaded pipe (?) from the temp valve to the volume control valve(s).

Would I then have a transfer valve(?) to select either the rain head, shower wand, or both. Or instead of the transfer valve, would it be better to just use two volume control valves, one for the rain head and one for the shower wand?
 

CountryBumkin

Active Member
Messages
915
Reaction score
70
Points
28
Location
Orlando, FL
In my shower (I used the same Moen valve). I centered the Temp Control Valve on the wall (hot cold feeding into it of course from PEX) then from the Outlet of the Temp valve, I have PEX again that tees off to feed three control valves (these three valves are equally spaced and centered about 8" above the temp control). The center control valve goes to the Rain head, the left control valve goes to the spray wand, and the right control valve goes to body spray heads. The location of these control valves is up to you, obviously. If you just have a spray wand and a rain head, you might want to just put them to the left and right of the temp control valve.

I'm not sure what you mean by "transfer" valve. The valve you turn to let water come out of spray-wand or shower head is the "control" valve (this valve shuts the water off when rain head is not in use and controls the flow depending on how far the valve is opened).
You are feeding water out of the Temp control valve equally to all the control valves. There is no transfer valve (if I understand your question).

The question about the 1/2 to 3/4 PEX, I think doesn't matter. You won't notice the difference either way, so I would just leave it as is. Replying to your statement in bold - all you need to do is buy some 3/4"NPT to PEX fittings (probably a couple of straight fittings and a couple of 90deg. Coming out of Temp valve and all the Control Valves will have NTP t0 PEX fittings with the PEX hose running in between (such as in my picture).

Here's a couple of pictures:
These things never look too pretty behind the wall.... but I'm proud of the end result.
 
Last edited by a moderator:

Yukoner777

Member
Messages
44
Reaction score
0
Points
6
Location
Whitehorse, Yukon
Wow, beautiful finished product! Your explanation and pics really helped me. So I'll be ordering one thermo valve, two control valves, six 3/4" NPT to 3/4" Pex adapters and two 3/4" NPT to 1/2" Pex adapters (for the outlets of the flow valves).

I guess the "transfer valve" is more commonly called a diverter. Anyway, turns out it's only 1/2". http://www.build.ca/MOE3372

I notice that your stub out for the hand held shower is a threaded 1/2" pipe (brass?). I hadn't thought that far ahead, but now that I see it I realize it needs to be a solidly fastened piece of pipe to attach the shower items. Is that called a 1/2" Drop Ear Elbow that goes from the pex to the pipe? Do you have to cut and thread the pipe yourself to get the right length? Or is the pipe sold in a standard length just for that purpose? How far out past the Durock should the stub out be?

I've used crimp rings for all the pex fittings. You are using a different method. Is there anything wrong with crimp rings?

Thanks again for all your help.
 

CountryBumkin

Active Member
Messages
915
Reaction score
70
Points
28
Location
Orlando, FL
I see now - the diverter valve is like a three-way switch, you can have water flow out the left port or right port, or both ports depending on handle position. I suppose that save some space on the wall. You would still need a on-off valve installed before the diverter. I think it is just as easy and maybe less confusing to guests to just have a separate on-off control valve for each function (shower head, spray wand, body jets).

The hand-held shower wand and body jets use 1/2" threaded brass "nipples" (mine are 2-1/2" long, but yours will depend on the thickness of the backer board and tile and location of the drop ear elbow). You can see in the second picture that there is about an 1" of pipe nipple sticking out and that's before tile. So after the tile is installed there is about a 1/2" of thread showing.
So my setup have five drop-ear-elbows (one for hand-held, one for shower head, three for body jets).

Buy standard length pipe nipples (2-1/2") find out how much needs to stick out past tile (the Moen "fixture" instructions will say how far out the control valve bodies and spray-wand fitting should protrude from tile), then mount the drop ear elbow in the correct place to give you that amount of nipple protrusion. You need to know how thick your tile is (adding a little for grout thickness and Kerdi, if you using it) and the thickness of backer board. So you could have 1/2" nipple protrusion + 1/4" thick tile + 1/2" for grout and Kerdi + 1/2" for Durock = 1-3/4" so you would mount the drop ear elbow 3/4" to 1/2" inside the framing ( considering some of the nipple length is lost inside drop ear when things are assembled/threaded together).

Also, use Teflon tape and pipe dope on the threaded ends going into the valves and elbows. I also suggest you put a tempory pipe cap on the nipples for spray wand and rain head so you can turn on the water and pressure test all the crimps/hose/fittings before you close up the wall.

There is nothing wrong with the crimp ring style.
I just used the "ProPEX Expander" fittings/style. I think it is easier because you don't need to get a crimp tool around the hose while it is installed on the fitting inside the wall. You just put the "plastic PEX expander ring" on the end of the PEX hose, then use the tool to expand it, then you have a a couple of seconds to stick the hose onto the fitting before it tightens up. I was able to do all the expanding outside of the wall then reach in and stick the hose on the fitting. Also with the crimp type there is usually a "gauge" http://www.supplyhouse.com/Viega-53507-3-8-3-4-PEX-Crimp-Caliper-7741000-p that is used to make sure the crimp ring is not installed too tight or too loose. With the Expander style there is no gauge needed - the hose goes on the fitting and it is correct (but it requires an $$ expander tool http://www.supplyhouse.com/Wirsbo-U...nd-Expander-Tool-with-1-23-41-heads-2412000-p).
 

Jadnashua

Retired Defense Industry Engineer xxx
Messages
32,770
Reaction score
1,190
Points
113
Location
New England
1/2" pex will supply a single shower head fine...you may be very disappointed if you try to feed much more than that. Going from a 1/2" supply line to a 3/4" line doesn't really help much...the pipe needs to be bigger all the way back to the supply. The key to all of this is to add up all of the outlets gpm from their spec sheets, and then decide what supply you need to make them work. A showerhead needs enough volume coming into it so that it is at least the minimum stated...IOW, if you add everything up and find they need 6gpm, you need a pipe and valve capable of providing that or more. Keep in mind that 1/2" copper ideally shouldn't be forced to supply more than about 4-5gpm, and pex would supply less. The saving grace on pex is that you tend to use fewer fittings (unlike what was shown in the pictures posted above), and fewer fittings means less friction, and more available pressure and volume. Each fitting adds friction, and reduces the available pressure while in use (pressure is not impacted when no flow).

Water, ideally, should not flow faster than about 5fps in a pipe.
 

Yukoner777

Member
Messages
44
Reaction score
0
Points
6
Location
Whitehorse, Yukon
I see now - the diverter valve is like a three-way switch, you can have water flow out the left port or right port, or both ports depending on handle position. I suppose that save some space on the wall. You would still need a on-off valve installed before the diverter. I think it is just as easy and maybe less confusing to guests to just have a separate on-off control valve for each function (shower head, spray wand, body jets). I agree, it would be better to just use two separate volume controls.

The hand-held shower wand and body jets use 1/2" threaded brass "nipples" (mine are 2-1/2" long, but yours will depend on the thickness of the backer board and tile and location of the drop ear elbow). You can see in the second picture that there is about an 1" of pipe nipple sticking out and that's before tile. So after the tile is installed there is about a 1/2" of thread showing.
So my setup have five drop-ear-elbows (one for hand-held, one for shower head, three for body jets).

Buy standard length pipe nipples (2-1/2") find out how much needs to stick out past tile (the Moen "fixture" instructions will say how far out the control valve bodies and spray-wand fitting should protrude from tile), then mount the drop ear elbow in the correct place to give you that amount of nipple protrusion. You need to know how thick your tile is (adding a little for grout thickness and Kerdi, if you using it) and the thickness of backer board. So you could have 1/2" nipple protrusion + 1/4" thick tile + 1/2" for grout and Kerdi + 1/2" for Durock = 1-3/4" so you would mount the drop ear elbow 3/4" to 1/2" inside the framing ( considering some of the nipple length is lost inside drop ear when things are assembled/threaded together). I get it now. Okay, I'll make sure to add up all the thicknesses to get the correct nipple protrusion.

Also, use Teflon tape and pipe dope on the threaded ends going into the valves and elbows. So wrap the male threads with teflon tape, then coat with pipe dope before screwing it on? I also suggest you put a tempory pipe cap on the nipples for spray wand and rain head so you can turn on the water and pressure test all the crimps/hose/fittings before you close up the wall. Definitely!

There is nothing wrong with the crimp ring style.
I just used the "ProPEX Expander" fittings/style. I think it is easier because you don't need to get a crimp tool around the hose while it is installed on the fitting inside the wall. Ya, they had to be done in a certain order, or else some would be very difficult to get on. You just put the "plastic PEX expander ring" on the end of the PEX hose, then use the tool to expand it, then you have a a couple of seconds to stick the hose onto the fitting before it tightens up. I was able to do all the expanding outside of the wall then reach in and stick the hose on the fitting. Also with the crimp type there is usually a "gauge" http://www.supplyhouse.com/Viega-53507-3-8-3-4-PEX-Crimp-Caliper-7741000-p that is used to make sure the crimp ring is not installed too tight or too loose. With the Expander style there is no gauge needed - the hose goes on the fitting and it is correct (but it requires an $$ expander tool http://www.supplyhouse.com/Wirsbo-U...nd-Expander-Tool-with-1-23-41-heads-2412000-p).
 
Last edited:

Yukoner777

Member
Messages
44
Reaction score
0
Points
6
Location
Whitehorse, Yukon
I see now - the diverter valve is like a three-way switch, you can have water flow out the left port or right port, or both ports depending on handle position. I suppose that save some space on the wall. You would still need a on-off valve installed before the diverter. I think it is just as easy and maybe less confusing to guests to just have a separate on-off control valve for each function (shower head, spray wand, body jets).

The hand-held shower wand and body jets use 1/2" threaded brass "nipples" (mine are 2-1/2" long, but yours will depend on the thickness of the backer board and tile and location of the drop ear elbow). You can see in the second picture that there is about an 1" of pipe nipple sticking out and that's before tile. So after the tile is installed there is about a 1/2" of thread showing.
So my setup have five drop-ear-elbows (one for hand-held, one for shower head, three for body jets).

Buy standard length pipe nipples (2-1/2") find out how much needs to stick out past tile (the Moen "fixture" instructions will say how far out the control valve bodies and spray-wand fitting should protrude from tile), then mount the drop ear elbow in the correct place to give you that amount of nipple protrusion. You need to know how thick your tile is (adding a little for grout thickness and Kerdi, if you using it) and the thickness of backer board. So you could have 1/2" nipple protrusion + 1/4" thick tile + 1/2" for grout and Kerdi + 1/2" for Durock = 1-3/4" so you would mount the drop ear elbow 3/4" to 1/2" inside the framing ( considering some of the nipple length is lost inside drop ear when things are assembled/threaded together).

Also, use Teflon tape and pipe dope on the threaded ends going into the valves and elbows. I also suggest you put a tempory pipe cap on the nipples for spray wand and rain head so you can turn on the water and pressure test all the crimps/hose/fittings before you close up the wall.

There is nothing wrong with the crimp ring style.
I just used the "ProPEX Expander" fittings/style. I think it is easier because you don't need to get a crimp tool around the hose while it is installed on the fitting inside the wall. You just put the "plastic PEX expander ring" on the end of the PEX hose, then use the tool to expand it, then you have a a couple of seconds to stick the hose onto the fitting before it tightens up. I was able to do all the expanding outside of the wall then reach in and stick the hose on the fitting. Also with the crimp type there is usually a "gauge" http://www.supplyhouse.com/Viega-53507-3-8-3-4-PEX-Crimp-Caliper-7741000-p that is used to make sure the crimp ring is not installed too tight or too loose. With the Expander style there is no gauge needed - the hose goes on the fitting and it is correct (but it requires an $$ expander tool http://www.supplyhouse.com/Wirsbo-U...nd-Expander-Tool-with-1-23-41-heads-2412000-p).

Hi again, Mike. I've been busy with other stuff the past year and a bit, but I've been back at the bathroom project for a while and I've now installed the shower valves (following the setup in your pics - thanks a lot for that!!). I'm about to install the drop ear elbow and a 3" nipple for the drop ell. I've factored in the thickness of gyproc, Kerdi, thinset, and tile. But what is puzzling me is how to get the drop ell:
(1) tight enough so it doesn't leak, AND
(2) flush to the tiles, AND
(3) threaded on so that the outlet faces downward.

I've done a couple of test fits and of course the nipple doesn't thread as far, depending on how much thread tape is on it. And the threads for the drop ell are plastic, so I don't want to tighten them too much!

The nipple doesn't seem to want to thread into the drop ear elbow more than about 5/16". Should it be able to thread in a full 1/2"?

Thanks
Ross
 

CountryBumkin

Active Member
Messages
915
Reaction score
70
Points
28
Location
Orlando, FL
The machining of the threads on the nipple and elbow will change the depth of thread engagement. If you were to thread in 5/16 then remove the fitting, the next time you thread it in it will go in deeper. Is 5/16 getting you at least two full turns of the nipple into the elbow? If so I think that you will be fine. There is really no pressure on the handheld piping since the "shower head" end is always open.

I'm not a professional plumber.
 

Reach4

Well-Known Member
Messages
38,863
Reaction score
4,430
Points
113
Location
IL
(1) tight enough so it doesn't leak, AND
(2) flush to the tiles, AND
(3) threaded on so that the outlet faces downward.
On many fixtures, you don't need to be that close -- there is a range of depth that works fine. Are you talking about a diverter spout, or what? If you have something that is more critical, be prepared to use a different-length nipple if necessary. You can use a galvanized nipple for a test fit or temporary use. Then once you know the needed size, order up a brass nipple to the nearest 1/4 inch length. Or you could get a pipe die, then cut and thread as needed.

And the threads for the drop ell are plastic
What? That does not sound like a good idea. I would worry too.


I
 

Yukoner777

Member
Messages
44
Reaction score
0
Points
6
Location
Whitehorse, Yukon
Right, I hadn't realized that there is no water pressure on that connection, as the volume control valve is used to turn on the handheld shower.

The drop ell is a Moen product (A725BN) and cost about $50. The shell is metal, but maybe the threaded part is nylon, not plastic; I'm not sure. Either way, I certainly don't want to tighten it much. But as Mike pointed out, there's no water pressure on it, so it's much less of an issue than I was thinking.

I'll get it as close as I can, then when it comes time to thread the drop ell on, if the outlet is not pointing downward or is not flush to the tile, I'll crank on the nipple however much is needed to get the drop ell lined up.

I'll be using thread tape and pipe dope. I guess it's okay to retighten the nipple several days later - the pipe dope will still seal?
a725bn.jpg
 

Reach4

Well-Known Member
Messages
38,863
Reaction score
4,430
Points
113
Location
IL
The drop ell is a Moen product (A725BN)
Gotcha. I thought you were leaving out "ear" as an abreviation, and you are using something totally different.
I was thinking of something like this... I don't know about that device. Ignore my commants on nipples.
bpf8001-03.jpg
 

Yukoner777

Member
Messages
44
Reaction score
0
Points
6
Location
Whitehorse, Yukon
Ya, my pex supply line from the volume control valve connects to one of those drop ear elbows, which has the 3" nipple threaded into it. The Drop Ell is the trim piece.
 
Top
Hey, wait a minute.

This is awkward, but...

It looks like you're using an ad blocker. We get it, but (1) terrylove.com can't live without ads, and (2) ad blockers can cause issues with videos and comments. If you'd like to support the site, please allow ads.

If any particular ad is your REASON for blocking ads, please let us know. We might be able to do something about it. Thanks.
I've Disabled AdBlock    No Thanks