The problem I have relates to my discovery that I had a shower installed in my house that does not have a liner. Originally when the house was built ~ 25 years ago there was a large PVC tray throughout the shower with a drain in the center. The tray was cut out and only the drain in the center remained (with a small amount of the tray left). Tiling was then done---two layers of tile on top of the wood sub floor (it is on the second floor). I have removed all walls (green-board) and the tiling on shower floor to reveal the thin set on top of the plywood. I have cut out a section of this plywood sub floor (5/8 " inch) around the drain. I then removed the existing drain by cutting the rising pipe horizontally from the side. On doing measurements with respect to a new drain installation I found that I had to remove the P2 trap so I removed from the system by vertically cutting a rectangular section of the downstream pipe.
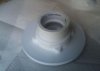
I will cut a new section of plywood to fit it over the rectangular hole created between 2 adjacent joists. The new section of plywood will have a circular hole cut out to accommodate the new shower drain (see photo shower drain).
Questions I have:
How best to fit the new shower drain plus new plywood section over the hole created in the original plywood.
First what I am thinking is to connect up the new P2 trap to the existing drain pipe downstream. The new rising pipe will be fitted into place into the P2 trap and finally up into the shower drain. { I am aware that dry fitting the pipe joints leads to the joint not being closed up completely, but when using adhesive the fitting goes all the way up into the union}.
The new section of plywood will be fitted into the vacant plywood section and the shower drain base will be fitted into the hole cut in the plywood to accommodate the drain.
Now the final plumbing step is using applied adhesive to push the shower drain over the rising pipe, twist and set horizontally with a level. You can see the line I marked for the dry fitting inside the shower drain. In order to twist the shower drain then it must be sitting over the plywood and you have to be able to rotate it while pushing down over the rising pipe leading to the P2 trap. In this case the rising pipe will not fit all the way up into the shower drain base joint, but will probably go up a little more than dry marked as per photo. Any comment on how much it will go up? As the rising pipe moves up into the shower drain base then the drain base will move down (do not want the drain base to go down too far!
So how should the shower drain base be placed over the plywood? You can see in the photo the shape of the PVC accommodates 4 the bolt fittings for the shower liner, but I do not think I should use spade bits on the plywood to accommodate these 4 shapes on the hole , since then if placed as such into the plywood then I could not twist the shower drain when fitting it with adhesive into the rising pipe.
Another issue is how to immobilize the rising pipe plus P2 trap while securing the shower drain over the rising pipe below the new section of the plywood. I will not be able to access it by hand, since the new plywood will be in place. Underneath the sub floor ( and below P2 trap) is a sheet of 3/8" plywood so the trap could be clamped to that.
I am aware that the mud prepan over the plywood will support the shower drain base.
Comments are welcome on this plan, strategy and the issues raised.
emil