Sayco Shower Diverter Problem/Question

Users who are viewing this thread

Snovicki

New Member
Messages
1
Reaction score
0
Points
0
Location
Michigan
I realize this is a 7 year old thread, but did this ever get resolved? I have the same issue
 

JustShootMe

New Member
Messages
3
Reaction score
0
Points
0
Location
Michigan
FWIW: We solved a diverter problem in my 60-something year-old Briggs by putting in a spout with pull-up diverter and leaving the original diverter open. It works just fine. I don't know why. In this case, the diverter seat was destroyed by efforts to remove it and replace it. The diverter never had a removable seat, but the Danco rebuild kit specifically for Briggs came with one. Neither contractors nor plumbing guys knew about this. I talked to Briggs and to Sayco, which is Briggs' arm for everything but toilets. Briggs uses its own brand only for toilets. The company offered to sell me the entire valve body (but in brass), plus seats/stems/handles, for around the same price as the $100 Danco kit.
 

Jeff Schindler

New Member
Messages
3
Reaction score
0
Points
1
I also have the *exact* same problem (I could've easily authored this same thread). Is this just bad design by Sayco? As far as I can tell, there is *no way* that valve is coming out no matter what. I am at the exactly same place as this poster got to. Anyone with any advice at all?

For anyone who runs into this issue - turns out I had cranked the old diverter valve so hard in my attempts to remove it, that a squashed bushing from the valve itself was the mystery object preventing it from coming out. I ended up having to carefully drill at it with a titanium bit to break it apart and the valve finally came out. That was a "learning experience", as they say, amongst other things...
 

GA_

New Member
Messages
14
Reaction score
1
Points
3
Location
Georgia
For anyone who runs into this issue - turns out I had cranked the old diverter valve so hard in my attempts to remove it, that a squashed bushing from the valve itself was the mystery object preventing it from coming out. I ended up having to carefully drill at it with a titanium bit to break it apart and the valve finally came out. That was a "learning experience", as they say, amongst other things...
PLEASE provide additional information on how you drilled it out!! PLEASE
I have the exact same problem - Sayco diverter stem will not come out and it looks just like the above photos with the "reddish" piece inside. I can spin the red piece around, but it and the rest of the stem wont come out. I need to get it out because I broke off the end of the old stem try to get the old handle off.
 

Jeff Schindler

New Member
Messages
3
Reaction score
0
Points
1
I feel your pain. It wasn't pretty - I consulted my master plumber brother-in-law and he pretty much said the only way I was getting that out of there was by drilling it into bits. I've attached a pic of what mine looked like pre-drilling. I bought a 1/8" or so titanium bit and carefully drilled around the valve stem so I could slowly break apart the bushing that was sitting back there. It was basically brute force - I just kept drilling bits off until it finally came out. Just be careful not to go too far with the bit that it goes through the pipe! I almost did that. It's not perfect now - I still get some water coming through the spout when the shower is on, but it doesn't leak and I didn't have to pay $300 for a plumber! :) Good luck!
 

Attachments

  • 20140722_122151.jpg
    20140722_122151.jpg
    46.4 KB · Views: 416

GA_

New Member
Messages
14
Reaction score
1
Points
3
Location
Georgia
Jeff- thanks so much for the reply.
How deep did you drill it? All the way through that bushing, or just the front part of it? I'm thinking the bushing is crimped in the middle where it has the slots, which is what is preventing it from coming out so do you need to drill through the crimp?
Do you need a really long drill bit so you can get all the way through the bushing while still seeing what you are doing? Or is there no way to see what you are doing and you just do it by estimating where the end of the bit is?
Would a dremel tool grinding the bushing from the inside work better than a drill bit?
How long did the drilling take? - Just wondering if I am better off just pulling the entire valve and replacing.
 
Last edited:

Jordan Craig

New Member
Messages
1
Reaction score
0
Points
1
Location
Marietta, GA
I am having the EXACT same problem. Having so much trouble. Any help would be so appreciated.

I have tried drilling it out but to no avail. I have worn down the titanium drill bit b/c I have drilled it out so much. I am hesitant to drill into it anymore. Did anybody find another solution or is this the only way???
 

GA_

New Member
Messages
14
Reaction score
1
Points
3
Location
Georgia
I am having the EXACT same problem. Having so much trouble. Any help would be so appreciated.

I have tried drilling it out but to no avail. I have worn down the titanium drill bit b/c I have drilled it out so much. I am hesitant to drill into it anymore. Did anybody find another solution or is this the only way???

I just kept drilling it with a titanium bit. I did not have too much trouble and it did not wear out the bit, so I would be concerned you are drilling something else - drill the reddish ring in photo. I was scared to drill through the mixing valve housing and was very scared the drill would jump and I would mess up the exposed threads, so I resorted to resting the side of the drill bit on the red ring and pressing it in - sort of using the drill bit as a grinder. After about 20 minutes of work, it came apart into small enough pieces that I was able to pull the stem out and then fish the pieces out. The key was breaking the ring so it would no longer hold the stem in. I can't recall exactly but I think I drilled the ring in two places which essentially cut the ring into two pieces. I turned the water on to flush out the inside to make sure I got the big pieces and then used a brush to get the little pieces out of the bottom of the threads.
 

Fixitfaucet

New Member
Messages
3
Reaction score
0
Points
1
Location
North Carolina
4699D795-1DE5-42AE-9BE8-1B095B8C10F7.jpeg
34C321AF-EEAE-4976-9187-F46D57DEC65B.jpeg
I just kept drilling it with a titanium bit. I did not have too much trouble and it did not wear out the bit, so I would be concerned you are drilling something else - drill the reddish ring in photo. I was scared to drill through the mixing valve housing and was very scared the drill would jump and I would mess up the exposed threads, so I resorted to resting the side of the drill bit on the red ring and pressing it in - sort of using the drill bit as a grinder. After about 20 minutes of work, it came apart into small enough pieces that I was able to pull the stem out and then fish the pieces out. The key was breaking the ring so it would no longer hold the stem in. I can't recall exactly but I think I drilled the ring in two places which essentially cut the ring into two pieces. I turned the water on to flush out the inside to make sure I got the big pieces and then used a brush to get the little pieces out of the bottom of the threads.
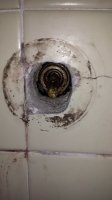
Having the same problem. Any help would be appreciated. See pictures.
 

Fixitfaucet

New Member
Messages
3
Reaction score
0
Points
1
Location
North Carolina
627DE4FC-9AE4-4C94-9C5B-1E389A506B1C.jpeg
FA8D3E0F-02A4-4F99-A123-5D36BD08FDE8.jpeg
I feel your pain. It wasn't pretty - I consulted my master plumber brother-in-law and he pretty much said the only way I was getting that out of there was by drilling it into bits. I've attached a pic of what mine looked like pre-drilling. I bought a 1/8" or so titanium bit and carefully drilled around the valve stem so I could slowly break apart the bushing that was sitting back there. It was basically brute force - I just kept drilling bits off until it finally came out. Just be careful not to go too far with the bit that it goes through the pipe! I almost did that. It's not perfect now - I still get some water coming through the spout when the shower is on, but it doesn't leak and I didn't have to pay $300 for a plumber! :) Good luck!
Having the same issue. Any help would be appreciated.
 
Top
Hey, wait a minute.

This is awkward, but...

It looks like you're using an ad blocker. We get it, but (1) terrylove.com can't live without ads, and (2) ad blockers can cause issues with videos and comments. If you'd like to support the site, please allow ads.

If any particular ad is your REASON for blocking ads, please let us know. We might be able to do something about it. Thanks.
I've Disabled AdBlock    No Thanks