Replacing cast iron sewer with plastic

Users who are viewing this thread

Switchex

New Member
Messages
17
Reaction score
0
Points
1
Location
Maryland
I am trying to replace some old (perhaps 60 or more years) cast iron sewer line that rns into my basement with plastic. I went to Lowes and they have like 3 different brand and colors of pipes that says "sewer" on them .. they were white, green, and gray in color .. i ended up buying the white one because it was the cheapest ($8 / 10 feet pipe).. here are my questions:


1- Do the colors mean anything? What type do u recommend?

2- I have 2 use those black flex rubber coupling that have those screw rings (sorry don't know proper name) in a couple of places .. how tight can i make them? i am afraid that i should have bought the more rigid pipes since i have to use these type of coupling

3- what is the best way to cut the old cast iron pipe .. i am afraid that it would crack .. specially at the end where it eventually goes under the ground ..

Thanks for your help and suggestions.
 

Bob NH

In the Trades
Messages
3,310
Reaction score
9
Points
0
Location
New Hampshire
If you bought white sewer pipe that doesn't say "Schedule 40" or DWV; if it is that thin white stuff that is similar to the kind that has holes in it and used for french drains, then you should take it back and get some that at least says DWV.

Another way you can check is to see if it fits a DWV fitting such as a Wye or Tee.

And your clamps should have a piece of metal that covers the full length of the rubber cylinder.

If it is the right pipe, you will not be able to break it with the clamps.

You can cut the pipe with a chain cutter/snapper device, or you can cut it with an abrasive wheel on an angle grinder. I have also occasionally cut a piece with a very good and heavy duty saber saw. You could probably also do it with a SawZall. I would be more inclined to use a saw or grinder device near the concrete where the consequences of breaking the pipe into the floor are severe.
 

Switchex

New Member
Messages
17
Reaction score
0
Points
1
Location
Maryland
Bob . .thanks for the reply .. no it does not say DWV or schedule 40 .. it does say "sewer line" on it .. i guess i just return it and get the good stuff to be on the safe side .. i am selling the house and want to make sure it will work later .. what does DWV mean anyway?

Also, a couple of my clamps have that metal piece around them so i should be good there .. but i am also using a flex rubber 3 way (t shape) and U shape one .. r those ok to use?

also, i am having a very hard time finding all the pieces that i need .. like transfering a 2 inch pipe to 4 inch .. is it because lowes oe ********* don't have all the stuff? where should i look for my parts?

Thanks for all the help.
 

Bob NH

In the Trades
Messages
3,310
Reaction score
9
Points
0
Location
New Hampshire
DWV means Drain Waste Vent.

I'm not a pro at DWV plumbing, and I'm not familiar with rubber Tees and U shapes, and would suspect that they are not acceptable. You should await feedback from the pros in that area.

You should be able to find 4x2 reducers and such in PVC (the white stuff) or ABS (the black stuff); whichever is used in your region.

You should search some of the older posts here under plumbing to find some examples and pictures. I'm a little concerned that you are on your way to cobbling something together without knowing the right way to do it. It will look like hell to a new buyer if you don't get it right.

Those rubber couplings should have metal wrap their full length, as well as screw clamps at the end.

You would usually use those only where you need to adapt from cast iron to PVC or ABS, and use cemented fittings at all other places. And you can't mix PVC and ABS; use one or the other.

It would be good if you could post some photos and/or sketches here and get suggestions before you start cutting cast iron.
 

Cass

Plumber
Messages
5,947
Reaction score
7
Points
0
Location
Ohio
You didn't mention how much pipe you are trying to replace and we can't see the scope of the work. By the questions asked I would recomend you get a few estimates at having the work done by a plumber. If nothing else you will have an idea of what amount of work realy needs to be done. Don't be afraid to ask questions. Replacing 1 small peice of pipe could end up being a nightmare if you end up having something go wrong that you didn't forsee and then dont have the knowlage or tools to deal with it.
 

Switchex

New Member
Messages
17
Reaction score
0
Points
1
Location
Maryland
Bob, Cass ... i did get an estimate about 6 months ago and it was about $1500 .. the parts will not cost me more that $200 and i can not imagine taking me (a non-professional) more than 10 to 12 hours, IF I have all the right parts!!!! .. basically .there are 2 iron pipes (one 3" and the other 2") that come from the bathroom and kitchen area from the upper floor (10 feet apart) into the basement where they feed into a 4 inch cast iron pipe that runs almost parallel to the basement floor (well, it is sloped and 20 feet later runs into the ground).. it is this pipe that needs to be replaced.

.. since the house is being sold "as is" and the buyer is aware of all that is wrong with it, i am just doing this learn something new .. for me it is just a matter of getting the right parts (and learning proper names for the parts) .. i have jumped into much larger projects .. i will try to take some pictures tonight and post .. thanks again.
 

SteveW

DIY Senior Member
Messages
1,282
Reaction score
22
Points
38
Location
Omaha, NE
Why does this section of cast iron pipe need to be replaced?
Is it corroded? If so, why? What will prevent it from happening again?

Replacing cast iron pipe is not the best DIY project. There may be unexpected consequences -- like the weight of the pipe from the upper stories of the house causing it to shift when you cut out the bad section.

Also, if you do use the flexible tee fittings, etc., and one of them comes loose or springs a leak and floods the basement with sewage, the new owners won't be too happy with you, esp. when they learn that the repair job was not up to code.
 

Switchex

New Member
Messages
17
Reaction score
0
Points
1
Location
Maryland
Steve, it needs to be replaced becasue it is the original pipe and corroded .. it leaks .. i see your concern about the weight ... i realize that i need to support the pipes before cutting any section .. maybe it is a bigger project that i am thinking??!!!
 

Gary Swart

In the Trades
Messages
8,101
Reaction score
84
Points
48
Location
Yakima, WA
Cast iron is extremely heavy and is assembled from the bottom up so the weight is supported by the lower portion. Remove that support and above can and will come crashing down. As evidenced by your lack of knowledge about PVC/ABS drain pipes, I think you may be starting a trip you don't want to go on. If the buyer is taking the place as-is, then let him repair the drain if you don't want to hire it a professinal to do it right.
 

Coach606

New Member
Messages
144
Reaction score
0
Points
0
Location
Illinois
You can maybe do it...

snap_cutter.jpg


It is good advice to be cautious about cutting into your four inch stack. You must buy riser clamps and build a little cage around the pipe to be cut. Use the riser clamps to hold up the cast iron above and below the cut. You don't want that pipe sagging or falling on you.

Secondly, understand that a lot can go wrong, especially with the snap cutters. If the pipe crushes, you will have to saw it out with one of the methods mentioned previously and it is apparently a huge hassle. I believe the possibility of sagging pipes or crushing the pipe rather than snapping it are the two most serious consequences.

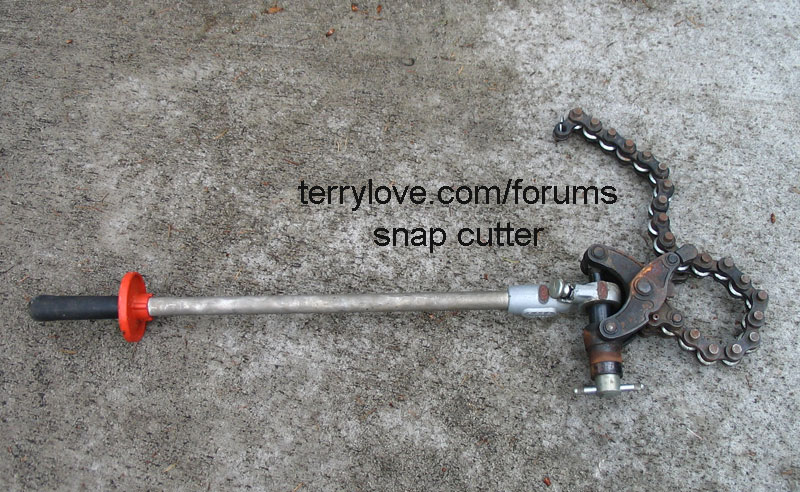
Having recently cut into my 4" cast iron stack to run a new drain line for a new bathroom I can tell you that you should be prepared for these negative outcomes. However, with advice I was able to do it with no problems. Be sure you support the pipes above and below the cut and rent a ratcheting chain cutter. There is really very little involved in using the chain cutter. Just mark your cuts, give yourself some extra room and then tighten the chain.

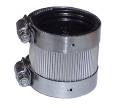
Once you cut out a section of pipe in the stack, Use a pvc wye fitting with some straight pvc pipe glued into the hubs. Then go ahead and use your rubber (no hub) gaskets to connect to the cast iron. Mine work great and I never had any leaks. When you snap the pipe it may not fall right out, even with riser clamps because a bit of weight is still on it. You can make a third cut between the first two, but make it at an angle, Then tap it with a hammer and the piece should fall right out. Be cautious about pieces falling into the cut stack when you use the hammer. I had to retrieve a piece with a telescoping magnet, but it worked.

I went ahead and cut my own stack because I really wanted to do it and felt I could handle it. Many people told me I should hire a pro, but it worked out okay for me. I went ahead partially because there are no guarantees when doing this. You could have a pipe that crushes instead of snaps even if a pro does it. If your pipes sag for some reason or fall, it could happen even to a pro. Then it'll cost you a lot. I figured I'd do my own because what could go wrong for me could also go wrong for a pro. But luckily, things worked out.

You could ask the pros here who do this all the time how often a pipe will crush instead of snap, but I think it's pretty rare. It may happen, but I think most pipes will snap. Just be sure you know what you are doing and that you are prepared for any consequences of what you do.

If you are really ready to accept and deal with the possible outcomes, research it until you feel ready and then go for it. I had some people on other boards who told me I "needed" to hire a pro, etc., for mine, but I just kept researching and when I was comfortable I did it. Took about three hours to cut the pipe and attach the new fitting.

Good luck. Feel free to ask me questions. Since I'm a DIY'er and I just did it I may better understand your questions than a pro who can't remember what it was like to have the kind of questions a newbie has.
 
Last edited by a moderator:

SteveW

DIY Senior Member
Messages
1,282
Reaction score
22
Points
38
Location
Omaha, NE
switchex said:
Also, a couple of my clamps have that metal piece around them so i should be good there .. but i am also using a flex rubber 3 way (t shape) and U shape one .. r those ok to use?

also, i am having a very hard time finding all the pieces that i need .. like transfering a 2 inch pipe to 4 inch .. is it because lowes oe ********* don't have all the stuff? where should i look for my parts?

Thanks for all the help.


Just to be clear about this, there are 2 different types of flexible connectors for DWV pipe. The standard, approved kind consists of a simple "rubber" (probably actually a synthetic material) cylinder, which is covered by a stainless steel band, which is held on by 2 screw clamps. It joins 2 straight pieces of DWV pipe together and is widely used and accepted.

The fittings you are referring to above are actually whole "joints" -- wyes, tees, etc., -- made out of that "rubber" material. I've seen 'em at the home stores. They certainly look tempting, but I suspect they may not be code (I'm not a pro so don't know for sure). I would recommend NOT using these, unless one of the pros here can vouch for them.

RE: where to buy "stuff," if you live in a big enough town, you may have access to a professional plumbing supply house like Ferguson's. I've been to my local Ferguson's several times, and while I feel a little like a fish out of water (not being a pro, and it shows!), they have generally been helpful, and they certainly stock fittings, tools, valves, etc. which you will NEVER see at a regular home store. Much better quality stuff in general (and of course more expensive).
 

mn_nobody

New Member
Messages
18
Reaction score
0
Points
0
hire a professional, this work is way out of scope for a DIY. This is plumber grade material.
 

Coach606

New Member
Messages
144
Reaction score
0
Points
0
Location
Illinois
maybe, maybe not...

He could be right about hiring a pro. But like I said, I did mine. The chain cutter is not very hard to use, nor were the riser clamps. Measuring, cutting and gluing in a pvc wye with shielded no hub couplers was also a fairly easy DIY'er job.

I'd be worried about crushing the pipe near the part that goes into cement, but I'm not sure that's even an issue. Seriously, the snap cutters were EASY to use. Just wrap the chain around your marks and ratchet it tight until you hear a little 'thunk.'

If you can properly support the pipe with riser clamps and the pipe snaps (as I believe most do) you should be fine. Hey, if you're not comfortable hire a pro. But I think a DIY'er can do it. I don't believe it's way out of scope. If things go well it's actually pretty easy.

If the pipe crushes, it would have happened to the plumber, too. So you might was well take a shot before calling him. Mine was 80 years old and snapped easy. I think a plumber will try snap cutters first, too.

If you want to research and are comfortable, it is something a DIY'er can do in my opinion.
 

Switchex

New Member
Messages
17
Reaction score
0
Points
1
Location
Maryland
Thank you All

I did the job! the estimate i had for the job was $1500 and i spent less than $200 and a weekend. The hardest job of the project was supporting the 3 inch cast iron pipe that came from upper floor bathroom perpendicular to the 4" pipe in the basement .. i was so afraid that once i cut it, it would come down bringing the upstaris bathromm down with it .. but i put a couple of U-bolts around the pipe and secured it to the brick wall ..

the chain cutter was no easy to use ... i think the one i rented was a super-heavy-duty .. very very heavy .. the chain it self was almost 2" thick... i suspect there are lighter and smaller ones ..

the pipe did crash in a couple of places where i was doing practice run (i had to cut it in pieces any wy to dispose of later) .. but it worked fine were i really needed it ..

nohub.jpg

This is the proper coupling.

i did cheat by using the rubber coupling that does not have the metal around it .. only becasue my pipe came 1/2 inch short at the end and the rubber without the metal around is much longer .. but i can easily cut the last piece of pipe o extend it and use the other coupling, if i am against the code

Thank you all for your help, suggestions, and support.

I'll be posting my next 2 projects soon. Later.
 
Last edited by a moderator:

Jadnashua

Retired Defense Industry Engineer xxx
Messages
32,771
Reaction score
1,191
Points
113
Location
New England
Banded no-hub inside, fernco burried where the ends can be supported. The steel support keeps the two ends aligned, the other one can offset things and potentially trap things and create a clog.
 

Stainedrat

New Member
Messages
6
Reaction score
0
Points
0
Location
Texas
mn_nobody said:
hire a professional, this work is way out of scope for a DIY. This is plumber grade material.


I have to laugh at this remark. It is a simple job that I could have done before I became a "Professional"
Coach says the truth. Make sure you support the pipe with riser clamps.
The Rubber flexible connectors are of two types. You have the simple connector which is commonly referred to by its major name brand (FernCo) and has 2 hose clamps on it. I recommend you avoid these. Use the No-Hub band connectors (rubber connector with a metal shield and 2-6 hose clamps) and only use these at your transition points. Make sure you use schedule 40 PVC Pipe for the new material. The Green pipe is not rated for the job you want it to perform. The Gray Pipe is more than likely Schedule 80 and much more pipe than what is needed.

As coach says the snapcutters are easy they are but even a "professional" can crush and old pipe with the snap cutters. When you cut the CI by the concrete floor I recommend you use an abrasive tool such as an angle grinder to cut the pipe. This will ensure you don't destroy the pipe and in turn have to do more work than you want. Make sure you use proper PPE (personal protective equipment) i.e. safety glasses, face shield, leather gloves, etc when grinding on the pipe.

Leave the support on the pipe you are not removing, it will be better for everyone in the long run.

One more thing. Selling a house as-is is fine but make sure you disclose what you know regardless, because in this day and time as-is doesnt necessarily protect you from lawsuits.

And frankly if it was me and I was selling the house as-is I'd leave it for the new owners. No sense in spending money on someone else's house.
 

bowenguinan

New Member
Messages
2
Reaction score
0
Points
0
Hi All:

I’m new to this board and felt compelled to reply to this post since it was my number one source for information for a similar problem.

In my case, one side of my house (upstairs bath, kitchen & laundry) kept backing up. Interestingly, these areas were being drained by a 3 inch schedule 40 PVC pipe. Of course, I assumed my problem was where the old met the new. Anyway, it happened again and I opened the cleanout in the laundry area and was surprised that I couldn’t get my de-logging device (the rubber tubes that expand…can’t remember the term at the moment) very far down the line. I started it up anyway and heard water flowing. Problem was, no water flowing when I removed the cap on the vent at the street connection. So, up under the house I go. Come to find out there is a 3 by 2 hole in the cast iron, just down line of the new to old splice.

So, I deactivated that side of the house and started my internet search. This was on Sunday the 17th.

Thanks to the info of this post I felt confident that I could handle the pipe cutter and splice in a section all the way to an area I knew to be sound (under my main downstairs bath). It was a piece of cake! The cutter was very easy to use. I rented it from the Home Dep*t in Reading, Pa and the guys there were very helpful and knowledgeable! They suggested oiling the section that I wanted to splice to for a cleaner cut. I soaked it with WD 40 and made a cut farther upstream just to make sure I was doing it right. Long story short (too late) I was so impressed with that cut and the condition of the pipe that I kept it as my splice area for my No Hub. I cut the other end and hauled about a 15 foot section (with a 90 in the middle of the run) out of the crawl space to make it easier to cut into smaller disposable chunks. Of course the new was easy. 3 inch Schedule 40 coupling to the PVC from the aforementioned areas and the no-hub where it spliced to the cast iron.

All told the job took me less than 2 hours. Cost was about $25.00 for the tool (since I had it less than four hours…would have been $32.00 for 24 hours). Materials were about $35.00.

I did not get a quote from a plumber but I would imagine it would have been no less than $500 just because of the difficulty in accessing the area and, let’s face it, plumbers are in it to make money. I don’t come cheap in my line of work either!

Sorry this is so long winded but the point I’m trying to make is that anyone with the least amount of mechanical aptitude can handle a job like this.

I do have a question to pose to the group, especially the experts. Down stream of my splice is my main bathroom which is all cast iron. The house is about 60 years old; I have every intention of replacing this at a later date just to update. Here is the question, just downstream of this bathroom is the main 4 inch that goes through the basement wall and thus to the street. I have no intention of replacing the buried part (unless I have a problem) but should I replace the four inch all the way to just before it penetrates the wall? The 3inch that I spliced into looked very healthy and I don’t think there is a need but I’d like a professional opinion. The main bathroom was recently updated and PVC was kludged into the cast iron (by the former owners) which is my impetus for replacing all of that.

Thanks for your help and thanks to everyone for the comments that helped me get this job done with such celerity.

Darryl
North Coventry, Pa.
 
Last edited by a moderator:

Terry

The Plumbing Wizard
Staff member
Messages
29,946
Reaction score
3,460
Points
113
Location
Bothell, Washington
Website
terrylove.com
If the existing 3" cast looks fine, then I would guess the 4" looks pretty good too.

You are right about being mechanical and logical.
It's kind of like working with Tinker Toys.
Gee, and they pay me to do this?

And like you say, it was in a crawl space and that pipe is dang heavy.
Gee, They don't pay me enought for this!

But then sometimes I haul 50 pounds on my back up mountain passes, and think, Why do I keep doing this, catch a few fish and think, I don't do this enough.

It's all good.
 

bowenguinan

New Member
Messages
2
Reaction score
0
Points
0
>>>>>Forgive my ignorance to your reference. Is that a reply to my post?<<<<

The above was in response to toolaholic because for some reason Terry your response didn't show up right away. Wierd!

Anyway, thanks for the advice. I'll go ahead with the plan to just replace the toilet flange and all the PVC to the bathroom and everything underneath up to the 4 inch. Would the best plan be to interface to the 4 inch cast iron with a no-hub?

I work with helicopters in conformity as an FAA designee and sometimes ask "and they're paying me for this?" it's like working with BIG toy!

Take care, thanks for the help!

Darryl
 
Last edited:
Top
Hey, wait a minute.

This is awkward, but...

It looks like you're using an ad blocker. We get it, but (1) terrylove.com can't live without ads, and (2) ad blockers can cause issues with videos and comments. If you'd like to support the site, please allow ads.

If any particular ad is your REASON for blocking ads, please let us know. We might be able to do something about it. Thanks.
I've Disabled AdBlock    No Thanks