Hello Forum,
Please note: I am an amateur when it comes to irrigation.
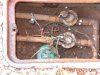
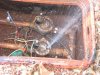
I have a small lawn (around 800 square feet) with an automatic two-zone sprinkler system that got probably installed around 1985. I own the property since eight years and decided today to replace the pop-up sprinklers because they sometime did not pop up correctly or sometimes did not go down correctly. For now I only replaced one zone with four sprinklers and put "Rainbird Sure-Pop 600" in.
Replacing the sprinklers was easy, however, I now have hardly any pressure on that zone (the other zone with the old sprinklers still works ok). After hours of trying this and that top no avail (very frustrating) I finally opened the little screw that is on top of the valve that is in the underground box. I believe that it is some kind of bleed valve (whatever that is ...) - and when I removed this little plastic screw not only came water out of the valve (spraying through the hole for the plastic screw up for about 1 foot) but I also suddenly had all the pressure of the world on the sprinklers. When I then put the plastic screw back on the pressure on the sprinklers got a little less but was still ok. When I then switched the whole system of and on again I had again no pressure on the sprinklers ... like before ... until I removed the plastic screw from the valve again ... and so on.
Can anybody explain what is happening here and what I might have to do to have the system work normally again?
Thanks for your replies!
Greetings - desertman
Please note: I am an amateur when it comes to irrigation.
I have a small lawn (around 800 square feet) with an automatic two-zone sprinkler system that got probably installed around 1985. I own the property since eight years and decided today to replace the pop-up sprinklers because they sometime did not pop up correctly or sometimes did not go down correctly. For now I only replaced one zone with four sprinklers and put "Rainbird Sure-Pop 600" in.
Replacing the sprinklers was easy, however, I now have hardly any pressure on that zone (the other zone with the old sprinklers still works ok). After hours of trying this and that top no avail (very frustrating) I finally opened the little screw that is on top of the valve that is in the underground box. I believe that it is some kind of bleed valve (whatever that is ...) - and when I removed this little plastic screw not only came water out of the valve (spraying through the hole for the plastic screw up for about 1 foot) but I also suddenly had all the pressure of the world on the sprinklers. When I then put the plastic screw back on the pressure on the sprinklers got a little less but was still ok. When I then switched the whole system of and on again I had again no pressure on the sprinklers ... like before ... until I removed the plastic screw from the valve again ... and so on.
Can anybody explain what is happening here and what I might have to do to have the system work normally again?
Thanks for your replies!
Greetings - desertman
")
