Need some advice in my renovation

Users who are viewing this thread

Drewski123

New Member
Messages
47
Reaction score
0
Points
0
Location
Seattle
Need some advice on my renovation

I have listed some of the options / ideas of what I am going to do with each part:

1. Bathroom Ceiling:
Option1:
• 5/8†greenboard
• 6mil plastic sheeting
• on attic side, greenfiber blow-in up to a recommended amount to achieve a high R-Value

Option2:
• 5/8†greenboard
• Faced Fiberglass Insulation Batts (faced down toward the bathroom ceiling)
• On top of batts, greenfiber blown-in to a recommended amount to achieve a high R-Value

Which option would make more sense?

2. Exterior Wall (will have no fixtures / no running pipes, just a window)

• Ultratouch batts
• 6mil plastic sheeting
• 5/8†greenboard (for better insulation)

3. Tub/Shower wall surround:

• No insulation in wall cavities
• 6mil plastic sheeting
• ½†Durock
• Shlutzer Kerdi membrane
• Tiles


4. Also, I will be insulating a garage ceiling, so our bedroom (which is directly above this unheated garage) will be much warmer in the winter months.

• About 2†of insulated sheathing (like XPS, EPS, or Polyiso, etc.)
• Ultratouch batts
• 5/8†Type X Drywall

In terms of insulated foam sheathing, I am not sure which one would be best for this project. Should I use boards that contain laminated facers on both sides, on one side, or neither, just “unfaced� Should I use XPS, EPS, or Polyiso?

Please, advice / comment on all of these above points.
Thank you.
 
Last edited:

Jadnashua

Retired Defense Industry Engineer xxx
Messages
32,770
Reaction score
1,190
Points
113
Location
New England
There's no reason for greenboard on the ceiling...regular drywall is actually stronger, and with a good coat of primer and paint, just as good (actually, the greenboard can droop, whereas the drywall is not likely to).

Where you are adding Kerdi, you don't want another vapor barrier on the wall - this would allow moisture to possibly be trapped between them - only one on any one wall.
 

Dana

In the trades
Messages
7,889
Reaction score
509
Points
113
Location
01609
Blown insulation works better than batts in every real world situation, even when they're equivalent in a lab. Cellulose is a good $/r value, and is a much better air-retardent than low-density fiberglass. In the attic dry-blown is fine, but insist upon "borate only" or "sulfate-free" material (IIRC Greenfiber is still using sulfated fire retardents in their dry-blown product.) All wet-sprayed or "stabilized formula" cellulose is borate-only. Aluminum sulfate can corrode metals if it ever gets wet, but on the upside you'll KNOW if it gets wet by that "eau du cat" litterbox smell. Batts are NEVER installed perfectly, and every void/compression creates a thermal leak and a potential moisture issue.

Also, cellulose protects the structural timber from seasonal moisture drives by wicking & buffering the moisture, something that mineral or glass-fiber products can't do. (Cotton does this as well, but it's more expensive.)

There's no excuse for using true vapor-barriers such as 6mil plastic or metal foil is in a Seattle climate- it's a "solution-problem", that limits wall assembly to drying only to the exterior, and unless you've built the interior-side to be truly air-tight (caulked & gasketed everywhere, blower-door tested) it'll be more likely to trap moisture that gets into the wall/ceiling via air-leaks than it is to protect the sheathing & stud. On the walls, as little as 3/4" of exterior XPS is sufficient to keep the sheathing above the average interior dew point during the coldest months in which case you need nothing more vapor retardent on the interior than standard latex. see: http://www.buildingscience.com/documents/guides-and-manuals/irc-faqs/irc-faq-insulating-sheathing-vapor-retarder-requirements Seattle is in marine zone 4.

With exterior rigid foam the ability to dry toward the exterior is compromised (foil faced goods are more vapor-retardent than 6 mil poly), making keeping the interior side at least semi-permeable even more critical. Concentrate on making the wallboard layer air-tight, caulking as you install it and foaming any electrical or plumbing penetrations, and keep the wall/ceiling as vapor-permeable as latex paint will allow- it'll be far more resiliant to moisture that way.

From a thermal and moisture performance point of view the type of foam used is far less critical than it's R-value relative to the center-cavity fiber's R value. Iso (polyisocynurate) will give you more performance per inch of thickness in a Seattle climate, but XPS isn't far behind. From a total greenliness point of view iso and EPS are more benign than XPS, since they use pentane as the blowing agent rather than the HFC-143 commonly used for XPS, with but a fraction of the greenhouse ozone layer environmental burdens.

Both EPS and XPS gain R with falling temps, being 5-10% higher in R at a average temp of 25F than at 75F number, whereas iso falls by a bit. If your mean January temp was below 25F instead of nearly 40F derating the iso to R5.6/inch down from R6/inch and up-rating EPS from R4/inch to R4.4/inch would be in order but in Seattle you can assume the performance of exterior foam to be pretty close to it's labeled R-value.

Kraft facers on batts are about ~0.5 perms (compared to 2-3 perms for latex paint), and can't be relied upon as an air-barrier by themselves.

Using 1/4" fan-fold XPS siding-underlayment can be used between the gypsum/tile-backer and studs/joists around the tub makes for a ~0.75 perm vapor retarder (about the same perm-rating as Kerdi) and capillary break, an order of magnitude preferable to 0.03-perm 6-mil poly It keeps the peak-event moisture from showering/bathing out of the assembly, but still allows it to dry toward the interior the rest of the time.
 
Last edited:

Drewski123

New Member
Messages
47
Reaction score
0
Points
0
Location
Seattle
Dana, in regards to insulating an unheated garage ceiling, so our bedroom (which is directly above this unheated garage) will be much warmer in the winter months, can I use 1.5†XPS (or EPS) rigid insulation as a first layer, then add Ultratouch batts (8" thick), and lastly 5/8†Type X Drywall?

Is this combination going to work? Should I use faced or unfaced rigid boards?

Thanks for your help,
Andy
 

Dana

In the trades
Messages
7,889
Reaction score
509
Points
113
Location
01609
Batts are kinda crummy from a total performance point of view, since they have to be installed PERFECTLY to achieve rated performance. Blown fiber fills in everywhere, even the gaps between the Romex and the edges of the drill holes where it's routed through joists or studs.

Facers on rigid foam are almost always low-perm vapor barriers, and unless there's a reason to put one in the stackup, you shouldn't. In a heating dominated climate it's better to put the most vapor-retardent element on the interior side of the assembly, but if it's on the exterior, as long as there's sufficient R value to the exterior of the vapor barrier that it's average temp in the coldest weeks of the year stays above 40F, you'll be OK, so long as there's only one vapor barrier (less than 1 perm) element in the stackup.

So whether you can use foil-faced rigid foam on the garage side of the stackup depends on what you have for a finish-floor & underlayment. Asphalt tile, vinyl flooring etc are very low-perm, but would be on the "correct" (warm-in-winter) side of the stackup, but would mean you should avoid putting faced goods on the bottoms of the joists. Hardwoods, rugs, ceramic tiles etc are vapor permeable, and not a problem, as long as you used rosin-paper rather than 6-mil poly or something as the slip surface between hardwood & sub-floor.

But no matter, the garage is semi-conditioned space, and the garage itself will likely average well above 40F even in January, so build it out without faced rigid foam and you'll be fine. Something like this will work:

Finish floor .
sub-floor .
blown cellulose, full cavity fill
7/16" OSB .
1-3" EPS (or 1-2" XPS) .
1/2"-5/8"gypsum .
Standard latex paint

If you MUST use batts, make sure that it's a full cavity fill- an air gap between the subfloor and the top of the batt is thermal-bypass, it will lower the as-installed R value of the batt due to convection, and any air-leakage at the ends can & will travel unimpeded through the joist bays, chilling the floor. If it's 2x10 joiste, low density unfaced fiberglass R38s snugged up to the subfloor and compressed compressed, would be "good enough", and would perform better than an an 8" Ultratouch with an air gap on one side or the other. If there must be an air gap, make it on the garage side of the assembly. (But blown goods are really the way to go here. It's not rocket science to get 2.5lbs+ density out of a rental blower even without dense-packing hose.)
 
Last edited:

Drewski123

New Member
Messages
47
Reaction score
0
Points
0
Location
Seattle
Thanks Dana.

I have purchased batts already so I need to use them.

So here are the final layers:

In the bedroom:
Existing finished floor (hardwood)
Exisitng sub-floor 7/8" tongue and grove + a layer of paper (some kind a light brown paper) + 5/8" ply

In the garage's joist cavity (joist cavity is 9.25"):
Adding Ultratouch batts (R30) 8" thick
1.5" EPS (XPS)
5/8" Type X gypsum
Standard latex paint

The joist cavity should be totally filled in without any voids. The batts are 8" thick, plus 1.5 EPS (or XPS) would add up to 9.5". In this case the batts will be squeezed in by 1/2".

Also, you listed EPS/XPS as a last layer before installing drywall. Is there a reason for this? Can the rigid boards be installed first in the cavity, and then the batts?
And lastly, you mentioned 7/16" OSB. What is this OSB for?

I appreciate you help Dana.

Andy
 

Dana

In the trades
Messages
7,889
Reaction score
509
Points
113
Location
01609
If you put the rigid board in the cavity, it's R-value is undercut by the thermal bridging of the joists. A 9.5" joist is about an R8-8.5 thermal short in your othewise R30+ floor. If 16" on center that will end up being well over 10% of the total floor area (counting blocking & other framing), and a large fraction of the total heat transfer between the garage & bedroom. If you instead put the foam on the exterior of the joists you're adding the full R of the foam to that thermal short. A 1.5" layer of XPS is R7.5, which is effectively cutting the framing losses in half. By thermally breaking the framing you boost the thermal performance of the assembly by more than 20% using the same amounts & types of materials. Putting high-cost per R foam in framing cavites is usually a waste, since it can be used more effectively as a thermal break outside the framing.

It's also more work, with more foam scrap to cut'n'cobble the foam into the cavities.

The purpose of the OSB would be there to guarantee that the recommended 2.5lb+ cellulose fill would not warp the gypsum over time, since it will be under pressure at that density. If 16" on center 5/8 gypsum + 1.5" of XPS should be stiff enough for 2.5lb cellulose, but installing the cellulose would involve drilling 2.5-3" holes in it to and snake the hose into the cavity, and you'd have to plug & finish the holes later. You could use a blown-in-mesh approach, but finding the right mesh is more than a trip to the box store, and the minimum roll would likely be several times what you'd need.

If going with a batt solution the OSB can be skipped. Stagger the seams of the gypsum with that of the foam for better air-tightness. To be even more serious about air sealing (and I would be) caulk the foam seams as you go or use housewrap tape over the seams and caulk the edges where it meets the wall before putting up the gypsum.

If using batts, see if you can't find a source for un-faced R7-R8 econobatts (used in 2x3 framing), or alternatively you could split unfaced R19 and compress it into the 1.5" gap. Compressed to 1.5" it would add another R5-6 to the center-cavity R, but the more important aspect would be that it retards the thermal bypass and convection currents that robs fiber insulation of performance.
 

Drewski123

New Member
Messages
47
Reaction score
0
Points
0
Location
Seattle
John, I decided to use Wedi boards instead of Durock with Kerdi membrane. The tub/shower alcove is not on the exterior wall. Do I still need a vapor barrier behind the Wedi board which would be installed right to the studs (The Wedi board is waterproof)? Also, you mentioned that in Vancouver, the inspectors require 6mil vapor barier. Since Vancouver and Seattle have similar weather, do you think that this requirement applies to Seattle as well? I will call the building inspector on Monday to make sure I will be doing this correctly.
 

Dana

In the trades
Messages
7,889
Reaction score
509
Points
113
Location
01609
John, I decided to use Wedi boards instead of Durock with Kerdi membrane. The tub/shower alcove is not on the exterior wall. Do I still need a vapor barrier behind the Wedi board which would be installed right to the studs (The Wedi board is waterproof)? Also, you mentioned that in Vancouver, the inspectors require 6mil vapor barier. Since Vancouver and Seattle have similar weather, do you think that this requirement applies to Seattle as well? I will call the building inspector on Monday to make sure I will be doing this correctly.

A 6 mil vapor barrier on all exterior walls (including basements) is part of the Canadian national building code, but it makes far more sense in Winnipeg where for 3 months of the winter the interior side of the structural sheathing of a studwall stays below the dew point of the inteior air, than in Vancouver where even the exterior of the siding (the great outdoors) average dew point is at or above the dew point of interior air except during extended cold-snaps. If the wall is built with Canadian code-required 10mm rainscreen under the siding the drying capacity of the sheathing is enhances, and merely painting the interior wallboard with standard latex paint is sufficient vapor retardency to protect it in Vancouver, but Calgary, Winnipeg or Montreal would either need the 6mil poly, sufficient exterior foam, or gypsum/fiber-cement/other structural sheathing less susceptible to and more vapor permeable to moisture, even with the rainscreen. Whenever condensation control is possible WITHOUT poly or foil vapor retarders, the resulting assembly will be more resilient to construction errors (minor air-leaks, etc.) since it's ability to self-purge moisture will be dramatically higher. In Seattle or Vancouver climates that should be easy (were it not for pesky inspectors less versed on the building science behind IRC 2009. :) )

As long as the bathroom meets code on ventilation, in Seattle a 0.5-1 perm vapor retarder (or 0.75perm Kerdi) will be sufficient moisture protection from interior vapor drives, independently of the wall stackup. The air tightness of the vapor barrier layer or interior wall is orders of magnitude more important than it's absolute permeability, and a 6 mil vapor barrier that isn't air tight will raise (not lower) the risk of moisture accumulation in the sheathing or studs, since air-transported moisture that gets into the assembly has a much harder time getting out via vapor permeation through ~0.05 perm poly. Detailing the Kerdi/other as well as the interior finish layers to be air-tight is the "right" way to go.

SFAIK interior vapor retarders as severe as poly are not required by code in Seattle, but depending on the wall stackup including insulation, sheathing, & siding types a sub 1.0-perm vapor retarder can still be useful. (1.0 perms is still more than twenty times the drying capacity of poly, Kerdi has more than 15x.) If it's 2x4 with even a half-inch of XPS would be sufficient to allow even 3-perms on the interior side. With unfaced UltraTouch batts the wood is somewhat further protected from the high moisture drives during showers by it's significant moisture buffering capacity taking up that moisture instead (similar to cellulose, in that regard), as long as the assembly is sufficiently vapor permeable to allow that moisture to dry for the other 23 hours of the day.
 

Dana

In the trades
Messages
7,889
Reaction score
509
Points
113
Location
01609
If Seattle has fully adopted the IRC 2009 climate-dependent moisture control & vapor retardency portions Seattle codes probably do work better than Vancouver's for some things, but less so for others. As I understand it Vancouver (as in all of Canada) requires a 10mm rainscreen gap under siding, whereas in Seattle that's completely optional (and rarely done), and the difference in drying rates toward the exterior is huge. But in Vancouver (as in all of Canada) a 6-mil poly vapor barrier on the interior is mandatory, which completely blocks drying toward the interior, in a climate where even in January the average temp of the sheathing will be well above the dew point of the conditioned space air, with the vast majority of winter hours favoring drying toward the interior.

In Vancouver with a 10mm rainscreen in place, keeping the interior more vapor-open (up to ~ 2-3 perms) rather than using 6 mil poly on the interior results in lower moisture content in the exterior wall framing and exterior sheathing- the assembly dries rapidly in both directions, and PLENTY rapidly to keep up with modest amount of time the sheathing spends below the dew point of the interior air. (Easily confirmed by a WUFI simulation of any number of stackups.) In Seattle without a rainscreen or exterior foam to keep the average temp of the sheathing high enough all exterior walls do better with a 0.5 perm or lower interior side vapor retarder. That slows but doesn't completely kill interior-drying capacity. Kraft facers are ~0.4 perms, and work fine if you keep it air-tight on the interior side. Poly works too, but makes the assembly less resilient by fully blocking drying to the interior. With rainscreened siding & 2 perm interior, drying times (even from bulk-water intrusions) can be remarkably short, and the risk of mold/rot become extremely low.

Placing 6-mil poly on interior walls that are kept vapor-open to the far side of the wall (the interior of the adjacent room) should not present a problem, and could only help. It's the exterior walls with fiber insulation that are most-susceptible though, since much of the winter the cool edge of the studs and the exterior sheathing will be well-below the dew point of active-showering dew points. But unless you're showering 3+ hours/day it's still not going to NEED to be below 0.75 perms, even without an exterior rainscreen to enhance drying capacity. (In a steam shower, maybe, or in public/commercial showers with high usage rates.)
 

Drewski123

New Member
Messages
47
Reaction score
0
Points
0
Location
Seattle
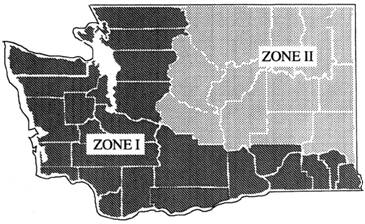
John, I did actually go to talk to a building inspector just recently but did not get true answers. The inspector appeared to be not very knowledgeable about what I was asking for. Seattle has reduced the number of inspectors they had on site in the past few years and only a few inspectors are left. So, I can presume I talked to a person that was not an inspector at all. Anyways, I found some codes on Seattle's DPD website and here they are:

Seattle’s Codes are based on the Washington State Building Code Council (WSBCC) which is based on the International Code Council (ICC). Seattle’s Codes do have their own amendments.

Moisture Control / Vapor Retarders: Vapor Retarders shall be installed on the warm side (in winter) of insulation. Exception: Vapor retarders installed with not more that 1/3 of the nominal R-value between it and the conditioned space.

Floors: Floors separating conditioned space from unconditioned space shall have a vapor retarder installed. The vapor retarder shall have a one perm dry cup rating or less (i.e. four mill polyethylene or Kraft faced material)

Roof/Ceilings: Roof/Ceilings assemblies where the ventilation space above the insulation is less than an average of 12 inches shall be provided with a vapor retarder. There are also some exceptions to this rule too.

Walls: Walls separating conditioned space from unconditioned space shall have a vapor retarder installed. Exception: For Climate Zone 1, wood framed walls with a minimum of normal R-5 continuous insulated sheathing installed outside of the framing and structural sheathing. For Climate Zone 2, wood framed walls with a minimum of nominal R-7.5 continuous insulated sheathing installed outside of the framing and structural sheathing. The interior cavity insulation for this exception shall be a maximum of nominal R-21.

Ground Cover: A ground cover of six mill black polyethylene shall be laid over the ground within crawl spaces. The ground cover shall be overlapped 12 inches minimum at the joints and shall extend to the foundation wall. Exception: The ground cover may be omitted in crawl spaces if the crawl space has a concrete slab floor with a minimum thickness of 3 ½ inches.
 

Dana

In the trades
Messages
7,889
Reaction score
509
Points
113
Location
01609
Does Seattle code specify the max vapor retardency of the vapor retarders? Polyethylene sheeting is retardent to the point of be a problem, not a solution in that climate. At 4 mils it's well below 0.5 perms not just 1 perm. XPS at 1.5" is a bit under 1 perm. Vapor barrier latex is a bit under 0.5 perms, which would be the better solution than poly for the floor or walls.

If you're feeling rich, 1.5" of closed cell spray foam applied to the subfloor would be an excellent air-barrier as well as meeting the sub-1 perm spec.

Certainteed MemBrain will be far more robust than poly or kraft paper in most wall & ceiling stackups (but I wouldn't use it in shower room). It has a variable permeance, and becomes fairly vapor-open (2+ perms) when the humidity is low.

Can you point me to the relevant website pages? I'm surprised they don't allow the IRC exceptions for vented cladding on walls or non-wood structural sheathing. The 1/3R placement rule is ridiculous, with no scientific basis for climates west of the Cascades- but it makes some sense for Quebec or northern New Brunswick. At 1/3R from the interior the average temp is more than 10F warmer than the average interior air dew point. You'll also note that R21 + 7.5 puts the condensing surface (interior side of the sheathing ) fully 3/4 of the way out from from the interior, not 1/3.

FWIW, read this carefully before deciding what type and where to install vapor retarders/barriers. It's not a simple model, and in your climate poly is way too vapor-tight to be optimal.

JW: Exterior insulated sheathing is standard on new construction in my neighborhood, R13+5 (2x4) as well as R19+7.5. (R13+ 5 doesn't even meet code-min in some towns.) The whole-wall R and thermal performance of R13+ 5 construction is about the same as 2x6 with batts/cellulose and no foam, (~R14-R15 after framing factors) but it's moisture resiliancy is much much better. If it works here (US climate zone 5), it's overkill for Seattle (marine zone-4). The IRC specifies R13+ 2.5 or R19 + 3.75 as the min required for marine zone 4. Using R5 foam is literally 2x the min necessary for condensation for a 2x4 wall, and R7.5 is 2x more than actually needed for 2x6 construction. It'll work, sure, but it's being a bit too conservative. The IRC also allows for no foam no vapor-barrier construction with vented siding, even over OSB or plywood sheathing in that climate. see: http://www.buildingscience.com/documents/guides-and-manuals/irc-faqs/irc-faq-insulating-sheathing-vapor-retarder-requirements/ Seattle may think they're doing the IRC one better, but they're actually going overboard- too restrictive, with no science behind it.

climate_zones.jpg
 

Drewski123

New Member
Messages
47
Reaction score
0
Points
0
Location
Seattle
The exterior wall is 2x4, 7/8" T&G 7" wide planks (I think exactly same as subfloor planks), then a black building paper (looks like asphalt roof sheathing) and lastly wood siding (I think it's wood, but felt like hard plastic, maybe because of many layers of paint). Below the bathroom floor is a deep unfinished basement (slightly above 80" in height) with quite large size windows. It is currently unconditioned, but the future plan is to finish it with conditioned spaces.

Dana, the Seattle Energy Code talks about moisture control on page #21 of this document: http://www.seattle.gov/dpd/cms/grou...b_informational/2009seattleenergycode.pdf.pdf
 

Dana

In the trades
Messages
7,889
Reaction score
509
Points
113
Location
01609
Seattle is clearly WA Climate zone 1:

ClimateZones.jpg

-----clipped from the code
502.1.6.6 Walls: Walls separating conditioned space from
unconditioned space shall have a vapor retarder installed.
Faced batt insulation shall be face stapled.
EXCEPTION: For Climate Zone 1, wood framed walls
with a minimum of nominal R-5 continuous insulated
sheathing installed outside of the framing and structural
sheathing. For Climate Zone 2, wood framed walls with a
minimum of nominal R-7.5 continuous insulated sheathing
installed outside of the framing and structural sheathing. The
interior cavity insulation for this exception shall be a
maximum of nominal R-21.
----------end clipped code

This means that in Seattle either R13+5 or R19+5 is acceptable without vapor retarders, per-code. (But R13+ 2.5 is actually sufficient.) Over in Spokane (zone 2) R19-21 + 7.5 construction is acceptable, but R13 +5 might not meet code-min for R?.

T & G sheathing with asphalt paper has a perm-rating of about 5. Shingle siding (but not clapboards or ship-lap) is fairly well vented, and if you have at least 6" of roof overhang you'd be able to get away with 2+ perms on the interior. When in doubt, err toward the more vapor-open. (Kraft facers rather than vinyl or foil, vapor retardent latex rather than poly.) Most moisture problems are from air-leaks. Air-tight but vapor semi-permeable is more resilient.
 

Drewski123

New Member
Messages
47
Reaction score
0
Points
0
Location
Seattle
Dana, I am attaching a couple of pictures of the siding on the house. One of them shows area below (how the siding is attached). I am not exactly sure of the type, and hoping you would be able to identify it. I also have well over 6" (about 2 feet) of soffit overhang. When I stripped the exterior wall from the old drywall, I did not find any moisture problems / mold, even though during last winter we had a few days with temperatures around 28 degrees F.

So here is what I plan to do on the exterior wall starting from inside:
Vapor retardent latex paint
5/8" Drywall
Ultratouch batts (R-13)
Exisitng T & G sheathing with asphalt paper
Existing siding

I will also air-seal this wall pretty well. Is the 4-mil poly still needed (the code says "yes" since I do not have the R-5 sheating on the outside wall)? If it is, can I use 6-mil instead of 4-mill?
Thanks,
Andrew
 

Attachments

  • P1060643 (640x480).jpg
    P1060643 (640x480).jpg
    31.7 KB · Views: 604
  • P1060644 (640x480).jpg
    P1060644 (640x480).jpg
    25.9 KB · Views: 567

Drewski123

New Member
Messages
47
Reaction score
0
Points
0
Location
Seattle
There are no horizontal groves on the siding. It is the conncetion between the two layers. When I was taking the pictures, it was very bright outside and created this horizontal shade (pic.1), and the second picture shows the siding from underneath of the connection to a next row of the siding (pic.2).
 

Dana

In the trades
Messages
7,889
Reaction score
509
Points
113
Location
01609
". Is the 4-mil poly still needed (the code says "yes" since I do not have the R-5 sheating on the outside wall)? If it is, can I use 6-mil instead of 4-mill? "

The code doesn't specify ANY poly- only a vapor retarder of 1 perm or less, and vapor-barrier latex fills the bill (as do kraft paper facers.) Poly vapor barriers create as many problems as they solve in your type of climate. If the inspector needs to see a sheet component as the v.b., use Certainteed MemBrain, and skip the redardent latex.

Even under a worst-case unvented reservoir cladding MemBrain does OK in a Seattle (or at least Puyallup) climate, better overall than poly in the same stackup. See wall #2 as compared to wall #1, the discussion in section 4.6 :

http://www.ewpa.com/Archive/2006/aug/Paper_296.pdf

Vapor barrier latex will perform comparably to kraft facers in that experiment. (Too bad they only compared it to standard 2-3 perm latex in the experiment.)

Shake siding such as yours is semi-vented on the exterior and has more capacity to dry toward the exterior that clapboard or shiplap siding, and the wintertime moisture buildup in exterior in your will be lower (much lower than in unvented stucco). Cotton insulation also buffers moisture, and will further reduce the moisture buildup, in the wood, but will also lengthen the drying time (another argument for enhanced drying toward the interior with a smart-retarder.)

Caulk the sheathing/stud and sheathing/plate interfaces before installing the batts in the walls, (Tremco Acoustic Sealant is great for this, but anything will be better than nothing) and caulk the wallboard to the studs as you go. Caulk the studwall plates to the subfloor too. Seal any plumbing/electrical/other holes in the studs or sheathing with 1-part foam as you go, and split the batts around wiring etc rather than stuffing behind and creating a gap.
 
Top
Hey, wait a minute.

This is awkward, but...

It looks like you're using an ad blocker. We get it, but (1) terrylove.com can't live without ads, and (2) ad blockers can cause issues with videos and comments. If you'd like to support the site, please allow ads.

If any particular ad is your REASON for blocking ads, please let us know. We might be able to do something about it. Thanks.
I've Disabled AdBlock    No Thanks