Need help with persistent tub overflow leak.

Users who are viewing this thread

AnMarie

New Member
Messages
7
Reaction score
0
Points
1
Location
Chicago
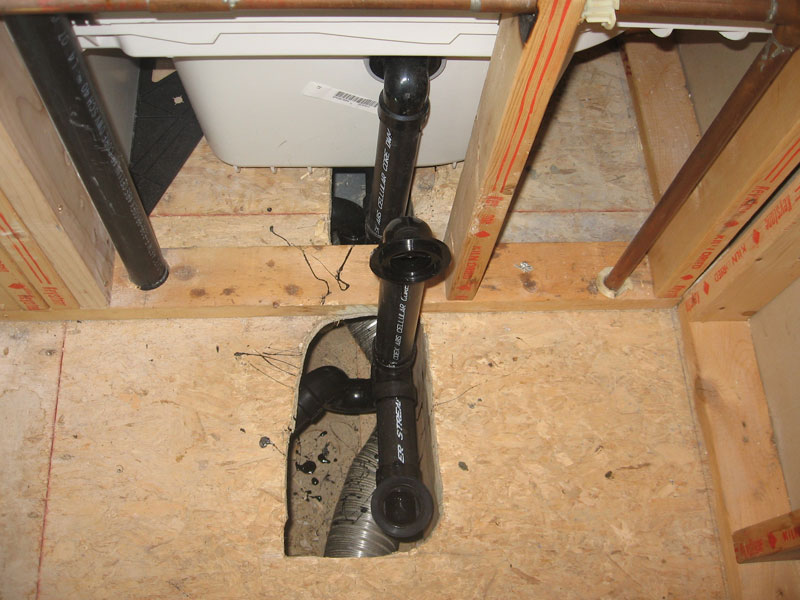
I have read many great posts here on overflow gaskets. Unfortunately, I cannot get mine to stop leaking heavily into the room below. I have an access panel behind the tub and a nice big hole in the ceiling beneath the tub for several months, so I can see what's going on. It started when I was adjusting the drain lever and noticed the overflow gasket was old and torn. It was the nonbeveled type often featured in the diagrams. I tried to replace it with the beveled type and that created a loose connection /uncovered a piping issue and a pro was brought in who cut the big hole to repair the pipes and install a new nonbeveled gasket.

I don't know if our overflow always leaked (we've had the house a few years now and out three year old started more independently bathing recently) or if the hole in the hole made the leak more visible, but we get a lot of water leaking from the overflow due to random splashing or movement in the tub, even when the water is several inches below the overflow (this is a shallow metal tub).

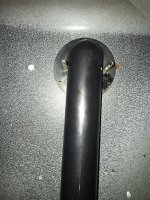
Another plumber verified the gasket was installed correctly and it's tight, but when we tested, the water still pours through. Hundreds of dollars later, the suggestion is to not let our kid move too much in the tub and only fill it about 8-10 inches. Not an option. Also, I found that when I use the tub, even carefully, water still gets through. We even tried the "ultimate overflow" gasket with no luck. I'm desperate. I want the leak gone, to use the tub freely, and to seal the hole in the ceiling below.

Any ideas?

Also to add insult to injury, the plumbers never adjusted the lever drain (the original issue), so we have to use rubber plugs that slowly let the water out. The waste plug assembly is well attached, so I can't even remove it to replace it with a twist up (and I'm really afraid if additional leaks). (Sigh) Please help!
 

Terry

The Plumbing Wizard
Staff member
Messages
29,942
Reaction score
3,459
Points
113
Location
Bothell, Washington
Website
terrylove.com
Wow!
You could have had a new waste and overflow by now now if the plumbers had the parts on the van.
A new waste and over flow is ABS or PVC runs less than $20 and the p-trap less than $5
Most of the time, it's easier to just junk the old brass overflow and go with a new one. The overflow should always work and seal no matter how high the water is in the tub. That's what they are there for. At the least, they should have installed a rubber gasket that sealed. Or they could have reached into the vast parts inventory and replaced the amazing high priced $20 waste and overflow and solved your problem. They will charge labor for this, and I totally thing they should. Most plumbing is more about the knowledge and time than it is about the parts.
 

AnMarie

New Member
Messages
7
Reaction score
0
Points
1
Location
Chicago
IMG_0691.JPG
The waste overflow was replaced as part of the work that resulted in the big hole in the ceiling below. I was told that the piping that was where the black stuff (in the photo) is was too lightweight and not meant for this use. I wasn't home during the replacement and no one thought to test the overflow.

IMG_0693.JPG
 

Attachments

  • IMG_0691.JPG
    IMG_0691.JPG
    198.1 KB · Views: 375
Last edited by a moderator:

AnMarie

New Member
Messages
7
Reaction score
0
Points
1
Location
Chicago
Right now I have the "ultimate overflow" gasket in there. The clear caulk is leftover from when plumber number two told me that the puddles of water were coming from around the screws. It wasn't.
 

CountryBumkin

Active Member
Messages
915
Reaction score
70
Points
28
Location
Orlando, FL
I looks like the tub drain (brass part) was not replaced. Is this where the leak is coming from?
If you put a couple of inches of water in the tub, can you see a drip/leak from the brass drain?
I'm thinking the Plumbers never fixed the original problem when thy replaced the overflow.

Since everything is open to view, it should be pretty easy to spot the leak. You could wrap some toilet paper around the various fittings to see what gets wet (to find a slow leak).

Also, it looks like there is no gasket between the tub and the overflow drain fitting. I'm not a plumber but I though the gasket went on the outside of the tub (like in the photo) maybe it's just a different design.

Bathtub_Drain_w550.jpg
 

AnMarie

New Member
Messages
7
Reaction score
0
Points
1
Location
Chicago
We've tested everything and the brass part, train, fittings, etc. are all dry. The beveled type of didn't work with our setup for some reason. I bought both and the plumber went with the type in the non beveled type (flat with a few tabs). When we had the professionally installed one in there, I could see the water flowing between the back of the tub and the front of the gasket, despite everything seeming tight and the screws being well tightened. It was a thin steady stream; it's amazing how much water ended up in the room below at the end of a bath. This is with the water level well below the overflow level and just a three year old "playing." The ultimate overflow gasket that's in there now sits on the inside of the tub and is supposed to allow the water to drain directly. Seemed like a good solution, but we're still getting water from the overflow.

Is it possible the screws can seem tight but not create a seal? I'm almost ready to close the overflow altogether and take my chances :)
?
IMG_0696.JPG
 

Reach4

Well-Known Member
Messages
38,858
Reaction score
4,428
Points
113
Location
IL
Is it possible the screws can seem tight but not create a seal?
See the light?

If not, try a brighter light or darker bathroom, and let your eyes dark-adapt. A bright LED flashlight with a blinker mode, clamped into position, can be useful to make the the light through a gap more obvious.

"Not an option. Also, I found that when I use the tub, even carefully, water still gets through."

If you cannot see the light, I would fill the tub (no occupant) to 1/2 inch below the overflow and let it sit for a few hours. Is there leakage? I am wondering if the water could be coming from lower.
 
Last edited:

Terry

The Plumbing Wizard
Staff member
Messages
29,942
Reaction score
3,459
Points
113
Location
Bothell, Washington
Website
terrylove.com
accord_wild_03.jpg


I normally replace the old waste and overflow with one that I can glue up. I also did not see an p-trap on the installation at the top of the page.
Also looking at your picture at the top, it looks like water has been leaking at the slip joint nut and washer on the riser section.
So.........do you have a p-trap, and have you taken a look with the tub filled to overflowing with a flashlight on all the joints?
 

STove

New Member
Messages
1
Reaction score
0
Points
1
Location
Michigan
View attachment 37048 The waste overflow was replaced as part of the work that resulted in the big hole in the ceiling below. I was told that the piping that was where the black stuff (in the photo) is was too lightweight and not meant for this use. I wasn't home during the replacement and no one thought to test the overflow.

View attachment 37046

I joined this forum so that I could post this because someone should have recognized the cause of your problem with the photo of the overflow pipe you posted.

It sounds like the plumbers you hired were either; not very experienced with metal tubs or just didn't want to hassle with fixing the real problem.

What's even more surprising is that you're post and pictures have been up for about 4 months and no one bothered to mention the rust on the back of your tub.

I have good news and bad news regarding this problem.

First the good news:

Looking at your picture of the overflow drain, I noticed very quickly the bit of rust on the right side to the right and just above the right screw. In all likelihood, that is your problem.

The first step you need to take is to sand off all the rust that is on the back side of the tub. Hopefully, it's just surface rust.
While doing this, keep in mind that any amount of rust can and will prevent the gasket from sealing properly due to the porous nature of rust.

You may want a magnifying glass handy once you have the rust cleaned up. Use it to see if there are any cracks in that area of the tub.

If the rust is extensive enough that it leaves an indentation or a gap in the back of the tub, you will need to use a filler such as J B Weld or a putty filler that is used to seal leaks in radiators. Once your choice of filler cures, sand it down so that it is smooth and even with the rest of the surface of the tub. In addition, you need to make sure that the entire area of the tub where the gasket sits against is smooth and clean. For proper sealing, no little bumps or indentations allowed.

If after you clean up the back of the tub, the overflow still leaks, you have the option of applying a silicone water sealer to both sides of the gasket and mounting it and then snugging up the screws. Keep in mind that the silicone will not aid in sealing against rust or dirt so there are no short cuts to fixing this problem.

By the way, if you know someone who has auto body repair skills, that person will be able to do this repair at the level necessary.

Now the bad news:

If repairing the rust area and cleaning up the back of the tub and using silicone glass sealer does not resolve the problem, you will likely need to replace the tub.
 
Last edited:

hj

Master Plumber
Messages
33,603
Reaction score
1,042
Points
113
Location
Cave Creek, Arizona
Website
www.terrylove.com
A bevel one ALWAYS fits, because if the angle is not correct, you rotate it until it DOES match up, the twist the overflow fitting to mate to it. It should only take ONE trip to make it leak proof, but that metal nut on the plastic thread at the bottom is NOT correct and will usually fail.
 

coppcar

New Member
Messages
1
Reaction score
0
Points
1
Location
Wisconsin
A bevel one ALWAYS fits, because if the angle is not correct, you rotate it until it DOES match up, the twist the overflow fitting to mate to it. It should only take ONE trip to make it leak proof, but that metal nut on the plastic thread at the bottom is NOT correct and will usually fail.

Yes!!!! Thank you hj! I'm ignorant, but perfectly willing to be less so. It wasn't until I read your post that the light went on. I rotated that gasket 90 degrees and the vertical pipe was perfect. Why didn't the manufacturer say that on the new overflow kit instructions?? Moreover, why did their customer assistance guy tell me, "Those gaskets are designed to offer 4 positions. Try flipping it around or the bottom for the top." Sigh. Now I know how to install an tub overflow kit. FYI, Flipping (like flipping pancakes) the gasket around does not change the angle on the downtube. Only rotating it will do that.

This website is wonderful. I don't refer to it very much, but when I need you, you're always there. Kudos to all of you and thank you!
 
Top
Hey, wait a minute.

This is awkward, but...

It looks like you're using an ad blocker. We get it, but (1) terrylove.com can't live without ads, and (2) ad blockers can cause issues with videos and comments. If you'd like to support the site, please allow ads.

If any particular ad is your REASON for blocking ads, please let us know. We might be able to do something about it. Thanks.
I've Disabled AdBlock    No Thanks