Need advice on best way to redo drain for walk in shower

Users who are viewing this thread

MCU

New Member
Messages
39
Reaction score
0
Points
0
Location
Montreal
Hi,

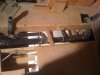
I am redoing our master bath and have to move the shower drain for a new walk in. Attached is a pic of what I am dealing with. The new drain has to be right where there is a half circle drawn on the plywood just under the existing on. Everything has to be done in the same joist cavity and being only 10.5" I am very limited in space to make the p-trap and drain properly. If I make the p-trap go towards the left and then come back to the right to connect into the main drain, will there be issues of slow draining or clogging? I will use 2" ABS and the main drain is a 3" ABS coming from the right and with a 90 degree going to the downstairs floor which I don't have access to. In the pic it may look like the 3" ABS is leading into the drain all the way to the right (existing shower drain) but its not. The existing shower drain is connected at about 16" from the beginning and goes into the next joist cavity

Looking for opinions please ASAP :)
 

Attachments

  • IMG_0108.jpg
    IMG_0108.jpg
    40.5 KB · Views: 1,186
Last edited:

Jadnashua

Retired Defense Industry Engineer xxx
Messages
32,771
Reaction score
1,191
Points
113
Location
New England
Can't really see the mark indicating where you want the trap nor have a good idea of the shape and size of the shower you want to build. There will be no issue with having the inlet and outlet of the trap rotated (folded) as long as you don't throw additional elbows into the equation. For maximum strength, you want any patches in your ply to span at least three joists. That way, the middle (at least) of the ply is supported, and it is not hanging just by the edges and the fasteners on 1/2 of a joist width. This can be an issue when you want cement and tile on top of the surface.

On a conventional shower, it's nicest to have the drain as close to the middle of the shower as possible. On an ADA, curbless shower (is that what you're talking about doing), it's nice to do something like a linear drain against say the back wall of the shower.
 

MCU

New Member
Messages
39
Reaction score
0
Points
0
Location
Montreal
its a prefab shower base from shluter and the drain is offset not centered. the mark (semi-circle) is about 1ft to the left of where the plywood starts on the right. If you still can't see it I will try to edit the photo (if I can figure out how).
 

MCU

New Member
Messages
39
Reaction score
0
Points
0
Location
Montreal
its a schluter drain. I can't really do much from downstairs since its a supporting wall and a division wall runs right up to where the 3" drain is. I opened a small little section to sweat a copper to pex transition and at same time see if I can do anything on the drain but no luck on that one. Any other suggestions to work on it the way it is? The shower will be 40x84 and drain will be approx at 20"x20". You actually walk in from the other side and plan to have a no door, glass walk in.
 

MCU

New Member
Messages
39
Reaction score
0
Points
0
Location
Montreal
it's actually Prova shower base. A competitor of Schluter and they recommend modified thinset as opposed to non modified Schluter recommends. I am making a curb out of 2x4s stacked up (3 of them). I don't want the drain to out either since I need to keep a distance from the door. what do you recommend for the plumbing? at 24" for the drain is it really non acceptable?
 

MCU

New Member
Messages
39
Reaction score
0
Points
0
Location
Montreal
I was also thinking of applying the base to a cement backer board instead of the plywood
 

Cacher_Chick

Test, Don't Guess!
Messages
5,458
Reaction score
213
Points
63
Location
Land of Cheese
I see where your mark is but am not sure where the vent is. The vent has to be downstream and within 6' of the trap.
 

Jadnashua

Retired Defense Industry Engineer xxx
Messages
32,771
Reaction score
1,191
Points
113
Location
New England
I have heard of the pans lifting right off of plywood when non-modified thin set has been used and the subfloor has some flex.

If your floor has flex, any tile situation can have problems. For any of these installs, they specify that the floor must be flat, and if not, flattened prior to installation of the (flexible) pan. Failure to do this may prevent a good bond as the pan has some resilience, and could pull itself away. If your subfloor has flex, neither tile nor pan will like it. Just like a cbu sheet on a floor, the mortar underneath is primarily to fill any imperfections first, and hold it down second - gravity works wonders. If the floor meets specs to tile on, and is flat, anything should work. Never hurts to talk to the manufacturer for special circumstances as they know their product best and have no desire for your install to fail and can advise.
 

MCU

New Member
Messages
39
Reaction score
0
Points
0
Location
Montreal
I see where your mark is but am not sure where the vent is. The vent has to be downstream and within 6' of the trap.

The vent links into the 3" drain and can't be seen in the pic. It's actually in the wall next to it and is also a 3" ABS
 

MCU

New Member
Messages
39
Reaction score
0
Points
0
Location
Montreal
JW,

I was planing on doubling up the subloor with two plywoods and then adding a 1/4" cement board with thinset and roofing nails. I am doing the same to prepare for tiles on the main floor. As for the curb i was planning on screwing and using PL glue in between and then covered with cement board and then kerdi. I thought about using bricks or pavers, but i was told not to do that because it will be on plywood. I will fix the blocking but what about the plumbing for the drain. How do you recommend i do it? I noticed you are in Canada also, who sells the prefab curbs? I checked home depot, haome hardware and all the other major retailers
 

MCU

New Member
Messages
39
Reaction score
0
Points
0
Location
Montreal
Nice little assistant. I got me four of those :)

How high and wide do you make your curbs? I will be using cinder blocks to make a bench and wondering if I could use some of the thinner center blocks or cut them with my wet saw. For the subfloor, the 2nd layer of plywood is only screwed onto the 1st and not the joists right? i will silicon my plywood joists and lay the CBU tomorrow morning. with versabond thinset and roofing nails on my mainfloor and in the master bath later this week.

For the plumbing any diagrams on how the best way you would go about settign up the ABS for the drain?
 

Jadnashua

Retired Defense Industry Engineer xxx
Messages
32,771
Reaction score
1,191
Points
113
Location
New England
Concrete pavers can work well for a curb.

the idea of the second layer of ply is partly to decouple, partly to strengthen, and as a result, it should be installed offset from the first layer with no joints aligning and not into the joists.

The reason for thinset underneath the cbu is to fill in any imperfections to provide 100% support, not to hold it down, the fasteners do that. Most, not all, specify unmodified, but a modified will work as an alternative. Some specify a modified...basically, download and read the manufacturer's installation instructions.

A sample of two: HardieBacker and Wonderboard do not say anything about filling seams with caulk. Wonderboard does specify filling the gaps with mortar prior to installing the tape. At least on the backer, the idea is to make it a monolithic layer, the mortar and the tape help tie the individual sheets together. While filling any gaps in the ply with caulk can't hurt, none of those I've looked at specify it. If they felt it was that important, not wanting their product to fail, I think they'd specify it. Can't hurt. From what they told me in class, was that over time, the subfloor moving will cause the backer to crush around the fasteners into a powder to allow for some movement between the tile/backer and the ply underneath.
 
Last edited:

MCU

New Member
Messages
39
Reaction score
0
Points
0
Location
Montreal
Thanks Jim. so the concrete pavers on plywood? should I glue it with PL glue since it's wood or still thinset instead?

the new subfloor i am building with 2nd layer of ply and cbu will still be 1/8-3/16" lower than the existign tile. I will then tile completely over the new floor and old tile to make one seemless hallway. to make up for the 1/8" would you guys just use a much thicker layer of thinset under the cbu to bring flush or use a type of self leveling over the cbu?
 

Jadnashua

Retired Defense Industry Engineer xxx
Messages
32,771
Reaction score
1,191
Points
113
Location
New England
Level after installing the cbu. It's very unreliable to try to use thinset underneath it to perform this task and, you may have trouble getting the fasteners seated without squeezing out the excess anyway, defeating the purpose. While you can flatten after the cbu is down, for 1/8", I'd not try to do it with slc...I think you'd have a bigger mess. There are some products you can use, but most people would just do it with thinset while they were setting the tile. This takes a little more skill, though. At 1/8", you could just spread/screed out a layer of thinset, let it cure, then tile as normal. Thinset sticks to thinse fine.

I'd feel better using concrete blocks installed on properly bedded cbu than directly on ply.
 

MCU

New Member
Messages
39
Reaction score
0
Points
0
Location
Montreal
Thant makes sense Jim. I will try to level after. Would you use a self leveling cement is a bit more than 1/8?

Also the backerboard manufacturer recommends either roofing nails or screws. Any beneit to using screws? I was not able to locate HD nails or screws at the local hardware shop. All are electro-plated
 

MCU

New Member
Messages
39
Reaction score
0
Points
0
Location
Montreal
i have every drill you can think of :) I am not a beginner just not a pro, every day plumber or tiler.

Would you be able to send me a small diagram of how you would redo the ABS? We have a toilet, bidet and shower all on the same line next to each other. The other idea I had yesterday was getting rid of the bidet and getting those bidet toilet seats and possibly making the shower wider by about 16". Those toilet seats range from 300 to 1200 which is a big expense but do they break down a lot also?
 
Top
Hey, wait a minute.

This is awkward, but...

It looks like you're using an ad blocker. We get it, but (1) terrylove.com can't live without ads, and (2) ad blockers can cause issues with videos and comments. If you'd like to support the site, please allow ads.

If any particular ad is your REASON for blocking ads, please let us know. We might be able to do something about it. Thanks.
I've Disabled AdBlock    No Thanks