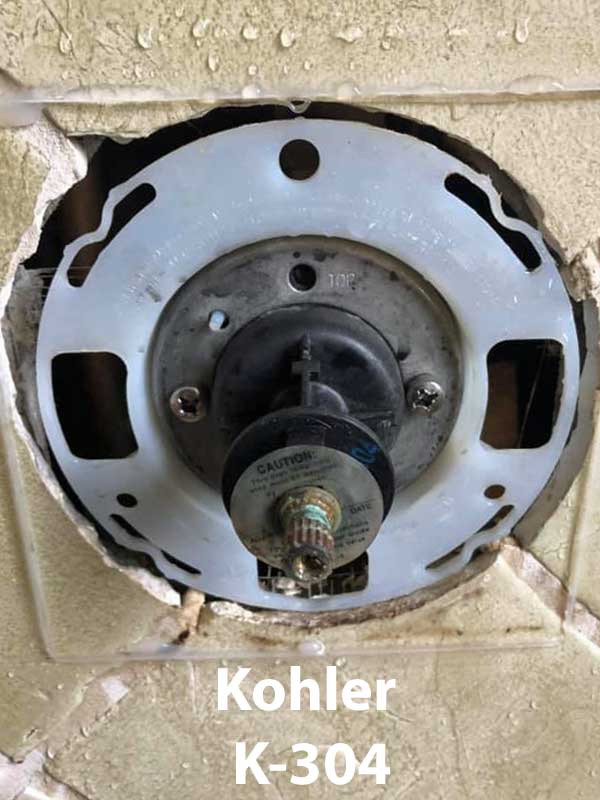
You have integreal stops back there. The plastic is a reminder not to cover them. You can remove the plastic, but don't forget about the stops.
You are using an out of date browser. It may not display this or other websites correctly.
You should upgrade or use an alternative browser.
You should upgrade or use an alternative browser.
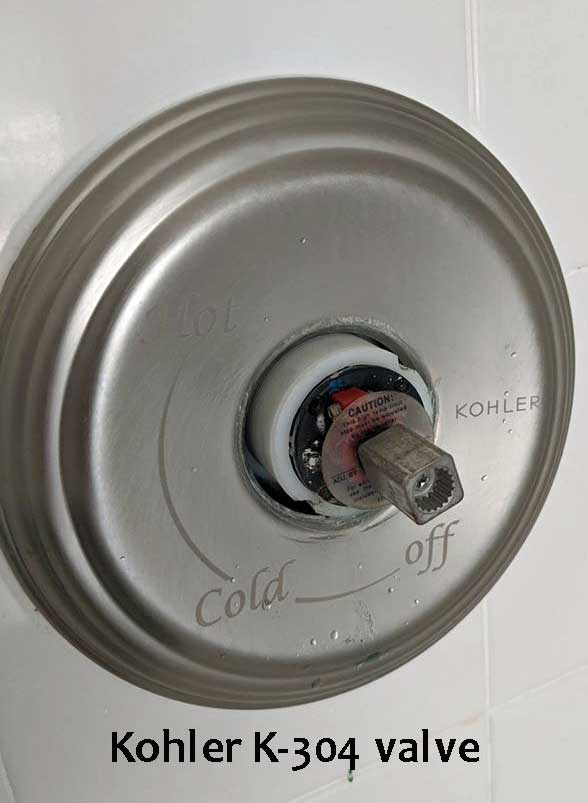
Installing a K-304 Kohler Rite-Temp bath & shower valve.
- Thread starter Terry
- Start date
Users who are viewing this thread
Total: 6 (members: 0, guests: 6)
Jadnashua
Retired Defense Industry Engineer xxx
If the trim plate screws to what's left, then yes, you can discard that plastic piece. It should say that in the manual. If I had to guess, I'd guess that is required if you have what is called a thin panel installation (i.e., one that c flex), then the trim sandwiches to that larger diameter to help stabilize the panel so it doesn't flex away from the trim plate.
Last edited by a moderator:
Sponsor
Paid Advertisement
Errant
New Member
hj wrote:
The prohibition "Do not install the valve upside down" ONLY applies for a tub/shower installation. In a shower only installation, I ALWAYS install it upside down. There are two good reasons for doing so;
1. the bottom port is larger than the upper one so you get maximum flow to the shower head, and
2. The capped bottom port, unless it was a "shower" or "tub" only valve, can accumulate debris and eventually stop flow to the shower head.
Kohler also recommends inverted install when combining the 304 with a transfer valve and wanting to use two items simultaneously. Here is the article. I'll be using a 304 valve with a 728 transfer. Looking at the document, I will need to invert the 304, per Install Option 2, then run tub, fixed head, and hand shower all from the 728 transfer valve. I have some questions:
Why install the valve upside down? Why not leave it alone, cap the top (shower) output and plumb from the bottom (tub) output? Wouldn't this prevent sediment from accumulating (as hj wrote above)?
Last edited:
PostPremium
New Member
hj wrote:
The prohibition "Do not install the valve upside down" ONLY applies for a tub/shower installation. In a shower only installation, I ALWAYS install it upside down. There are two good reasons for doing so;
1. the bottom port is larger than the upper one so you get maximum flow to the shower head, and
2. The capped bottom port, unless it was a "shower" or "tub" only valve, can accumulate debris and eventually stop flow to the shower head.
Kohler also recommends inverted install when combining the 304 with a transfer valve and wanting to use two items simultaneously. Here is the article. I'll be using a 304 valve with a 728 transfer. Looking at the document, I will need to invert the 304, per Install Option 2, then run tub, fixed head, and hand shower all from the 728 transfer valve. I have some questions:
Why install the valve upside down? Why not leave it alone, cap the top (shower) output and plumb from the bottom (tub) output? Wouldn't this prevent sediment from accumulating (as hj wrote above)?
I was wondering the same thing. Instead of rotating the valve, why not just cap the shower output and plumb from the tub output? Also, Kohler does not mention anything about rotating the "core" when installing it upside down. Does this need to be done? Can anyone provide some clarification on this?
Newplumbing
New Member
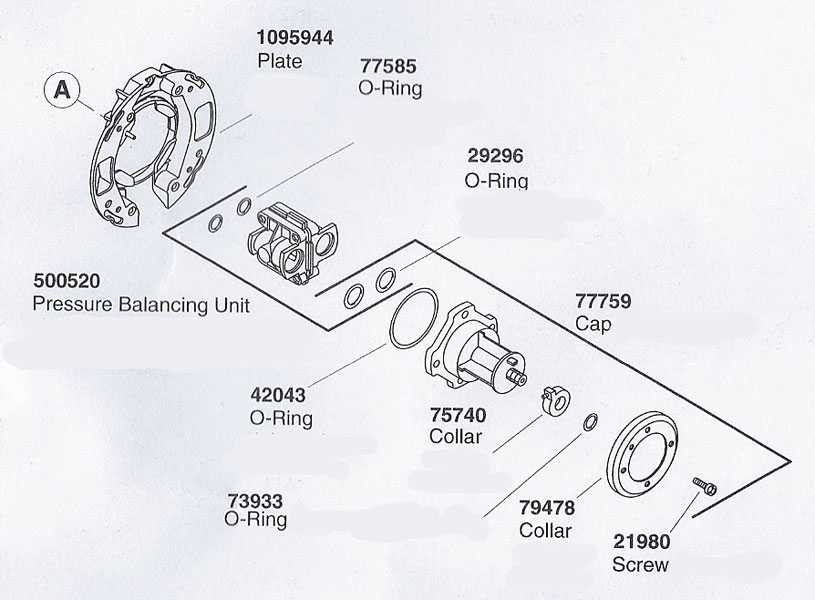
Hi I know this thread been a while but I have the 304 KS na rough in valve rite-temp pressure balance one with stops and the 77585 o ring got lost on one side will this cause the valve to not work? My valve doesn't seem to turn off the water.
Hi I know this thread been a while but I have the 304 KS na rough in valve rite-temp pressure balance one with stops and the 77585 o ring got lost on one side will this cause the valve to not work? My valve doesn't seem to turn off the water.
Yes, you need the O-Ring. If you have a hardware nearby, you can take the other O-Ring and find a match for it.
You need both O-Rings to make that seal.
Their tech line 1-800-456-4537
Last edited:
GMGERRY
New Member
I am having a similar problem with low pressure out of the 304. Water streams from the shower nipple. When I remove the PBU and put it back together, I get all the pressure I need. I placed the PBU back in the 304, no pressure. I have replaced both the PBU and the mixer, still the same issue.
The valve needs the same pressure from both sides of the valve. If you have stops on the valve, make sure both are opened.
Also make sure that the water heater is turned on and filling. If pressure to one side of the valve is closed, it shuts down.
Also make sure that the water heater is turned on and filling. If pressure to one side of the valve is closed, it shuts down.
Last edited:
I'm trying to figure out how far out to mount my k-304...
I believe I have what will be considered a "Thick Wall" design.
The Finished wall will be 1/2" then a kerdi membrane (1/16?) and finally a 3/8" thick tile (not including thinset, what would that be? 3/16"?)
for a ballpark total of about 1 1/8"...
I've attached the two pictures below in the reply, but they show two different things, one with the plaster guard and one with out.
I can't seem to find concrete information as to where I should mount it with the support framing -As in how far out of the wall should everything be?
I'd hate to screw this up at this point!
Thanks in advance!
EDIT: I found a Kohler video for replacing the PBU and snagged a pic, the unit looks pretty far back... what's the correct rule of thumb? I tried to upload a pic but seems I can't, here is the video reference (1:09) that shows the depth... I would still like a preferred answer, thanks!
EDIT#2: I just reviewed this thread again, and I saw an important asterisk * beside the one picture: "Refer to the valve trim specification sheet for roughing-in dimensions". I checked the instructions for my trim (kohler T14780-4-cp) and the instructions were very generic...sigh.. here are the rough-in and install docs, but they dont't tell me the answer
Last edited:
JoshuaDIY
New Member
I'm trying to figure out how far out to mount my k-304...
I believe I have what will be considered a "Thick Wall" design.
The Finished wall will be 1/2" then a kerdi membrane (1/16?) and finally a 3/8" thick tile (not including thinset, what would that be? 3/16"?)
for a ballpark total of about 1 1/8"...
I've attached the two pictures below in the reply, but they show two different things, one with the plaster guard and one with out.
I can't seem to find concrete information as to where I should mount it with the support framing -As in how far out of the wall should everything be?
I'd hate to screw this up at this point!
Thanks in advance!
EDIT: I found a Kohler video for replacing the PBU and snagged a pic, the unit looks pretty far back... what's the correct rule of thumb? I tried to upload a pic but seems I can't, here is the video reference (1:09) that shows the depth... I would still like a preferred answer, thanks!
EDIT#2: I just reviewed this thread again, and I saw an important asterisk * beside the one picture: "Refer to the valve trim specification sheet for roughing-in dimensions". I checked the instructions for my trim (kohler T14780-4-cp) and the instructions were very generic...sigh.. here are the rough-in and install docs, but they dont't tell me the answer
I'm doing the same thing this weekend and have been trying to confirm this answer myself. I think the correct way is to have the leading edge of the plaster guard flushed with the finished wall. See page 12 of the manual, "under the install the finished wall" to see what I mean. If it is proud at all I think your escutcheon will not sit flush. If it is recessed, the valve handle might not correctly engage the ribbing on the valve stem, but these can apparently be swapped out for longer ones so I'd err on the side of deeper, if you are unsure.
Good Luck
-Joshua
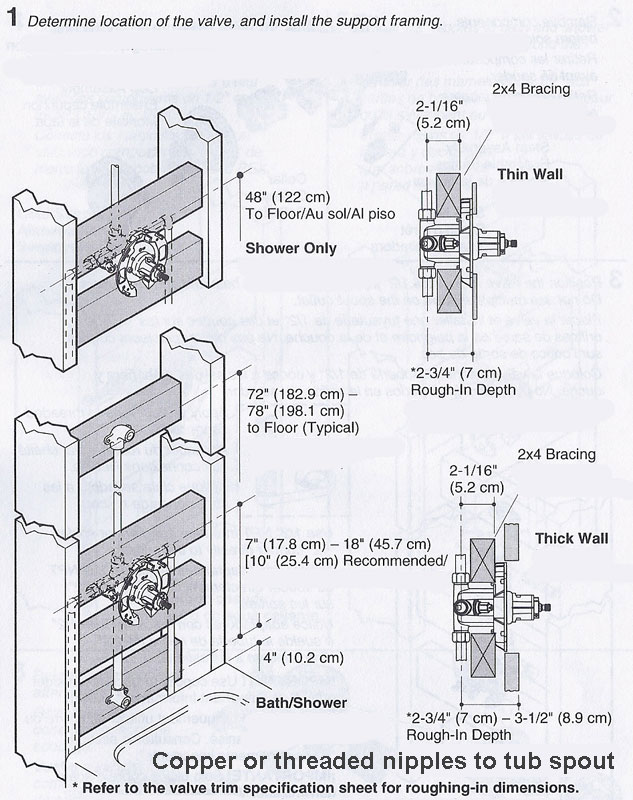
2-3/4" to 3-1/2" from the center of the supply pipes to the finished wall.
2-3/4" mininum for finished wall
3-1/2" maximum for finished wall.
The flat part of the plastic guide is the least, and the press on extension if the max.
You have 3/4" of an inch to play with.
If the valve is too deep, they many an extension for that.
Thanks to both of you for replying so quickly.
Terry, thanks for that confirmation. That 3/4" play was one thing I was assuming, but I hate assuming in case I'm wrong. I just wanted a solid confirmation. I mean it had to be designed to have play, as how the heck would anyone be able to do this?!?")
Cheers!
Terry, thanks for that confirmation. That 3/4" play was one thing I was assuming, but I hate assuming in case I'm wrong. I just wanted a solid confirmation. I mean it had to be designed to have play, as how the heck would anyone be able to do this?!?
Cheers!
Jadnashua
Retired Defense Industry Engineer xxx
I HIGHLY suggest that you mount the trim and handle to your valve, then measure. The allowable distance indicates that the screw lengths will let you attach things and the handle will fit and not bind, but you may find that you don't like the looks at one or the other extreme. You really need to mock it up. Lots of people install it so it will fit, then hate how it looks. Many people don't like the look if the handle projects out too far, but go to far in, and you may not get the screws to catch and hold, or the handle may be closer to the wall than you like aesthetically. The manufacturer's limits may not be yours...they only tell you if things will fit. You really do want both the look you're after and it fitting without issues. Get it too far out, can't be fixed without relocating the valve. Too far in, sometimes there are extension kits, but that may push things out further than you like.
Replacing parts in the K-304
Last edited:
Ok, I have a question and will admit I missed the instruction not to install the valve upside down in a tub/shower combo. To compound that error, I did it twice and the final tub surrounds have been completed. When I turn on the water the shower head automatically turns on without the diverter being pulled up and flow to the tub spout is minimal and I get hot water before cold. I believe I can fix the hot/cold situation by rotating the internal valve components 180 degrees like the set up for a back to back installation. Does anyone know if this will also solve the issue with the shower/diverter problem or am I going to have to open the wall behind the valve body and reorient the valve? Any help or guidance would be appreciated while I attempt to remove my cranium from my rectum.
You can run PEX to the shower head and you must have copper or threaded nipples to the tub spout.
No PEX or CPVC to the tub spout, the shower head has options though.
No PEX or CPVC to the tub spout, the shower head has options though.
TowerPower
Jack of all, Master of some… lol “I love my dogs”
Sorry, but I’m late to the party.. planning to swap out an 8300 Rite-temp valve that is currently roughed in from plumber. It was set up for shower head only with bottom port capped off. (Was told would not work for what I want to do)
Have a 304 with service stops - shower only, BUT wanting to have a tub spout for “toe tester” as well as bucket filler if ever desired. Also wanting to run a shower head, handshower and body spray. I have the 728 transfer valve I was planning to use for the head, handshower and body spray as well as a volume control to control head output and was hoping I could use the diverter button/bottom port of the 304 for my spout. But after reading some of the expert opinions here; I’m doubting my way of thinking… is it better to invert the 304 so I have more output to my 728 transfer valve or does it really matter?
Please advise this lost puppy on the best way to proceed.
The tub port does allow for more gallons per minute.
Can you sketch out what you're thinking of doing?
Can you sketch out what you're thinking of doing?
TowerPower
Jack of all, Master of some… lol “I love my dogs”
Anyone have any thoughts regarding this… need help before I make a major mistake lol.The tub port does allow for more gallons per minute.
Can you sketch out what you're thinking of doing?
Hope this helps.. by the way, tub spout is primarily for testing the water before turning on the shower head so lower volume there is ok. So I guess my main question is should I flip the main 304 valve upside down to increase flow to 728 3 way transfer valve and if so do I need to do anything else besides flipping the cartridge too? Looking at the 304 valve i do see that the bottom port does have a slightly larger diameter discharge hole than the the “top” hole. Also would 3/4” pex “expansion” be ok for tub spout or is copper/brass mandatory?
I’m now wondering if doing things this way will create a problem with water flow diverting down to the tub spout if I use volume controls on shower head or hand sprayer… would that back pressure be allowed to exit at tub spout or how does that work?? (OCD at its finest lol)
Last edited by a moderator:
Similar threads
- Replies
- 0
- Views
- 322
- Replies
- 2
- Views
- 395
- Replies
- 1
- Views
- 1K
- Replies
- 8
- Views
- 803