how to square up mounting holes for closet bolts

Users who are viewing this thread

Messages
50
Reaction score
0
Points
6
Location
Keansburg, NJ
Hi Guys..

I'm tiling my floor and will soon be installing the toilet. American Standard Champion 4 (they got me on the hotdog flushing videos).

I have 12 3/4 inches from the wall to the center of the pipe, the toilet says 12" rough in.

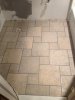
In the picture below, the tiles around the edges of the room (including the one under the flange) are just sitting on the floor- no thinset yet. The flange is just stuck into the pipe for alignment purposes. Its one that fits inside a 4 inch pipe or onto a 3" pipe. I have a 4 inch pipe. I cut the pipe a little short.. but I have at least an inch for primer and glue..

So here are my questions:

1. Is there a better flange to use in this instance?
2. Once I glue the flange down.. the metal ring will spin around and need screws to hold it down.. Carbide pre-drill through the tile and then stainless screws into sub-floor?
3. How do I align the ring properly? What do I use as a reference? The walls aren't square like most houses aren't, and I have no vanity yet. should I just wing it? Do the slots for the closet bolts offer a lot of adjustment? How much could I be off and not have anyone notice?

Thanks in advance floor (Medium).jpg
 
Last edited by a moderator:

Terry

The Plumbing Wizard
Staff member
Messages
29,946
Reaction score
3,460
Points
113
Location
Bothell, Washington
Website
terrylove.com
The metal ring is fine. You can use the slots, that gives some adjustment later. Galv or stainless screws for the flange are fine. You align the bowl so it looks right to the eye.
Buy shims for installing your Champion. They tend to be a bit wavy on the bottom. That's why we install so many more TOTO bowls. You must be feeling lucky if you bought American Standard. I'm not a gambler. Good luck!

Here are Jamie's instructions for installing a toilet
 
Last edited:

WJcandee

Wise One
Messages
3,182
Reaction score
170
Points
63
Location
New York, NY
A few other thoughts:

(1) As Terry alluded to, his experience is that the American Standard products now are very hit or miss as to whether you'll get a defective one. There are lots of stories on here about it, but bottom line is that you should inspect your Champion very, very carefully, looking for things like areas that were not glazed, particularly in the bowl, chipped or broken areas that were repaired at the factory and yet sold as new, defective trapways, castings that slump to one side or another, etc. Please, please take it back as many times as you need to (more than once isn't unheard-of) in order to get a good one. If you do, it will do the job, as shown in Terry's Toilet Ratings (green box above). The point is, make sure YOU are happy with the one you get, and keep returning it until you are. If it seems defective, it is. And believe me, anyone who sells these things has seen it before, no matter how surprised they claim to be.

We're not kidding: apparently, AS will sell this stuff and just hope that the homeowner doesn't return it, and our experience on here (which is sometimes heartbreaking) is that they typically don't. That is, someone saves up and special-orders an expensive AS toilet in a particular color; it arrives with a big spot of glazing missing right in the bowl, which couldn't have been missed by even the laziest QA in the factory, but it isn't noticed by the homeowner until after they install it, and they're very sad because they were so happy to get their new toilet and instead have spent all this money on something defective. So they are sad, but it just seems like too much of a hassle to replace it. So they live with it. It appears to be an awful, cynical approach to doing business. It's like GM used to be -- all marketing and limited engineering or quality -- which is why the Japanese manufacturers, who focused on engineering and quality assurance, wiped the floor with them. It's happening again with toilets. Toto does almost no national retail advertising, and yet word of mouth, recommendations of professionals, and sites like this have let them explode in the American marketplace, basically on merit alone.

(2) 12 3/4 is going to give you the toilet's 1.25" plus another .75" off the wall. That 2" or so isn't small, so make sure you paint the wall first and well, because the area behind the toilet will be visible. The benefit is you can easily clean and dust behind it.

(3) You are doing it correctly to mount the flange on top of the tile, secured to the subfloor. That's what is going to hold it in place for the toilet to be secured to. One way to align it is to put the closet bolts in to the long slots, threads up, slide them all the way to the end of the slots, secure them with a nut so they stay there for now (and most plumbers do that when installing the toilet, too: two nuts -- one on the flange, one to secure the bowl). Now, use a long straight edge of any kind on the wall side of the bolts to get a sense of their alignment, and spin the flange until you have them aligned how you want to align them. It's typical to square the flange bolts to the rear wall -- after all, your other fixtures likely will be square to that wall -- but you can do it so it's how you like it. The slots give you some wiggle room to adjust the toilet so it looks good even after you have secured the flange to the floor. When you have the flange aligned how you want it, mark the drill holes, and drill your holes through the tile then secure with screws to the subfloor below. The toilet is going to be held to the floor by the flange, and the flange is going to be held down not by your glue, but by the secure attachment by screws to the subfloor.

Looks nice! Good luck!
 
Last edited:
Messages
50
Reaction score
0
Points
6
Location
Keansburg, NJ
That's the drywall. The white is the mud that's been applied and sanded. He's getting it ready for painting.

That's all brand new drywall.. this bathroom was demo'ed to dirt and Studs.. The white is primer, and the gray is finish paint.. My finance wanted bead board wainscoting.. so I only gave the top half of the wall a nice coat of paint to ensure I had enough.. She insisted on using the $7 gallon of "oops!" paint from Home depot that I'd never ever be able to match again.. during the second coat.. I just rolled out whatever was left on the roller to the lower area of the wall figuring it couldn't hurt for sealant/another coat purposes.. now.. shes telling me she wants wall paper on the lower half.. (The thick textured stuff you can paint).. so it looks like I'm going to have to scuff up that paint anyways..

As for the American Standard.. I got it from Lowes for $199, it's been sitting in my kitchen in the box for 6 months or so.. I think I've probably even lost the receipt.. that was back when I thought this was going to be a quick project.. I went on a good review from my boss who is good with DIY stuff..and their magic flushing power videos.. so I'm going to cross my fingers.. when I come here.. I see I might be in for a disappointment when I pull it out of the box.
And.. theres actually a plumbing place in town that sells TOTO toilets.. so if this one is acceptable here for this project.. I guess I'll go with the TOTO when i redo the other smaller bathroom.

Thanks for all the Replies!

wjcandee - I think I'm going to like having a little space between the tank and Wall.. for some reason.. it always bothers me when it's touching.. plus then like you say... i can get behind it a little better for cleaning.. and thanks for the tip about the straight edge and back wall.. that's what I was looking for..

Another question on this about the sink.. the drain is an old piece of copper.. I left all the drain piping in place because it seemed structurally sound. When I bought the house.. it was connected to the plastic trap with a fernco and a "squiggle flexi-tail piece".. the kind that is corrugated and I think is frowned upon.

What would be a good way to clean this up without using the fernco? Do they sell a slip/compression type fitting for connection to the copper, or would I have to solder an adapter to the copper and transition to pvc? I can solder alright when the pieces are on the work-bench.. but my record of not setting walls on fire isn't too great.. and would a standard propane torch even get that hot for the big/old copper? If that is all a big hassle.. I can get another fernco.. we are planning an enclosed vanity.. so the plumbing wont normally be visible.
 

Jadnashua

Retired Defense Industry Engineer xxx
Messages
32,771
Reaction score
1,191
Points
113
Location
New England
Depending on the tile, you may or may not be able to drill holes for the toilet flange with a carbide bit...if you mark things, you can make a slot with the tile saw for the screws to pass through the tile. Re how to align the slots of the flange...measure from the wall and make the slots equidistant from the wall. The slots are fairly long, and the bolt doesn't need to be at the end away from the T-slot, but needs to be far enough away for decent support. Use a second set of nuts and washers to lock the bolt in place - makes it easier to set the toilet without knocking things out of line.

Don't know if they make a compression Desanko fitting to the copper drain pipe, but you could use a nohub connection. Fernco is a brand like Kleenex...they make lots of products. A no-hub connection has a metal reinforcement sleeve over it to maintain alignment.
 
Last edited:

Dlarrivee

New Member
Messages
1,150
Reaction score
0
Points
0
Location
Canada
That's the drywall. The white is the mud that's been applied and sanded. He's getting it ready for painting.

Not even a homeowner would mud and tape the bottom 2" of the wall... it's dark paint.
 
Messages
50
Reaction score
0
Points
6
Location
Keansburg, NJ
White is primer.. gray is finish paint.. sorry it got hidden in my last reply.. but was planning beadboard/wainscoting so i didnt paint the whole wall.. just rolled out what was left on the roller. Also.. bottom 4 feet has a rougher finish than the top.. only put on one skim coat and didnt go crazy sanding the bottom
 

Nestork

Janitorial Technician
Messages
98
Reaction score
2
Points
0
Location
Winnipeg
Cold Solder Joint:

You said:

"My finance wanted bead board wainscoting.. so I only gave the top half of the wall a nice coat of paint to ensure I had enough.. She insisted on using the $7 gallon of "oops!" paint from Home depot that I'd never ever be able to match again.. during the second coat.. I just rolled out whatever was left on the roller to the lower area of the wall figuring it couldn't hurt for sealant/another coat purposes.."

If you're saying you used real cheap paint on the upper half of those walls, then you need to repaint. Especially if you painted the ceiling with that paint.

You see, 90 percent of the latex paints in North America are made from one of two different kinds of plastics:

1. All exterior latex paints, top quality interior latex paints, kitchen & bath paints and special primers for fresh masonary will be made of a plastic called polymethyl methacrylate, which you probably know better as Plexiglas.

2. General purpose primers and budget priced interior latex paints are made of a plastic called polyvinyl acetate, which you probably know better as white wood glue.

The problem with using a budget priced paint in a bathroom is that white wood glue just doesn't have good resistance to moisture. In fact, it doesn't matter how long white wood glue has been dry, it'll still soften up and re-emulsify if it gets wet and stays wet for a while. When you use a white wood glue type paint in an area with high moisture and humidity, the result is that the paint softens up and looses it's adhesion, and the result is that it cracks and peels off the substrate. Peeling paint on the ceiling above the shower or high on the walls around the bathroom is probably THE most commonly misdiagnosed paint problem there is. People invariably attribute it to insufficient prep work prior to painting, and that's exasperating to the homeowner who knows that he did everything he could have done to ensure good adhesion prior to painting. In most cases the real problem is that a paint with poor resistance to moisture and humidity was used in the wettest and most humid room in the house; on the ceiling and high up on the walls where the humidity is highest of all.

Your best bet would be to paint over that cheap paint with a paint specifically made for bathrooms like Zinsser's "PermaWhite" bathroom paint available at Home Depot or a product sold at Sherwin Williams paint stores called simply "Bath Paint". By purchasing a paint specifically intended to be used in bathrooms, you know you're getting a paint where the binder resin was selected specifically because of it's high moisture resistance. And, two coats of a paint specifically made for use in bathrooms will protect the underlying white wood glue from the moisture and humidity, thereby preventing it from cracking and peeling and taking the much better quality Bathroom paint off with it.

Look on that can of black paint to see if it says it contains "vinyl acrylic copolymers", which means it's made out of polyvinyl acetate (and other stuff), and that in turn means it's not a good choice for use on surfaces that are exposed to dampness, moisture and high humidity. And if it wuz me, I'd repaint with two coats now while you still have good access to all the painted surfaces.
 
Last edited:
Messages
50
Reaction score
0
Points
6
Location
Keansburg, NJ
No.. by "oops!" paint I mean when they mess up a color or the customer don't want it.. they sell it cheap for $7/ gallon.. they usually put out a whole bunch of them on Tuesdays and they are all gone by the weekend.

I used Glidden Duo which is around $35/gallon normal price, on the ceiling and upper walls.. and glidden pva drywall primer on the lower half which is to be covered over..

paint per the msds:

limestone
kaolin
titanium oxide
2-propenoic acid, butyl ester, polym
propanoic acid, 2-methyl-, monoes
water
ammonium salt of polycarboxylic a
acrylic resin

primer:
titanium oxide
nepheline syenite
ceramic materials and wares, chemicals
water

So if im reading this right.. the paint is ok.. but the primer is wood glue primer.. but it might not be a big deal because its to be covered over anyways....
 
Last edited:

Nestork

Janitorial Technician
Messages
98
Reaction score
2
Points
0
Location
Winnipeg
You're correct.

If it says acrylic resins on the paint, then that normally means "100% Acrylic" resins, which in paint speak means the Plexiglas type paint which have much better moisture resistance that the wood glue type paints.

And you're also correct about covering a general purpose primer. Once it's covered with a quality paint, it won't get enough moisture into it to cause problems with peeling.

In future, when it comes time to repaint your bathroom, remember that you can also get paints specifically meant for bathrooms. Not only will these paints stand up better to moisture and humidity, but they'll also have mildewcides added to them. These mildewcides are solid powders that dissolve in the latex paint. These mildewcides are so highly soluble in water that even the presence of high humidity causes those mildewcides to migrate through the solid paint film toward that humidity. Once at the surface of the paint, those mildewcides kill any milidew spores that land on the paint before they have a chance to grow. So, to keep a bathroom paint effective for as long as possible, it's a good idea not to clean that paint with water any more often than necessary because doing that accelerates the depletion of the mildewcide out of the paint film.
 

Brucet99

New Member
Messages
24
Reaction score
1
Points
3
Location
SoCal
PVA primer is perfectly fine for drywall. In fact drywall is the only substrate for which PVA is suitable.
 

Dlarrivee

New Member
Messages
1,150
Reaction score
0
Points
0
Location
Canada
w
You're correct.

If it says acrylic resins on the paint, then that normally means "100% Acrylic" resins, which in paint speak means the Plexiglas type paint which have much better moisture resistance that the wood glue type paints.

And you're also correct about covering a general purpose primer. Once it's covered with a quality paint, it won't get enough moisture into it to cause problems with peeling.

In future, when it comes time to repaint your bathroom, remember that you can also get paints specifically meant for bathrooms. Not only will these paints stand up better to moisture and humidity, but they'll also have mildewcides added to them. These mildewcides are solid powders that dissolve in the latex paint. These mildewcides are so highly soluble in water that even the presence of high humidity causes those mildewcides to migrate through the solid paint film toward that humidity. Once at the surface of the paint, those mildewcides kill any milidew spores that land on the paint before they have a chance to grow. So, to keep a bathroom paint effective for as long as possible, it's a good idea not to clean that paint with water any more often than necessary because doing that accelerates the depletion of the mildewcide out of the paint film.

I'm sorry to hear that you drank that kool-aid and feel the need to spread the word.

I'm going to ask for plexiglass paint the next time I'm at the paint store too, they should get a good laugh out of that one.
 

Nestork

Janitorial Technician
Messages
98
Reaction score
2
Points
0
Location
Winnipeg
Yes, good quality latex paint is made of the same stuff Plexiglas is made of

w

I'm sorry to hear that you drank that kool-aid and feel the need to spread the word.

I'm going to ask for plexiglass paint the next time I'm at the paint store too, they should get a good laugh out of that one.

If people working in a paint store laugh at the idea of latex paint being made out of the same plastic that Plexiglas is made of, it's more sad than it is funny. That's cuz most people working in paint stores know next to nothing about the paint they're selling. If they did, they'd know that good quality latex paints are made from polymethyl methacrylate, which is the plastic that Plexiglas is made of.

Here, take a look at this Wikipedia page:
http://en.wikipedia.org/wiki/Poly(methyl_methacrylate)

Right at the beginning of that page it says:
"Poly(methyl methacrylate) (PMMA) is a transparent thermoplastic... ...and was first brought to market in 1933 by the Rohm and Haas Company, under the trademark Plexiglas.[4] It has since been sold under many different names, including Lucite and Perspex.

They're saying that Plexiglas is made out of PMMA, or polymethyl methacrylate.

Now, look further down on that same Wikipedia page under Artistic and Aesthetic Uses where it says:

"Acrylic paint essentially consists of PMMA suspended in water; however since PMMA is hydrophobic, a substance with both hydrophobic and hydrophilic groups needs to be added to facilitate the suspension."

What they're saying is that acrylic paints consist of extremely tiny blobs of hard clear and colourles Plexiglas (called "binder resins") suspended in water, and that a chemical is added to the paint to keep those tiny particles of plastic in suspension.

Now take a look at this page from the Rohm & Haas Company:

http://www.paintquality.com/homeowners/paint-advice/infosheets/100acrylic.pdf

In paint-speak, the term "100% Acrylic" means the binder resins are made out of polymethyl methacrylate and "vinly acrylic" means that the binder resins are made out of polyvinyl acetate, which is often abbreviated to "PVA".

That web page from Rohm & Haas lists the benefits of using paints made with PMMA resins, and point #1.b is that under wet conditions, there is a "minimized chance of peeling and loss of adhesion".

They're saying that if you use a 100% Acrylic paint on the ceiling and walls of a bathroom with a shower that's going to create wet conditions for the paint, the paint isn't less likely to peel off.

However, when most people see paint peeling in a bathroom, expecially on the ceiling and high up on the walls, they attribute the problem to insufficient prep work prior to painting. This is probably the most commonly misdiagnosed problem when it comes to painting.

http://cds.a9t2h4q7.hwcdn.net/main/...lcoverings/conco/ProductLarge/5000front1G.jpg
 
Messages
50
Reaction score
0
Points
6
Location
Keansburg, NJ
I put the grout in last night.. and ordered wainscotting for the bottom 36" of wall.

When I do install the toilet.. can I use the wax rings and bolts that are in the toilet box, or should I get new ones?
 

Attachments

  • photo (Large).jpg
    photo (Large).jpg
    47 KB · Views: 1,308

WJcandee

Wise One
Messages
3,182
Reaction score
170
Points
63
Location
New York, NY
I would look carefully at what they give you in the box, because it's not always the best quality. Frankly, if I were going to spend money on something, I would get myself a better set of tank-to-bowl hardware, as many of the reporting professional on here do with this toilet. I would likely get a decent set of closet bolts, meaning made out of an appropriate material in a good thickness, with two nuts: one to nut to the flange and another to secure toilet to flange. As to wax rings, if you have the flange at the proper level, which you will here, a standard-thickness wax ring should suffice; when using a single wax ring, many posters here recommend the one without any kind of plastic horn or flange built-in. Of course, it couldn't hurt to have a good, thick wax ring...
 

BobL43

DIY Senior Member
Messages
1,802
Reaction score
8
Points
38
Location
Long Island, NY
I put the grout in last night.. and ordered wainscotting for the bottom 36" of wall.

When I do install the toilet.. can I use the wax rings and bolts that are in the toilet box, or should I get new ones?

Just out of curiousity, why do you feel that the bolts and wax ring are any different than what you'd buy yourself? Are they not brass bolts, or long enough?

On my last toilet installation, I used the Sani-Seal ring instead of a wax ring. Its not very long ago, but it is very neat to use and I liked that part of it. I have had no leaks with it, and hope it lasts as long as the wax ring that was under the old toilet that I replaced. time will tell
 
Top
Hey, wait a minute.

This is awkward, but...

It looks like you're using an ad blocker. We get it, but (1) terrylove.com can't live without ads, and (2) ad blockers can cause issues with videos and comments. If you'd like to support the site, please allow ads.

If any particular ad is your REASON for blocking ads, please let us know. We might be able to do something about it. Thanks.
I've Disabled AdBlock    No Thanks