How does drain assembly get mounted in vessel sink - pictures

Users who are viewing this thread

CountryBumkin

Active Member
Messages
915
Reaction score
70
Points
28
Location
Orlando, FL
I purchased two vitreous china vessel sinks last week. i didn't order the drain assembly at the same time beacuse the sinks didn't say what size the drain holes were (1-1/2 or 1-3/4). So I received the sinks and meaured the opening (it's 1-3/4 inches) and went to HD to get the drain assemblies. Note that my sinks have overflows.

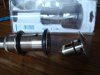
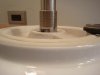
HD sold me the drains in the pictures (pop-up drain for sinks with overflow). I tried to instll the drains but they don't seem to work/fit. You can see in the pictures that if I insert the drain into the sink and tighten dowm the nut, the brushed nickel piece with the pop-up drain button sits about 3/8" off the bottom of the the sink. I don't see how this could work plus I don't like the looks. Did they sell me the wrong thing or am I not understanding how to install this?

The drain is the only think that holds the sink in place so the big nut is used to tighen the drain to the sink and the second big nut secures the sink/drain to the counter top. Maybe some plumber's puddy or silicone is used too - I don't know.

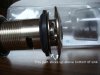
The piece that is shown out of the drain tube (pop-up drain assy) only slides into the drain as far as shown in the bottom picture. I stops against a machined shoulder. I want the top of the pop-up drain head flush with the bottom of the sink.

What kind of drain do i need?
 

Attachments

  • drainAssy2.JPG
    drainAssy2.JPG
    38.1 KB · Views: 12,827
  • drainAssy1.JPG
    drainAssy1.JPG
    37.4 KB · Views: 20,233
  • drainAssy3.jpg
    drainAssy3.jpg
    29.9 KB · Views: 12,195

Krow

Plumber
Messages
903
Reaction score
3
Points
16
Location
Ontario, Canada
The gasket that you have on the top of the assembly goes under the sink. In place of that gasket, you place plumber's putty.

this assembly is designed to sandwich the vessel sink and your countertop together so it doesn't move.

1. place putty under the top lip of the assembly and insert into sink hole.
2.next insert first large gasket up against the bottom of sink.
3.place sink over top the countertop so that the first gasket sits firmly on your top and the drain assembly penetrates through the top.
4. Now install the last gasket and nut inside the cabinet and tighten everything together.

Thats what it looks like anyway.
 
Last edited:

Jimbo

Plumber
Messages
8,918
Reaction score
18
Points
0
Location
San Diego, CA
Athough your sink has an overflow, as does the drain piece, the sink bottom is quite shallow and looks like it will require a special drain. You may have to buy the drain from the same company that made the sink.
 

CountryBumkin

Active Member
Messages
915
Reaction score
70
Points
28
Location
Orlando, FL
Thanks for viewing my post and replying.

Krow, I thought about what you said (installation method) before my first post but if I do it that way the only thing holding the sink to the counter top is the piece with the o-ring and plumbers putty. I suppose that would do the trick as long as no one pulled straight up on the sink. I would have expected that the sink would be attached to the counter top with a threaded connection/fitting. If the o-ring threaded in instead of a push fit, I would think it would be a more secure fit.

Jimbo, regarding the thickness of the sink and possibly needed a special drain assembly, I am going to call the sink supplier (Signature Hardware - item 244426) and see what they offer.

BTW, the sink sales description says "sink accepts a 1-1/2" lavatory drain) even though I measured the hole at 1-3/4".

Thanks again.
 

hj

Master Plumber
Messages
33,603
Reaction score
1,042
Points
113
Location
Cave Creek, Arizona
Website
www.terrylove.com
Your popup has a "hood" to cover the opening. The drainage takes place into the perimeter of the "hood". All you need is a standard popup drain with an exposed pop-up plug. One advantage of the hood is that it breaks up the aerated water stream coming from the faucet and thus will usually have a better drainage rate.
 

CountryBumkin

Active Member
Messages
915
Reaction score
70
Points
28
Location
Orlando, FL
Okay. this is a crappy drawing/photo but I hope this helps me ask my question. As hj noted the sink is thin for a sink with an overflow. I had the supplier send me a drain. I don't know if it will work. The new drain does not have the hood (which I like) but the slots for the overflow do not fall within the sink body itself when the drain is put in place. Meaning the overflow slots fall into the space under the sink and inside the granite. This would mean that any water overflow would drain through through the sink body and into the space between the bottom of the sink and the bottom side of the granite - which is sealed by the rubber washe. Could this possibly be the way the sink and drain are supposed to work? It seems it would work but it doesn't seem correct.
In this idea, the nut has the big rubber washer on top of it sealing the drain to the underside of the granite countertop (not as shown in the photo). The popup drain head would be flush on the bottom/inside of the sink with some pluber puddy under it. The sink would be installed with plumbers puddy under it sealing it to the top surface of the countertop. Will this work?
 

Attachments

  • Sink4.jpg
    Sink4.jpg
    25.1 KB · Views: 12,142

Cacher_Chick

Test, Don't Guess!
Messages
5,458
Reaction score
213
Points
63
Location
Land of Cheese
Sorry to be a bit off topic, but my first thought is that every time something small is dropped into the sink it will slip under the hood and be hard to retrieve. Worse yet, it might go unnoticed and be gone forever.
 

CountryBumkin

Active Member
Messages
915
Reaction score
70
Points
28
Location
Orlando, FL
Drain with Hood is bad idea

I agree that the hood sounds like a bad idea. I sent the first one back and received two more. Both are similar (no hood) in that the overflow holes are about 3/4 from the bottom of drain head and my sink is about 1/2 thick. i thought this was aproblem but now that I am studying the problem, I am beginning to think that the granite must be considered part of the sink body.

The bottom of the sink is flat (except a groove in the ceramic for a bead of plumbers puddy). So if the nut were to go directly on the bottom of sink, the granite countertop would need a cut recess to accept the nut. And there would need to be a second nut under the granite to mechanically hold the sink to the countertop.

This is probably obvious to a pro, but this is the first time I ever saw/had a vessel sink. Should I just put the tapered washer against the (rough) granite and tighten it up, or should I put some silicone around the hole first?
 

Attachments

  • SinkDrain5.JPG
    SinkDrain5.JPG
    11.9 KB · Views: 11,514
  • SinkDrain6.JPG
    SinkDrain6.JPG
    22.1 KB · Views: 11,362

Cacher_Chick

Test, Don't Guess!
Messages
5,458
Reaction score
213
Points
63
Location
Land of Cheese
A proper drain would only allow the overflow to drain into the the pipe, not into the space around the countertop hole.
 

CountryBumkin

Active Member
Messages
915
Reaction score
70
Points
28
Location
Orlando, FL
I understand you - it's not the correct way. But will it work this way? If not, I have to return everything and start over.
 

Cacher_Chick

Test, Don't Guess!
Messages
5,458
Reaction score
213
Points
63
Location
Land of Cheese
Not unless you can find a way to properly seal the mating surfaces at both the top and the bottom of the counter top. It will be very likely to fail as if the bowl is bumped hard enough it may break the seal.
 

Jimbo

Plumber
Messages
8,918
Reaction score
18
Points
0
Location
San Diego, CA
This install sheet for an American Standard vessel cabinet shows that the drain assembly is purpose-built.....it has a long threaded shank, and two nuts are used....one to secure the drain into the sink, and the second to secure the sink down to the counter top. So we are back to the fact that your drain is not proper for that installation.

If you installed it as shown in your pic with the overflow hole below the bottom of the sink , a leak is just about guaranteed.
 
Last edited by a moderator:

CountryBumkin

Active Member
Messages
915
Reaction score
70
Points
28
Location
Orlando, FL
Back to square one

Thanks again.
I guess I need to go back to the supplier. Perhaps my sink style needs that spacer used for glass vessel sinks shown in the instructions you attached.
 

Plumbermurrieta

Plumber
Messages
18
Reaction score
0
Points
0
Location
Murrieta Southern California
Website
www.plumbermurrieta.info
Before you even start ripping apart countertops or ordering a new vanity you must consider your options when it comes to vessel sinks. First and likely the most important is what material, style, color and shape. These items are important because it will allow you to determine the necessary height of the countertop, mounting method and countertop material. Something I am often asked is, "What is the ideal height of a bathroom vanity for a vessel sink?". My answer is usually, "personal preference", but to come to a decision on height you have to consider the height of most of the people who will be using the sink. Small children and short adults will find it uncomfortable if not impossible to use if the sink is to high, and tall people will have to bend over if the sink is to low.

Most bathroom cabinetry for regular under mount sinks are between 30 and 32 inches, plus the countertop. So if you have to decide if it is ok to bring the total height to over 36 inches (since most vessels are between 5 and 6" tall) or if you want to have a more realistic 30-32" total height. You may be in a situation where you do not have a choice, either you want to use the existing cabinetry you have or the cabinet you want only comes in a standard height. In this case you may want to consider recessing your vessel sink to reduce the overall height, which brings us to the two main ways vessel sinks are mounted.

There are essentially two main ways to mount a vessel sink, but to be more specific, there are two main ways to mount a bowl shaped or cone shaped vessel sink with a smooth outer surface that is NOT MADE OF GLASS. If you have a glass sink or square / rectangular / zen / oval sink then you are basically "stuck" with the above counter mounting method. The other method, which is effectively known as "recessing" allows you to lower the sink partially into the cabinet so only a fraction of the sink is above countertop level. This method requires that your sink be a non-translucent material and that the exterior of the sink be very smooth and even the whole way around in order to prevent gapping. The recessed method of mounting also allows for greater stability since the bowl shaped vessel sink is supported all the way around by the countertop, vs. being supported by a mounting ring, the weight of the sink, adhesive and the drain itself (or a combination of these) in the "above counter" method.
 

Redwood

Master Plumber
Messages
7,335
Reaction score
13
Points
0
Location
Connecticut
Some of the worst ideas in plumbing survive by being fashionable...

Vessel sinks are high on the list...
 

CountryBumkin

Active Member
Messages
915
Reaction score
70
Points
28
Location
Orlando, FL
Finished install

Thanks for all the help. I was able to order two drains without the overflow and drill the overflow holes where I needed them. That took care of the drain overfloe hole location issue. I got the sinks installed and luckily had enough thread sticking through the granite that I was able to use the nuts from the "old" pop-up drains to secure the sinks (as the "new" drain nuts where used to secure the drain to the sink itself) to the countertop. I used a scap piece of tile and drill a hole in it so the nut/tile would tighten up against the underside of the granite. It was more work than it should have been - but its done now.

BTW - do you receommend plumbers putty or silicone adhesive between the underside of the sink and top of the granite countertop? I used putty on one sink and ran out, and when I asked at HD the sales guy where the putty was he said use the silicone - so I used that on the second sink install.
 
Top
Hey, wait a minute.

This is awkward, but...

It looks like you're using an ad blocker. We get it, but (1) terrylove.com can't live without ads, and (2) ad blockers can cause issues with videos and comments. If you'd like to support the site, please allow ads.

If any particular ad is your REASON for blocking ads, please let us know. We might be able to do something about it. Thanks.
I've Disabled AdBlock    No Thanks