How Best to Replace Shower Drain Assembly (Plywood Subfloor)

Users who are viewing this thread

jmmec

New Member
Messages
6
Reaction score
0
Points
0
Location
New Mexico
Hi,

I had someone start a re-build for a custom shower on a 2nd floor (plywood subfloor). The original shower was not built correctly, and it is costing a lot of $$ to redo it (no warranty). :(

The guy working on the shower is at the shower pan phase, and I've figured out that the pre-slope was not done correctly, and I have concerns about how the shower pan was pieced together. So I want to tear it all out and re-start from scratch. I'm thinking I'll do everything myself. :eek:

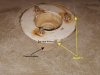
The bad thing is that the guy doing the job siliconed both the top and bottom of the drain assembly to the shower pan (also the weep holes are partially clogged!). So I can't easily remove the top clamping ring since it is glued on pretty tight with silicone.

I have two questions:
  1. Any ideas how to remove the top clamping ring without doing damage to the rest of the drain assembly? Looks like he used A LOT of silicone underneath it.
  2. Is it best to tear out the entire drain assembly and start over? If so, can it be done without tearing out the plywood subfloor? Could a plumber use an inside pipe cutter and replace the drain assembly?

Unfortunately, I do not have access to underneath the shower -- it is on a 2nd floor.


By the way, I'm pretty sure the drain pipe is PVC since I see signs of the purple primer, but I'm not sure if the drain assembly is ABS or PVC (I'm sorta dumb in that area), but it is definitely glued to the 2" waste pipe.

Attached are some pictures of what the drain currently looks like with the shower pan, and there is a plywood subfloor under the shower pan liner. The tile guy re-used the bolts from the original drain, and the top of the bolts are almost stripped.

I appreciate your help!

drain2.jpg
drain3.jpg
 
Last edited by a moderator:

Jadnashua

Retired Defense Industry Engineer xxx
Messages
32,771
Reaction score
1,191
Points
113
Location
New England
White=pvc, black=abs.

It doesn't appear that the preslope is under that liner, so to do it right, it needs to come out as well.

Proper buildup on a plywood subfloor is metal lath stapled to the floor, preslope, liner, setting bed, then finished tile floor. Check out www.johnbridge.com for help with that part of the construction. If I was going to do this, I'd use the Kerdi system from www.schluter.com. That would require a different drain altogether. They have some videos on the Schluter site to see how to do that. For custom sizes, you'd still make the preslope almost the same, but that becomes the only layer of deck mud needed...then you apply the Kerdi membrane and tile to it.

It somewhat depends on how long the riser to that drain is. If it is long enough, you could use an internal cutter, cut the pipe, then use a coupler to add a section back and a new drain assembly. If you can get the top part of the clamping drain off, you might be able to use a hack saw blade to cut through the outside of the drain assembly and peel it off. You'll possibly mess the pipe, but often you can with some finese.

If you want to stick with a conventional shower construction, you may need to buy a new liner if you can't get the drain out without cutting.

Keep in mind that the deck mud underneath the liner at the drain should be about minimum 3/4" thick (you could get by with less if it was a concrete slab), otherwise, it doesn't have enough strength. It looks like yours is installed flush with the floor, so it'd be too low with a proper preslope then liner install. Hard to be sure from a picture, though.
 

jmmec

New Member
Messages
6
Reaction score
0
Points
0
Location
New Mexico
Turns out all I needed was your encouragement. :D

I was able to get the clamping ring off without too much trouble by gently prying around (and into) the clamping ring with a screwdriver. Of course the liner is trashed, but that's okay. The remaining drain parts look okay, so guess I just need a new clamping ring if sold separately.

Please see the attached picture -- any idea why there are nails around the drain? (I point out 2 nails, but there are more.) The nailheads would puncture the liner, I would think, especially since the pre-slope mud had broken away (it was about 1/4" thick around the drain). Also, he didn't use metal lath / plastic on top of the plywood before putting down the mud.

I have looked at JohnBridge, and will do more study and take another look at Schluter (ripping out the existing drain scares me, as well as the extra cost).

Now I need to break-up & get the pre-slope out of there, and then do my own pre-slope. I was thinking about using the "Pre-Pitch" system to help me:

http://www.tools4flooring.com/prepitch-standard-kit-p-833.html

Thanks!
 

Attachments

  • drain5.jpg
    drain5.jpg
    52.1 KB · Views: 13,657

jmmec

New Member
Messages
6
Reaction score
0
Points
0
Location
New Mexico
Kerdi & Clamping Drain

I just came across this post on John Bridge:

Just talked to David at Experts and indeed the KDA (and another brand new product, KD3) solves the problem of going Kerdi after a clamping drain is installed.

I'm going to explore how much $$ it would cost to do Kerdi.

Thanks
 

jmmec

New Member
Messages
6
Reaction score
0
Points
0
Location
New Mexico
I'll probably go with Kerdi....

I talked to a guy a tile-experts.com this morning, and I could use the Kerdi KDA drain with my existing clamping drain system, however that would require two mud beds (and the KDA drain is $115).

Instead, he suggested using an inside pipe cutter to remove the existing clamping drain system, and buy the normal Kerdi drain for $95. Then I only need a pre-slope mud bed.

I got a lot more to learn....
 

Jadnashua

Retired Defense Industry Engineer xxx
Messages
32,771
Reaction score
1,191
Points
113
Location
New England
The advantage to a Kerdi shower is that the whole thing is waterproof and there's very little to retain moisture. If you use a porcelain tile, that won't absorb much of any moisture (often less than 1%), and there's not much mortar underneath. If you go conventional shower, you have an inch or so of porous cement underneath the tile and 1/2" cbu on the walls. Depending on how much the shower is used, that can absorb and retain moisture. WIth a Kerdi shower, you've waterproofed the whole thing, floor and walls which means you can use drywall on the studs (easier and cheaper and faster to install). Putting it up is sort of like wallpaper, except you overlap the seams instead of butting them. You can butt them, then use their banding material, which is thinner, to minimize any buildup from the overlaps. As long as you get at least a 2" overlap of the material, it will be waterproof. At a class, they had applied Kerdi to a paper box, then used it for months as a drink cooler. By the end of the day, it was full of ice-cold water instead of ice...box was fine.

I've used it twice, once on my tub/shower, and in a custom shower I built for my mother. It's worth the piece of mind to have the whole thing waterproof. A conventional shower only needs to be waterproof at the liner, but having the whole thing also helps keep mold and mildew down. Regardless, though, you need a good fan or ventilation, especially if you live in a damp, humid environment.
 
Top
Hey, wait a minute.

This is awkward, but...

It looks like you're using an ad blocker. We get it, but (1) terrylove.com can't live without ads, and (2) ad blockers can cause issues with videos and comments. If you'd like to support the site, please allow ads.

If any particular ad is your REASON for blocking ads, please let us know. We might be able to do something about it. Thanks.
I've Disabled AdBlock    No Thanks