Hiding main water valve

Users who are viewing this thread

dosby

DIY plumber
Messages
24
Reaction score
1
Points
3
Location
Bellevue, WA
As part of my basement renovation, I am thinking of opening up an unfinished closet which has a main water pipe with a valve. I will be finishing the concrete wall with 2x4's, insulation, and drywall.
There is a main water line there, however, which I am planning to hide behind an access panel.
Is there a regulation as to what size/material that panel should be? I was thinking just enough to be able to operate the main valve as well as pressure relief valve - thinking of moving the main valve up the stack closer to PRV.
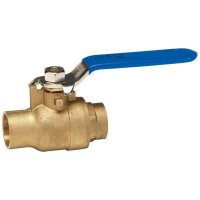
I am also thinking of replacing the valve with a ball valve and rotating the handle to make it parallel to the wall or even facing so that the handle could be completely concealed in the wall instead of sticking out. The pipe itself is currently at 3.5" from the concrete wall so it could be covered with drywall Ok.
The house is 1979, so pipes are relatively new and should not crumble.
Anything wrong with the plan?
Pics attached.
Thx
main water valve.jpg
main water valve closeup.jpg
 

Terry

The Plumbing Wizard
Staff member
Messages
29,946
Reaction score
3,460
Points
113
Location
Bothell, Washington
Website
terrylove.com
The pipe can be covered or exposed. There is no code that cares about that.
And if you have a T&P on your water heater you won't need the 125 PSI relief valve on the cold side there. That was a Bellevue requirement from the 80's.
If there isn't a T&P on the water heater, then the relief valve stays.
 

Dj2

In the Trades
Messages
2,611
Reaction score
258
Points
83
Location
California
New water heaters come with a T&P valve. If your WH is older than 10 years and has no such valve, install one. Or better yet, replace your water heater. Make sure the T&P valve drains outside or into a drain via 3/4" copper pipe.

It's your choice to keep this one or eliminate it. If there is no drain near bu, I would cancel it.
 

dosby

DIY plumber
Messages
24
Reaction score
1
Points
3
Location
Bellevue, WA
The pipe can be covered or exposed. There is no code that cares about that.
And if you have a T&P on your water heater you won't need the 125 PSI relief valve on the cold side there. That was a Bellevue requirement from the 80's.
If there isn't a T&P on the water heater, then the relief valve stays.
Thanks!
I do have a T&P on my new water heater (same 50 gal AO Smith with identical specs to the one from 1998, surprisingly) which drains right outside the garage, not sure if the previous one had T&P but the drain pipe was already there. I also have a blue expansion tank now.
I think I will keep the PRV - I checked it, it still works fine. With all the new construction around who know what will happen to PSI in our neighborhood, if it spikes I don't want my steel/copper pipes bursting.
So, I will just replace the main valve with some quarter turn one, move it up the stack and turn around so that the handle faces the wall.
I was wondering if there is any limit on the main valve installation height. With kids, I am guessing the higher the better :)
 

dosby

DIY plumber
Messages
24
Reaction score
1
Points
3
Location
Bellevue, WA
so what fittings are recommended for in-place pipe replacement?
something like slip coupling for ABS drain pipes?
84d2ce54-7169-4ea3-92ae-9c1c5893f91e_1000.jpg
636660616048.jpg
 

Dj2

In the Trades
Messages
2,611
Reaction score
258
Points
83
Location
California
You can't introduce galvanized to copper. The don't like each other.
 

dosby

DIY plumber
Messages
24
Reaction score
1
Points
3
Location
Bellevue, WA
Those are pictures of galvanized fittings. You have copper now. Why not copper or PEX?
You are right, it's copper, the pipe was so dirty I could not recognize (and lack of experience, of course :)), had to scratch it to confirm
It makes my life much easier, I can solder it just like I did 1/2" pipes for my shower.
Found a slip coupling, too.
So what valve would you recommend? I know I could as well keep the existing one but why not replace with quarter turn.
Screen Shot 2016-05-13 at 10.20.34 PM.jpg
 

dosby

DIY plumber
Messages
24
Reaction score
1
Points
3
Location
Bellevue, WA
Will this valve be fine there?
So I am planning to cut out the existing valve and a chunk of existing pipe above it right up to just under the PRV's tee
Insert a new valve between PRV's tee and that chunk of pipe, solder the valve then solder the slip coupling at the bottom of the pipe chunk
Does it sound right? I am planning to reuse the existing pipe, it seems to be in good shape.
I think it should work w/t having to buy new 1" pipe, if the length of new valve is greater than that of the existing one.
 

Attachments

  • 6765b586-3e7e-4c19-82e9-13ea3d34d570_1000.jpg
    6765b586-3e7e-4c19-82e9-13ea3d34d570_1000.jpg
    39.3 KB · Views: 262

dosby

DIY plumber
Messages
24
Reaction score
1
Points
3
Location
Bellevue, WA
This is what I ended up doing. Instead of painful soldering with my small torch, bought sharkbites, one slip connector and a 1/4 turn valve. Not the cheapest solution but well worth the time and trouble I avoided. Replacement took less than 30 min. including shutting/opening the street valve - had to use 13mm wrench there. The hardest part was sliding the slip coupling down using a small orange horseshoe.
The lengths worked out perfectly, I cut out the old valve which was, like, 3.75", and reused the same pipe piece, slip coupling covered 2" span and the new valve 1.75" !
Now I need to find some good access panel and prepare some framing for it while it's all open.
20160709_200749s.jpg
20160709_200759s.jpg
20160709_200806s.jpg
 

FullySprinklered

In the Trades
Messages
1,897
Reaction score
208
Points
63
Location
Georgia
I started using the slip coupling maybe last year. I was skeptical at first, but I like them a lot. Solves a lot of problems. I've had trouble sliding them back also. What I do in that situation is to snap the little tool on there, then tighten my crescent wrench down on the pipe, loosen it slightly and tap evenly on the tool until the fitting bottoms out. Helps in removing SBs also.
 

dosby

DIY plumber
Messages
24
Reaction score
1
Points
3
Location
Bellevue, WA
I started using the slip coupling maybe last year. I was skeptical at first, but I like them a lot. Solves a lot of problems. I've had trouble sliding them back also. What I do in that situation is to snap the little tool on there, then tighten my crescent wrench down on the pipe, loosen it slightly and tap evenly on the tool until the fitting bottoms out. Helps in removing SBs also.
That is a great advice.
What I have not figured out yet is what actually releases the grip, pushing on an inner plastic sleeve or a metal rim?
 

Flapper

Member
Messages
516
Reaction score
27
Points
18
Location
California
This is what I ended up doing. Instead of painful soldering with my small torch, bought sharkbites, one slip connector and a 1/4 turn valve. Not the cheapest solution but well worth the time and trouble I avoided. Replacement took less than 30 min. including shutting/opening the street valve - had to use 13mm wrench there. The hardest part was sliding the slip coupling down using a small orange horseshoe.
The lengths worked out perfectly, I cut out the old valve which was, like, 3.75", and reused the same pipe piece, slip coupling covered 2" span and the new valve 1.75" !
Now I need to find some good access panel and prepare some framing for it while it's all open.View attachment 35114 View attachment 35115 View attachment 35116
You can get a valve with a slip end so you don't need a separate coupling.
http://www.homedepot.com/p/SharkBite-3-4-in-Brass-Push-to-Connect-Slip-Ball-Valve-24736LF/205476362
e62f9b6e-32fd-4272-a881-27736ed28741_400.jpg
 

dosby

DIY plumber
Messages
24
Reaction score
1
Points
3
Location
Bellevue, WA
It's only 3/4", not 1", but good to know they exist.
I had to cut out the old valve, anyway, and put a new one 2 ft higher, so I had to patch 2 spans. Yes I could do a regular coupling plus this slip valve instead of slip coupling and regular valve. If 1" slip valve existed.
Now that I am really thinking about what I should have done, is just replace the valve in-place and have a lever turn behind the pipe. The thickness of a 1/4 valve, though, would cause me building a new wall 0.5-1" farther from the concrete wall that it is now. Slip coupling is much thinner than a 1/4 valve's body.
 
Top
Hey, wait a minute.

This is awkward, but...

It looks like you're using an ad blocker. We get it, but (1) terrylove.com can't live without ads, and (2) ad blockers can cause issues with videos and comments. If you'd like to support the site, please allow ads.

If any particular ad is your REASON for blocking ads, please let us know. We might be able to do something about it. Thanks.
I've Disabled AdBlock    No Thanks