Help: How to Fix Tiled Shower Tray?

Users who are viewing this thread

Arun

New Member
Messages
8
Reaction score
0
Points
1
Location
Washington, DC
Folks,

We are having our bathroom remodeled and have run into problems. In one bathroom, the contractor recommended a tiled shower tray for a neo-angle shower door, specifically,

http://www.homedepot.com/p/DreamLin...e-in-Brushed-Nickel-SHEN-2136360-04/204290392

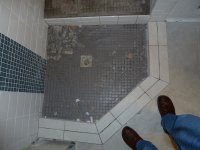
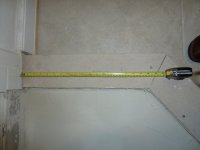
The first attempt to build the tray went very wrong. The second attempt is better but leaves something to be desired. The mosaic floor tiles vary quite a bit in size at the edges of the tray. Moreover the two legs of the shower curb are not perpendicular to the wall. See pic below, and the gap in the lower left corner between the edge of the curb and the edge of the new shelf structure at the very bottom left of the picture.

The contractor indicates this is all because the walls are not square. I don't understand this b/c presumably the perfectly symmetric prefabricated shower tray could have been installed. I think the problem, at least in part, is that the curb wasn't constructed properly.

Any thoughts and suggestions would be really appreciated.

Arun
 

Attachments

  • P1010193.JPG
    P1010193.JPG
    80.8 KB · Views: 335

Jadnashua

Retired Defense Industry Engineer xxx
Messages
32,770
Reaction score
1,190
Points
113
Location
New England
I'm not particularly impressed. But, a bit of information on what's underneath may be telling and a deciding factor on whether it should be torn out and started over. Do you have any pictures of the basic construction as it was being put together?

FWIW, there are lots of different tested, reliable ways to build a shower. GIven what it looks like in your picture, I wouldn't have confidence in the guts of the thing having been put together properly.

You might want to also check out www.johnbridge.com .
 

Arun

New Member
Messages
8
Reaction score
0
Points
1
Location
Washington, DC
Thanks very much for the feedback. Here is some more information.

This bathroom is on the second floor. The bathroom space was originally part of the bedroom. The original add-on bathroom (built in the early 90s) had a prefab shower tray over the original wood flooring from what I remember.

For this renovation, the wood flooring was removed. Backer board was laid down. For the shower tray, the curb was constructed, concrete was poured and a white lining placed/poured over it covering the bottom. Then the tile placed on it.

Attached is a pic of what it looked like last night before the tile went down. Last night, the two legs of the curb differed by an inch in length. They fixed that today, though I'm not sure how it was done given that the concrete was already poured, etc.

Happy to provide additional information.

Thanks again.

Arun
 

Attachments

  • P1010192.JPG
    P1010192.JPG
    50.6 KB · Views: 340

Arun

New Member
Messages
8
Reaction score
0
Points
1
Location
Washington, DC
Unclear why the contractor didn't fix the walls. The walls are already tiled (by the contractor). This was a redo of the first attempt at the shower tray.

And yes a glass-walled shower enclosure is going up--it's the one in the link in the first post in this thread. If the walls aren't square I'm wondering if the enclosure can be installed properly.

Suggestions on what to do now?
 

Jadnashua

Retired Defense Industry Engineer xxx
Messages
32,770
Reaction score
1,190
Points
113
Location
New England
Plumbing code requires the waterproof layer (that is NOT the tile) to extend at least 2" above the top of the curb. ANd, it looks like they put screws into the top of the curb. IF there was any waterproofing there, it is now shot. One study I saw indicated that 70-80% of the tiled showers built in the USA are not built properly...yours is just adding to that value. Building one isn't particularly hard, at least in concept (skill can make it look good), but it is VERY detail oriented...sorry to say this, but I have little confidence that this is being put together properly, let alone the quality of the workmanship on aesthetics.

The Tile Council of North America sets the standards for various ways to build a shower that are known to work. This is probably the industry bible on how to put one together, and should be considered a baseline of good practices. From the little I can see, it does not appear that the people putting this together have a clue on those requirements, or how to do one properly. But, viewing this from remote can be misleading, but I don't think so.
 

Plumber69

In the Trades
Messages
2,380
Reaction score
214
Points
63
Location
Prince Rupert, British Columbia
Unclear why the contractor didn't fix the walls. The walls are already tiled (by the contractor). This was a redo of the first attempt at the shower tray.

And yes a glass-walled shower enclosure is going up--it's the one in the link in the first post in this thread. If the walls aren't square I'm wondering if the enclosure can be installed properly.

Suggestions on what to do now?
Glass walls won't work unless the walls and base are almost perfect.
 

Arun

New Member
Messages
8
Reaction score
0
Points
1
Location
Washington, DC
Thanks very much for all the feedback. As part of the fix, would it be better to just go with the prefab shower tray? I realize that this won't take care of installing the glass doors with imperfect walls, but would the prefab tray be better than trying to fix the tiled shower tray? The prefab tray for this door is

http://www.homedepot.com/p/DreamLin...eo-Shower-Tray-in-White-DLT-2038380/204045983

I'm not a fan of these prefab units (they are hard to keep clean in my experience and can squeak when stepped on) but it might be the lesser evil. Is there an alternative prefab shower tray that would be better?

Thanks again.
 

Jadnashua

Retired Defense Industry Engineer xxx
Messages
32,770
Reaction score
1,190
Points
113
Location
New England
Without being there, it's hard to say how things are together right now. I'd mentioned the liner, but tying the wall to the pan is also critical as is what was put behind the tiled walls. Lots of little details, any one of which done wrong can doom a shower. Given the guy moved the curb, I do not see how he was able to verify the integrity of the waterproof layer to the wall, and up over the curb. As I said, you CANNOT put screws into the top or insides of the curb to hold cbu in place. In fact, CBU on the curb is NOT an accepted way to make a curb, since you cannot waterproof it properly done that way. CBU is NOT waterproof, but it is not damaged by being wet and is stable and compatible with the mortar used to set the tiles.

Personally, I prefer a tiled shower pan. If a preformed one is installed properly, it should not move or squeak, or flex. But, again, lots of people just slap it on the floor. First, the floor itself must be perfectly flat and plumb OR, in the process of setting the pan in place, you must make it that way. Given what I see from the guy's workmanship, I'm not sure he can accomplish that.

Was a flood test ever done? Plumbing code requires one. I do not have faith in what I can see. A flood test after tile is installed isn't as reliable since it's harder to verify a slight drop in level isn't just water saturating the mortar. Normally, it is done after the liner is installed, so there is nothing to absorb the water, and verifying the level is easier and more reliable. But, a flood test done now might still verify the integrity of the thing. With the fasteners holding the cbu on the curb, I'd bet it leaks like a sieve. Again, the waterproof layer is the liner. A properly built shower should be waterproof before the tile is installed, which is the decorative, wear layer, not waterproofing. And, you can't do anything to compromise the liner after the flood test, or it was useless.

My sister bought a nice house out in Haymarket, not far from Washington...cost lots of money (at least in my view of things). I had to help them fix some stuff, the shower leaked, the tile on the floor outside cracked because they did not follow industry standards on installing it, and while it looked great when new, it did not last more than about 5-years before major issues started to show up. I don't give yours that long, if I'm right on what I see (again, I'm not there and we don't have construction pictures to see how it was done).
 

Dj2

In the Trades
Messages
2,611
Reaction score
258
Points
83
Location
California
From the picture: tear it all off and start from scratch.

Who will pay for this is another question. If you have a written contract, see if you can make the plumber to pay. If he is licensed and bonded, go to your state board and see if they can help. You will need VERY strong evidences with your claim. If the installer is unlicensed, it's over, the Buck stops here.
 

hj

Master Plumber
Messages
33,603
Reaction score
1,042
Points
113
Location
Cave Creek, Arizona
Website
www.terrylove.com
The "pan" is square with 90 degree corners. The only wall that is straight is the left hand one. ALL the others were crooked so they do NOT conform to the design of the pan. DO IT OVER CORRECTLY. The plumber connected the pan. He did not build the walls.
 

Arun

New Member
Messages
8
Reaction score
0
Points
1
Location
Washington, DC
Folks,

I really appreciate all the careful feedback and advice. It looks like it has to be redone from scratch.

I'll add that the walls were built by the contractor. The left-hand one was taken down to the studs and redone. New studs, etc. were used to create the tiled shelf at the top of the picture and the wall behind it, which is not visible in the picture.

Thanks again.

Arun
 

Arun

New Member
Messages
8
Reaction score
0
Points
1
Location
Washington, DC
Thought I would report back on this story. The contractor who did the work argued that I was just being picky and that I could take him to court if I wasn't happy. Ended up getting three other contractors to take a look at the work. They were not impressed and confirmed, as HJ pointed out, that the only wall that was square was the left-hand one. Also recommended, as you folks did, that given what they saw of the workmanship, it was best to tear out the tray and start over.

New contractor found upon removing the tray that the integrity of the waterproof liner had not been preserved, as suspected by jadnashua. He redid the tray area and adjacent tiling and made sure the walls were plumb. The final product now looks very nice. Am out a few thousand dollars though!

Thanks again for all your feedback.
 
Top
Hey, wait a minute.

This is awkward, but...

It looks like you're using an ad blocker. We get it, but (1) terrylove.com can't live without ads, and (2) ad blockers can cause issues with videos and comments. If you'd like to support the site, please allow ads.

If any particular ad is your REASON for blocking ads, please let us know. We might be able to do something about it. Thanks.
I've Disabled AdBlock    No Thanks