Hansgrohe 35015 rough in valve help

Users who are viewing this thread

Jsmallberries

Member
Messages
265
Reaction score
18
Points
18
Location
Zephyrhills, Florida
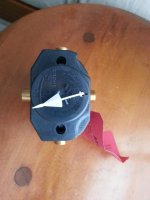
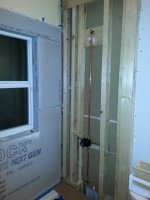
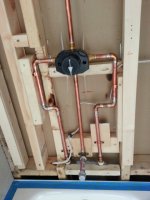
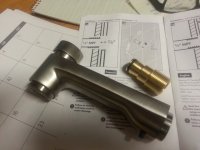
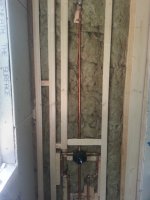
I purchased a Hansgrohe control valve for my bathroom remodel. Need some help with the rough in body.
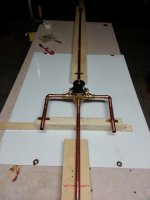
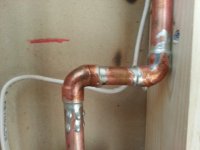
I've seen online videos where the 1/2" copper is "sweated" into the rough in, instead of Using NPT or threaded female.

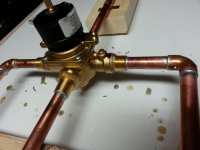
1) Better to use threaded NPT-MIP to connect to the valve than to solder copper to the interior at the rough in valve? Pros and cons

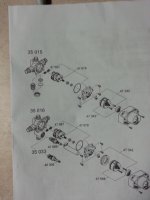
2) Instructions state not necessary to remove cartridge during "normal" soldering. Assume they mean if you are using threaded connections at the port, soldering 1/2" copper to the port would require applying heat to the port, to draw in the solder?

3) There is no mounting flange. Install advice without a mounting flange?

4) The plastic finish wall template directions state, "the finished wall must be within the dimensions shown on the template? there is app a 1" range . Is it better to have it flush with the finished wall or slightly proud or slightly recessed?

5) Once installed and pressure tested is there an internal water shut off besides the control knob

Any other advice greatly appreciated
 

Attachments

  • Grohe 35015.jpg
    Grohe 35015.jpg
    112.6 KB · Views: 842

Terry

The Plumbing Wizard
Staff member
Messages
29,946
Reaction score
3,460
Points
113
Location
Bothell, Washington
Website
terrylove.com
I like to install somewhere in the middle of what I think the finished wall will be at.
You never know exactly where the finish will be, so I like to be safe on that.
I've come back and the tile guy has shimmed the heck out of the wall on me.
 
Last edited:

Jadnashua

Retired Defense Industry Engineer xxx
Messages
32,771
Reaction score
1,191
Points
113
Location
New England
If your install is not between the min/max, the trim will not fit! If it is too far inside the wall, you might be able to buy an extension kit to move the trim and handle out, but if it is too far out, nothing will fix it except relocating the valve. Temporarily, install the trim, view where the handle is relative to the escutcheon plate, and see where you prefer it, then attempt to get it close to that point. All the min/max does is verify the trim will fit, not that you'll like the way it looks. Lots of people complain about the handle sticking out too far...it is not defective as long as it fits. You have to decide how you prefer it to look, then get the rough-in where that can happen. A mockup board can save your sanity, especially if your spouse has anything to say about how it looks in the end! Figure it out beforehand, as after the tile is installed, it's a major pain to change.

As to supporting the thing, straps or clamps around the supply lines can work - blocking makes that possible. Once things are roughed in, if you used threaded connectors and they leak, you still have to tear most of it apart to fix it...most find it better to just solder it in and have one less connection. Remove the cartridge to be safe.
 

Jsmallberries

Member
Messages
265
Reaction score
18
Points
18
Location
Zephyrhills, Florida
Thanks for the advice.

Since I'm doing the build out and tile work, I can set this where I want it,within min/max of course. On this template, the maximum would put this furthest back into the wall, minimizing control protrusion. Yeah, will run it by the wife first

Good point about if there is a leak, there is no easy fix, so why not eliminate the four connectors. As for removing the cartridge, any advice with that?

I apologize for so many questions, but I have not had the pleasure of building and installing the riser rough-in from scratch before. I was going to reuse the old copper riser, 15 years old in good shape, but the plumber I hired to help install the cast iron tub helped himself to it.
 

Jsmallberries

Member
Messages
265
Reaction score
18
Points
18
Location
Zephyrhills, Florida
Arghhhh, not computing, there is no simple cartridge to remove. Do I need to disassemble this entire valve. can't have any plastic remaining. See diagram, maybe this one is designed for threaded connectors.

But directions clearly state " do not have to remove the cartridge for normal soldering connections"

How can the internal components "not" get damaged if the brass body is heated enough to solder?
 

Attachments

  • specs.jpg
    specs.jpg
    94.5 KB · Views: 767

hj

Master Plumber
Messages
33,599
Reaction score
1,037
Points
113
Location
Cave Creek, Arizona
Website
www.terrylove.com
IF you are proficient in soldering, the body will act as a heat sink to protect the internals, but if for any reason you need excessive heat, then you must remove the cartridge, which on your faucet is part #47-678.
 

Jsmallberries

Member
Messages
265
Reaction score
18
Points
18
Location
Zephyrhills, Florida
Thanks HJ,

IF.....what's the worst that can happen. guess I'll find out.

I also have no room on one side, need immediate right angle right out of the valve body

What's the smallest pipe gap I can solder between the valve body and right angle fitting and still get a good sealed joint on both, any advice on that?
 

Jsmallberries

Member
Messages
265
Reaction score
18
Points
18
Location
Zephyrhills, Florida
Set it up on a table top, secured, leaving a couple of fittings to be soldered that will be in between the incoming CPVC and the valve body, while it's installed. Figured it was best not to re-heat near either.

There is a warning tag, stating, to test valve, hot and cold must be applied at the same time.

After I connect the CPVC to copper and solder the last connectors,......
1) What's the next step? How do I test the valve and soldered fittings? flush the debris, etc, without fixtures installed
2)If a soldered fitting leaks, can I reheat and re- solder, or am I up the proverbial creek, paddleless
 

Attachments

  • Set up solder.jpg
    Set up solder.jpg
    91.8 KB · Views: 873
  • soldered pipe.jpg
    soldered pipe.jpg
    109.7 KB · Views: 1,213
  • Riser final resting place.jpg
    Riser final resting place.jpg
    116.9 KB · Views: 711

Jadnashua

Retired Defense Industry Engineer xxx
Messages
32,771
Reaction score
1,191
Points
113
Location
New England
On many valves, with the cartridge removed, it then makes sense to try to flush the lines before reinstalling the cartridge. If the cartridge is left in place, not sure how any flushing would really help!?

Once a joint becomes contaminated with water, you have to take it apart, clean, and then resolder it...you cannot just reheat and add solder...the trapped water will prevent the joint from working properly.

Most valves have a pressure balance feature, and wont' pass water, or if they do, not much, unless both supplies are on. That pressure on both sides keeps the spool valve centered, which is what allows water to pass through.
 

Jsmallberries

Member
Messages
265
Reaction score
18
Points
18
Location
Zephyrhills, Florida
Any way to tell if a soldered joint is bad?

I had trouble sweating the joints with the riser in the wall, no room to work. I held a mirror at the back of the joints and didn't see complete coverage on some, so re-heated and added more, that's where those large drops came from(see pic)

I did run water from shower head spout and tub spout, then capped them off for 24 hours, leaving the control on, no leaks, for now.

That's what concerns me, as the next step is durock, hydrobarrier and tiling
 

Attachments

  • Lumpysolder.jpg
    Lumpysolder.jpg
    96.2 KB · Views: 679
  • riser Completed.jpg
    riser Completed.jpg
    121.5 KB · Views: 1,112

Jadnashua

Retired Defense Industry Engineer xxx
Messages
32,771
Reaction score
1,191
Points
113
Location
New England
If you cleaned and applied flux to the whole joint, and heated things evenly enough, solder will wick to all of the areas. It doesn't look like you got things too hot to burn out the flux, which could be an issue. Normally, you do not need anywhere near that amount of solder...
 

Jsmallberries

Member
Messages
265
Reaction score
18
Points
18
Location
Zephyrhills, Florida
Thanks Jim,

I cleaned and added flux to all pipes and fittings, I panicked when I didn't see solder all the way around the joint, then added more, oh well

I understand now, for next time. Just hope it's not this riser again once the wall is up, that wold really be painful
 

Jadnashua

Retired Defense Industry Engineer xxx
Messages
32,771
Reaction score
1,191
Points
113
Location
New England
Before you close the wall up, you can install a cap or plug at the end of the riser to test it for leaks, too. When soldering, the liquid flows toward the heat, which is why you heat the fitting (mostly) and not the pipe going into it. The fitting tends to have more thermal mass, so it's another reason why you heat it rather than the pipe.
 

Jsmallberries

Member
Messages
265
Reaction score
18
Points
18
Location
Zephyrhills, Florida
I had plugged both and left the control valve on overnight, no leaks.

Before I complete the wall, I'm second guessing whether if the fixtures I bought were a good choice, or not. The Hansgrohe tub spout with diverter install requires to leave 1/2" male NPT, 3/8" behind the finished wall. (See photo)

1) If the spout needs replacement at some point, is this mounting arrangement going to cause problems trying to find a spout that fits?

2) This tub will be used 95% as a shower only, is a spout diverter a good option

3) Is the valve body a good choice? thinking now a control w/diverter would have been a better choice.

Just trying to get the most sensible fixtures before competing the shower walls. I can still return all but the valve body. any recommendations greatly appreciated
 

Attachments

  • Spout.jpg
    Spout.jpg
    112.9 KB · Views: 702

Reach4

Well-Known Member
Messages
38,749
Reaction score
4,400
Points
113
Location
IL
Before I complete the wall, I'm second guessing whether if the fixtures I bought were a good choice, or not. The Hansgrohe tub spout with diverter install requires to leave 1/2" male NPT, 3/8" behind the finished wall. (See photo)
If you have enough clearance, it seems to me that you could could later screw a coupler on to extend the pipe beyond the wall. If that is a nipple that you will have recessed, you could have the option of unscrewing it with an internal pipe wrench.
 

Jsmallberries

Member
Messages
265
Reaction score
18
Points
18
Location
Zephyrhills, Florida
Hey, one more thing, for now anyway,
while there are no leaks, strong flow through the temporary threaded nipples top and bottom

1) I've read there is a potential for water to leak from the shower head when running the tub spout. Is there a required distance between the control and shower head to prevent this? I used 1/2" copper for the riser and have a Hansgrohe control and tub spout w/diverter, 44" from control to shower head.
 

Jadnashua

Retired Defense Industry Engineer xxx
Messages
32,771
Reaction score
1,191
Points
113
Location
New England
A couple of things come to mind...
- the valve to spout needs to be full-diameter piping so that the combination of gravity and low friction causes the water to go out the spout verses backing up and going out the riser to the showerhead.
- some tub spouts require a twin-el fitting to help prevent water backing up to the showerhead in the riser. If yours called for the use of one, and you didn't use it, yes, you could have a problem.

The minimum distance of the valve to the spout is usually such that the trim will fit...most people would not put the valve really high up an interfere with the shower head. If your valve body allows use of both ports, the top one is usually smaller to help create a bit of resistance, and keep the flow out the spout unless the diverter is activated. This typically isn't an issue unless you are feeding multiple showerheads, as Federal standards require the showerhead to be flow restricted.
 

Jsmallberries

Member
Messages
265
Reaction score
18
Points
18
Location
Zephyrhills, Florida
Used Roxul "Safe N Sound" in between the studs, in and around pipes. any reason not to?

Trying to cut sound when bath/shower being used to the bedroom behind this wall.

Durock with Laticrete Hydrobarrier over the studs, so not worried about water entry from that, now f the pipes leak ?????
 

Attachments

  • Roxul (2).jpg
    Roxul (2).jpg
    121.1 KB · Views: 675
Top
Hey, wait a minute.

This is awkward, but...

It looks like you're using an ad blocker. We get it, but (1) terrylove.com can't live without ads, and (2) ad blockers can cause issues with videos and comments. If you'd like to support the site, please allow ads.

If any particular ad is your REASON for blocking ads, please let us know. We might be able to do something about it. Thanks.
I've Disabled AdBlock    No Thanks