DWV Layout

Users who are viewing this thread

tombat

New Member
Messages
21
Reaction score
0
Points
0
Location
Seattle
Another homeowner doing a remodel and looking for advice. I've done the DWV for relocating the washer and adding a utility sink in the basement and a fresh layout for the bathroom.

Everything is done in 2" except the toilet and the vent which are 3". The main drain portion is 4". Any comments would be greatly appreciated.

I'm hoping everything is pretty good. My biggest concern is the venting for the shower.

I'll let pictures tell the story. Nothing is glued up yet and I haven't tapped into the existing system.

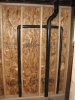
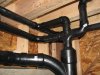
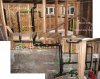
Pic 1: Bathroom connections. Sink on the left, toilet in the center and the vent from the basement coming up on the right.

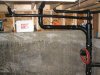
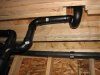
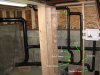
Pic 2: This shows the connections in the basement. Left is the bathroom sink (with future expansion to kitchen sink), center is the toilet, and right is the vent.

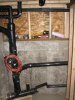
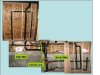
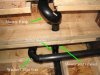
Pic 3: This barely shows the shower - you can see the bottom of the P-trap in the top of the picture. The top horizontal pipe is the vent. The 3" line is the existing bathroom and the 2" line will be for the washer/utility sink.

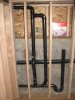
Pic 4: Washer and utility sink - as seen before on this forum.

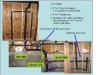
Pic 5: This is the top of the 4" drain. You can see the 3" line for the toilet. Top left is the bathroom sink, top right is the shower and the very top is the vent for the shower. This ties into the vent for the washer/utility sink.

Thanks for any help.

Tom
 

Attachments

  • DWVBathroom1.jpg
    DWVBathroom1.jpg
    41.4 KB · Views: 959
  • DWVStack2.jpg
    DWVStack2.jpg
    75.6 KB · Views: 1,022
  • DWVStack3.jpg
    DWVStack3.jpg
    78.6 KB · Views: 970
  • DWVWasher1.jpg
    DWVWasher1.jpg
    68.1 KB · Views: 1,038
  • DWVStackTop1.jpg
    DWVStackTop1.jpg
    67.2 KB · Views: 991

Redwood

Master Plumber
Messages
7,335
Reaction score
13
Points
0
Location
Connecticut
I don't know about the shower because I can't see it, most of what I see looks decent...

Possible problems... Under some codes 1 full size vent through the roof is required. That would be 4"

Definite problems... You say none of this is cemented? All of your work is going to plug deeper into the hubs when you cement so all of your pipes will end up being way short! Dry fitting never gets good results!
 

tombat

New Member
Messages
21
Reaction score
0
Points
0
Location
Seattle
Thanks for the quick reply. I've attached a picture of the shower.

I thought about going 4" for the vent, but didn't. I do have two 3" and will add a two inch later. I realize that doesn't make it 4" though.

I figured I'd have to redo some of the pipe lengths during gluing. Since I'm a flunky at this, I wanted to make sure I got everything right before I glued.
 

Attachments

  • DWVShower.jpg
    DWVShower.jpg
    75.9 KB · Views: 912

Winslow

Plumber
Messages
445
Reaction score
0
Points
0
Location
Hawaii
Looks like the vent is tied in below floor level, it needs to tie in 6" above the flood rim of the fixtures it serves.
 

hj

Master Plumber
Messages
33,599
Reaction score
1,037
Points
113
Location
Cave Creek, Arizona
Website
www.terrylove.com
dwv

The shower has an "S" trap and is not vented. The cross fitting in picture #5 and the elbow above it would not pass inspection here. If a plumber were to redo the system he might have enough extra fittings to do another job.
 

tombat

New Member
Messages
21
Reaction score
0
Points
0
Location
Seattle
OK, off to do a little more research. The shower was my concern. Looks like it has to be on it's own vent until it get six inches above the water line.

The cross fitting in picture #5 and the elbow above it would not pass inspection here.

By cross fitting, do you mean the fitting that sits on top and has the two drains in the side and the vent out the top?

If a plumber were to redo the system he might have enough extra fittings to do another job.

Yeah, wait until you see my redo. I'm working in a tight place with a lot of obstacles. My choices of direction are limited. At this point, I'm not even sure how I'm going to get the shower vent up on its own.

Thanks for all the comments. Any suggestions or links on how to do the shower pan would be appreciated.

Tom
 

Redwood

Master Plumber
Messages
7,335
Reaction score
13
Points
0
Location
Connecticut
Looks like there is plenty of room to me!

A diagram of everything all together would be a great help!
Looking at a series of indivual pictures it is hard to see the big picture.

Here is your shower pan link... http://www.johnbridge.com/
 

tombat

New Member
Messages
21
Reaction score
0
Points
0
Location
Seattle
Looks like there is plenty of room to me!

Yeah - I'll make it work. My new plan is to run the shower drain straight down the joist bay to the wall. From that point I'll bring the drain down and the vent up. According to my reading, I have up to 42" before I have to tie in the vent. This should put it at about 36". The drain will have to make a 180 degree turn and go back to the 4" pipe (yeah - more fittings). The vent will go up into the bathroom to just below the window, go left and tie in with the other vent. I think that will handle the shower.

Not sure yet how to tie the bathroom sink drain and shower drain back into the 4" pipe. I'll have to give it more thought. I'm thinking a 2" to 4" adapter and tying everything into that.

A diagram of everything all together would be a great help!
Looking at a series of indivual pictures it is hard to see the big picture.

Do you mean a 3D layout of the system? My 3D skills are lacking but I'll see if I can find some software that will do it.

Thanks again to everyone.

Tom
 
Last edited:

tombat

New Member
Messages
21
Reaction score
0
Points
0
Location
Seattle
Played around with the pictures a little. Hopefully this will give a little better idea what is going on.

Tom
 

Attachments

  • DWVLayout.jpg
    DWVLayout.jpg
    57.5 KB · Views: 888

Redwood

Master Plumber
Messages
7,335
Reaction score
13
Points
0
Location
Connecticut
Your picture playing works!
Sketches don't need to be fancy 3-d models...
Just a simple drawing showing the big picture works.

I notice how you are doing the laundry tie in now. I would suggest a full size 4" cleanout installed there so if the mail line ever needs cleaning the plumber has a straight shot out.

What are you doing with the vent mess on the top of the 4"? Have you checked to see if a full size vent is required?

Also, at the base of the 4" where it goes out the wall that should be a wye & 45, or a combo. However, you sure see a lot of them done just like you have and they work.
 
Last edited:

hj

Master Plumber
Messages
33,599
Reaction score
1,037
Points
113
Location
Cave Creek, Arizona
Website
www.terrylove.com
dwv

I have up to 42" before I have to tie in the vent. This should put it at about 36".

Correction that will put it at 42", unless the shower "overflow" point is 6" below the floor. You also do not need that additional vent for the washer. The lavatory or sink will act as its vent. Still a lot of extra fittings.
 

tombat

New Member
Messages
21
Reaction score
0
Points
0
Location
Seattle
Thanks for the help - I think. Looks like I'll be re-working everything. But that's OK. I want it to be correct and I'm only looking at the price of materials and my time. I debated a long time over whether to go 3" or 4" to the roof. Looks like I made the wrong decision.

I notice how you are doing the laundry tie in now. I would suggest a full size 4" cleanout installed there so if the mail line ever needs cleaning the plumber has a straight shot out.

OK, are you suggesting I run the 4†past the laundry tie in or put a cleanout at the end of the 4†horizontal run? If you look closely (I know, difficult with pictures) but where I plan to tie in the 2†from the laundry/sink used to be a cleanout. I planned on bringing the drains into the stubbed out two inch on the horizontal 4†but that put the sink too high.

So, if I put a 4†to 2" wye there with a cleanout, I should be able to keep the utility sink at a reasonable height. Also, if you notice the 4†pipe is at an angle that runs it right into the south wall. Should I turn the pipe so the cleanout is perpendicular to the south wall – this leaves about a 120 degree turn. If I leave the cleanout parallel to the wall, it will only give about 3 feet of access in front.

What are you doing with the vent mess on the top of the 4"? Have you checked to see if a full size vent is required?

I’m going to punt that mess and go with a do-over. I’m going to assume a full size vent is required and just go with it. Not sure how I’ll make it fit up the wall (2x6 minus rim joist = 4 inches) but I’ll find a way. The 4†pipe will follow the path of the current 3†which will put the toilet on a 4†drain.

Also, at the base of the 4" where it goes out the wall that should be a wye & 45, or a combo. However, you sure see a lot of them done just like you have and they work.

Yeah, looks like it’s going to be a complete do-over. The sanitary Tee actually is a problem the way you see it today. When I opened that pipe up to change the cleanout to a 2†adaptor, there was a backflow buildup in the pipe. It was about 1/3 full of waste after only 4 months usage. I figured having the washer on the line would eliminate the problem but I guess it’s better to just do it right.

I have up to 42" before I have to tie in the vent. This should put it at about 36".

Correction that will put it at 42", unless the shower "overflow" point is 6" below the floor. You also do not need that additional vent for the washer. The lavatory or sink will act as its vent. Still a lot of extra fittings.

Well, if you are going to measure like that...
Actually, it’s 36 from the drain to the wall. Add a couple inches to get into the stud bay, a couple inches to get to floor level, an inch or so to shower floor, and then six inches from there and it adds up to a different route.

Here is the picture with some initial changes. Still working on getting the shower plan together. I'm thinking about going up a different wall and doing another roof penetration for 2". I'd tie the washer in to that vent if I go that route.

Thanks again for the input.
Tom
 

Attachments

  • dwv.jpg
    dwv.jpg
    90.8 KB · Views: 997

tombat

New Member
Messages
21
Reaction score
0
Points
0
Location
Seattle
Layout - Rev A

Hopefully this is a little better. Rather than write a story, I'll let the pictures do the talking.

Questions/Comments?

Thanks for any input

Tom
 

Attachments

  • DWVRevA.jpg
    DWVRevA.jpg
    85 KB · Views: 839
  • WasherRevA.jpg
    WasherRevA.jpg
    84.7 KB · Views: 825
  • ShowerRevA.jpg
    ShowerRevA.jpg
    70.1 KB · Views: 827

Geniescience

Homeowner
Messages
2,137
Reaction score
4
Points
0
Location
humid summers hot, humid winters cold
Two things I see to fix, and I'm not a plumber.

For what it's worth.

1. In the middle of Pic 1, the 90 is a short radius not a long sweep.
2. In the second picture, you used a San Tee on its back instead of a combo (long sweep).
Right next to it you have a combo (long sweep) for another pipe. Makes me say...

Editorial remark: i believe you need a pro to come in and be there when you put this together in final form. The two things I spotted make me less than confident.

David

by the way,
A.) in the first picture I see a lot of vents but i can't see where the vent goes up to the roof.
B.) you have labeled something in Picture #1 as a 4x4x2x2 SanTee. Is that to be where the vents connect?
C.) what is above the 4" pipe ?
D.) more doubts
 
Last edited:

Sjsmithjr

In the Trades
Messages
314
Reaction score
1
Points
16
Location
Knoxville, Tennessee
You may have gone about as far as you can with a keyboard and a camera and need a set of experienced eyes on site. Here's something you might want to consider at this point. Where I live, you can call for a inspection and even though you're not truely ready for an inspection, you can go over what you're about to do with the AHJ. If he or she sees something they don't like or that you've flat out got wrong, they'll point it out to you so that when you call for a re-inspection it'll be right. The charge for a re-inspection here is nominal - $30.
 
Last edited:

tombat

New Member
Messages
21
Reaction score
0
Points
0
Location
Seattle
1. In the middle of Pic 1, the 90 is a short radius not a long sweep.

I had two 90s - one long sweep and one not. Guess I should have taken the time to go get a second one. I'll replace it.

2. In the second picture, you used a San Tee on its back instead of a combo (long sweep).
Right next to it you have a combo (long sweep) for another pipe. Makes me say...

I realized I used the wrong fitting when I was labeling the picture. I plan on swapping it out. I copied this layout from a picture Terry Love posted. I figured since he is in my area, it must meet local codes. The difference between mine and his is that his drain goes down and mine goes horizontal, hence the need for a combo.

Another piece I'm going to replace is the washer p-trap. I used a screw together trap instead of a glue trap. It was leaking when I filled the trap and I had already tightened it pretty tight. Best to just change it.

Editorial remark: i believe you need a pro to come in and be there when you put this together in final form. The two things I spotted make me less than confident.

I'm working on setting that up right now.

A.) in the first picture I see a lot of vents but i can't see where the vent goes up to the roof.
B.) you have labeled something in Picture #1 as a 4x4x2x2 SanTee. Is that to be where the vents connect?
C.) what is above the 4" pipe ?
D.) more doubts

In the picture, above the 4x4x2x2 SanTee are a couple of 45s. These turn the 4" line so it goes past the ceiling joist and out the roof at that location. The pipe goes about 8" above the roof line. So, yes, that is where the vents connect and then exit the house.

Thanks a lot for the input.

Tom
 

tombat

New Member
Messages
21
Reaction score
0
Points
0
Location
Seattle
You may have gone about as far as you can with a keyboard and a camera and need a set of experienced eyes on site. ...

I believe you are correct. Sometimes I think we (people using this forum) expect a little too much from the experts. But at some point, there is only so much you can say from looking at a picture. At that point, it is time for some on-site help. I contacted a friend of mine who has a couple rentals and works with a plumber when needed. Sounds like he may be willing to give it a look.

Thanks again to all who offered help. I think I came a long ways from the first set of pictures I posted.

Tom
 

Redwood

Master Plumber
Messages
7,335
Reaction score
13
Points
0
Location
Connecticut
On second thought skip that cleanout I suggested earlier...
It would be useless as you have it configured.
 
Top
Hey, wait a minute.

This is awkward, but...

It looks like you're using an ad blocker. We get it, but (1) terrylove.com can't live without ads, and (2) ad blockers can cause issues with videos and comments. If you'd like to support the site, please allow ads.

If any particular ad is your REASON for blocking ads, please let us know. We might be able to do something about it. Thanks.
I've Disabled AdBlock    No Thanks