Drywall Technique Question

Users who are viewing this thread

Molo

Member
Messages
922
Reaction score
2
Points
18
Location
Cold New York
Regarding tape and plaster work:

Some cracks were put into the ceiling by someone in the attic.

1. The largest is 12" long it runs along a seam and one side of the tape is seperated from the drywall for the 12" span of the crack.


What would be the best technique to repair this and achieve a good smooth finish?

TIA,
Molo
 

Verdeboy

In the Trades
Messages
2,041
Reaction score
6
Points
0
A pic would be helpful.

You may be able to just remove the old tape, re-tape, and mud.

You may have to screw in the drywall first. Then do the above.

You may have to cut out a section and replace it.
 

Gary Swart

In the Trades
Messages
8,101
Reaction score
84
Points
48
Location
Yakima, WA
If it is just the seam split, then peel off the tape and retape. I like that fiberglass tape that sticks to the rock before you mud it on. Oh yeah, as suggested, renail or screw also. If the rock is broken, you will probably have to cut out the broken area, squaring it off as you do, then put in a patch.
 

Leejosepho

DIY scratch-pad engineer
Messages
2,483
Reaction score
0
Points
36
Location
200 miles south of Little Rock
Website
www.nonameyet.org
For that small of a spot, a Q-tip can be used to push some Elmer's glue under the tape, then press it back up into place. And if the rock has been cracked or even just pushed down a bit, first put a nailer between the ceiling joists and nail it back up.
 

Molo

Member
Messages
922
Reaction score
2
Points
18
Location
Cold New York
You may be able to just remove the old tape, re-tape, and mud.

QUOTE]

Thanks for the response. I am specifically looking for some advice on exactly How to Mud.I have searched and searched on the internet and have only come up with general suggestions.
What are the specific "mud" application techniques that will result in a smooth finish?

TIA,
Molo:)
 

Statjunk

DIY Senior Member
Messages
540
Reaction score
0
Points
0
Here goes.

Day 1:

Make sure you clear the crack and remove old loose tape or drywall.

Lay down a nice thick coat of mud over the crack with a 4-6" blade. Take a piece of paper tape and lay it over the mud. Don't use the mesh it sucks. Smooth some more mud over the tape and squeeze the tape to the wall, pushing out the mud from underneath the tape. If mud doesn't squeeze out the side of the tape then you need to put more mud underneath or you'll get a bubble. You will still be able to see your tape.

Take down any high spots.

Done

Day 2:

Take a larger blade 10" and run a coat of mud over your tape. You should not be able to see the tape anymore. Run your blade over your new mud coat pulling it smooth but don't get crazy you can fix minor suff later. Your patch should now be like 15" wide.

Day3:

Scrap or sand the area lighly just knocking down the high stuff or bubbles.

Put on the last finish coat feathering in your edges and filling in any bad stuff


Final day

Sand with fine sand paper or a wet sponge. Don't use the screens.

That's the best I got hope it helps.

Tom

P.S. With you hand on the blade place one finger up the handle with your finger tip pointing towards the blade. The finger guides your blade angle to taper your mud patch back to the original wall.
 

Bosun

New Member
Messages
89
Reaction score
0
Points
0
Location
Minneapolis
Qwik 'n' EZ

The quick and easy way to a smooth seam is to hire some guy. This stuff takes a lot of practice and patience. I've done it before, but it's just not worth my time these days...
 

Molo

Member
Messages
922
Reaction score
2
Points
18
Location
Cold New York
I'm hoping that guy will be me..... I know there are some really specific techniques.
I'm trying to get some pointers on those. Then I will take some mud and start practicing.
I appreciate the details in statjunk's response, that is the sort of info. I'm searching for.

TIA,
Molo
 

Frenchie

Jack of all trades
Messages
1,239
Reaction score
0
Points
36
Location
Brooklyn, NY and Fire Island, NY
For that small of a spot, a Q-tip can be used to push some Elmer's glue under the tape, then press it back up into place.

I can't see that giving good results. When you overcoat, any part of the tape that isn't perfectly adhered, will bubble up from the moisture in the overcoat.


Statjunk's covered the basic procedure. I'll only add that you want to avoid leaving too much mud on. The common amateur mistake is to pile it on, thinking you can sand it off later... what a mess. Much better to err on the side of putting too little, you can always fill the hollows on the next coat.

I hold my knife a slightly different way, though (pics below). It gives WAY better control than holding by the handle. A bit of pressure with the index, you can even impose a slight curvature to the knife, which is helpful when you're working without a taper (as you will be).
 

Attachments

  • IMG_1860.jpg
    IMG_1860.jpg
    44.9 KB · Views: 684
  • IMG_1861.jpg
    IMG_1861.jpg
    44.3 KB · Views: 637

Leejosepho

DIY scratch-pad engineer
Messages
2,483
Reaction score
0
Points
36
Location
200 miles south of Little Rock
Website
www.nonameyet.org
I can't see [Q-tipped glue] giving good results. When you overcoat, any part of the tape that isn't perfectly adhered, will bubble up from the moisture in the overcoat.

Sure, and that is why I make sure there is no void!

The other guys have you covered well here, Molo. Be sure the board is fastened tight and that it is clean. Be sure the mud oozes out all along the edges of the paper-only tape, but do not press *too* hard and leave virtually nothing underneath. I usually cover the tape with some more mud right away, but maybe there is some good reason for waiting a day. If you ever get the opportunity, drop in somewhere and watch a pro for a little while. Corners and such can seem tricky at first, but flat work is no more difficult than icing a cake very thinly!
 

Molo

Member
Messages
922
Reaction score
2
Points
18
Location
Cold New York
I have done a bit of taping (small project) in the past. After a few months the tape pulled away from the wall.
Is this because i pushed too much mud out from behind the tape?

TIA,
Molo
 

Leejosepho

DIY scratch-pad engineer
Messages
2,483
Reaction score
0
Points
36
Location
200 miles south of Little Rock
Website
www.nonameyet.org
I have done a bit of taping (small project) in the past. After a few months the tape pulled away from the wall.
Is this because i pushed too much mud out from behind the tape?

Possibly, but I do not know for certain there. The surface of the board, the quality of the tape and the mix of the mud could all play in there. With a smooth-looking -- not always completely flat -- mud job ultimately in mind, I try to think of the tape as being suspended within the mud while leaving enough mud there to suspend it! The tapered edges of a sheet of board make it possible to do that on the way to a relatively flat finish, but the 15-or-so inches Statjunk has mentioned is a necessary width in order to end up with a flat-looking surface while leaving some thickness at a butt joint.
 

Statjunk

DIY Senior Member
Messages
540
Reaction score
0
Points
0
Yes that was a very good point that I forgot to mention. Only leave mud on the wall that you intend to be there permanently. That is a very common mistake. I made it for years.

Another good tip is don't go after lap marks. Leave them and sand them down later. I've ruined real good seams that way.

I bet your tape pulled off because you didn't have the right amount of mud under there to begin with.

Tom
 

Molo

Member
Messages
922
Reaction score
2
Points
18
Location
Cold New York
Here's the Terry Love of drywall sites. Helped me out alot when I was just learning.

http://www.drywallschool.com

Thanks Livin4Real, I have allready been there. I found it hard to dig up real specific advice. So I decided to start a living open discussion.

Molo


Question:
When doing a butt-joint, you are clearly going to have mud that is thicker than the drywall itself (no recesssed area such as a tapered joint). I'm wondering how much you have there after the tape is in and embedded, is there some sort of visual or physical reference you can use (with your eye or the knife or something)?

TIA,
Molo:)
 

Jadnashua

Retired Defense Industry Engineer xxx
Messages
32,770
Reaction score
1,190
Points
113
Location
New England
One product I read about is a specially formed metal strip that is used between butt ends of drywall. It is shaped so that when you screw the pieces to it, it slightly bends the drywall so you end up with a taper that is easier to hide with the tape and mud. Never seen one for real.
 

Frenchie

Jack of all trades
Messages
1,239
Reaction score
0
Points
36
Location
Brooklyn, NY and Fire Island, NY
'Fraid not. You just get a feel for it, after awhile...

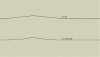
If you go wide enough, you can "dissapear" any hump, by feathering out the transition.

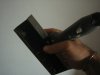
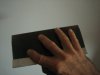
Trowel's better for this than a drywall knife, as it's less flexible. See attached drawing... I don't really trust a drywall knife beyond 8"; anything wider, I go to a trowel.


As far as tape pulling off, it's most likely (90% odds) because you squeezed out too much of the mud under the tape. But it can also be from dust on the wall, or dust on the tape...

You'll also get better adhesion if you wet the tape before applying it. It slows the drying a little bit, and makes a low spot because of shrinkage, but it is the classic old-school way to do it.


The reason it's better to let the paper dry before you overcoat, is to let the mud under the tape dry thoroughly. Otherwise you risk shrinkage, later (you know when you have a perfectly smooth surface, except you can still see the "shadow" of your tape?).

Also, if there's a layer of damp compound at the bottom, but the surface seems dry, and you prime & paint... a month later the paint right over the tape seam, peels.

I've seen both those, often enough that I don't overcoat on the first pass anymore.


Of course, if you use setting compound (powder, comes in a bag), you can get the whole thing done in a day, regardless.
 

Attachments

  • seams.jpg
    seams.jpg
    6.9 KB · Views: 637

Statjunk

DIY Senior Member
Messages
540
Reaction score
0
Points
0
A butt joint is the toughest one for obvious reasons. I still struggle with them from time to time. Depends on the size. I have less of a problem with the larger ones.

One thing to keep in mind is that a properly done butt joint is usually between 20-24" wide. That took me a long time to get used to. I like to keep them real small and you can see them. Here's how I do a butt joint.

Day 1

Tape seam as usual.

Take and 8" or 10" knive and form an elevation on either side of the butt joint higher than the tape.


Day 2

Scrap humps

Using a 12" knive lay mud down center of the seam.

Using 8" knife smooth edges


Day 3

Scrap and sand

Lay finish coat.


Good Luck

Tom

P.S. For corners you have a couple of choices. You can do one side at a time or you can use a corner trowel. If you use a corner trowel do one corner at a time. So a standard room corner at a ceiling will take 3 days with a finish coat.

Also there is an order of operations, butts first, recessed joints second, corners last.
 

Molo

Member
Messages
922
Reaction score
2
Points
18
Location
Cold New York
Other reading has led me to believe that mixing the joint compound with water is neccesary. Is this true, and what is the desired consistency? (I'm sure this is tough to answer).

TIA,
Molo
 

Jadnashua

Retired Defense Industry Engineer xxx
Messages
32,770
Reaction score
1,190
Points
113
Location
New England
A little creamier than how it usually comes in the bucket otherwise, you end up getting little pulls or voids. You don't want it so loose it slumps or runs, though.
 
Top
Hey, wait a minute.

This is awkward, but...

It looks like you're using an ad blocker. We get it, but (1) terrylove.com can't live without ads, and (2) ad blockers can cause issues with videos and comments. If you'd like to support the site, please allow ads.

If any particular ad is your REASON for blocking ads, please let us know. We might be able to do something about it. Thanks.
I've Disabled AdBlock    No Thanks