Cracked Flange/Pipe Repair Options

Users who are viewing this thread

Jeff_08

New Member
Messages
34
Reaction score
1
Points
0
Location
Chicago area
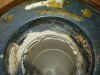
It didn't actually rock after I used a router to flatten the floor where it was a little high underneath (I liked that option better than a few shims and it seemed to work fine), but it was the very front of the base that would slightly shift from side to side if I pushed on it. I felt that maybe it was just the lack of friction that caused some of the shifting and the silicone would fix that, but I took the advice of the hardware store guys and tightened the nuts more and it still shifted. That's when it made the popping sound and I couldn't help but take the toilet back off to see if everything looked ok underneath but it wasn't. The top of the flange that's there now is flush with the finished wood floor, so I'd almost have to cut from inside the piping with a Dremel or something similar. I would feel comfortable trying to remove some of the flange (have a pretty steady hand with cutters/Dremel), but it's the old piping combined with the new flange and solvent welding - I'm not sure how to prep the old pipe since it's not as clean as a new one and I don't want it to leak. As I mentioned, I have another bathroom to use in the meantime so I'll look into as many options as I can. So far I think having a plumber do it would be a good idea unless I can convince myself otherwise.
 

Jeff_08

New Member
Messages
34
Reaction score
1
Points
0
Location
Chicago area
Just thinking out loud here, but if I could fasten one of those metal flange spanner parts (or a metal ring type) to bridge over the ruined slot and then go with a Fernco waxless seal wouldn't that bypass the cracked inner area and also give something to anchor the bolt to?
 

Jadnashua

Retired Defense Industry Engineer xxx
Messages
32,770
Reaction score
1,190
Points
113
Location
New England
There'd still be the crack. If the main line backed up, that area would be underwater, and the crack could leak. Will it happen? Who knows. Best to not cover up a known problem and fix it.
 

Jeff_08

New Member
Messages
34
Reaction score
1
Points
0
Location
Chicago area
It would be good to fix the problem rather than bypass it, but I was just thinking of a few options that might last a while and they seem to make the spanners and other parts for similar repairs to the bolt slots. The reason I mentioned the Fernco waxless seal is because they claim on their site:

"Gas & water tight. Seals to the toilet flange below the floor."

"A strong seal that will not break if the toilet ever becomes backed up."

Just an idea.
 

Jadnashua

Retired Defense Industry Engineer xxx
Messages
32,770
Reaction score
1,190
Points
113
Location
New England
Yes, I realize that. But, if the whole line was backed up and you then started to plunge it aggressively, while unlikely, you could push the big foam o-ring up with the pressure, uncovering the crack.

You could try futzing around and try to put some pvc cement in the crack then screw or clamp it together. Not recommended.
 

Jeff_08

New Member
Messages
34
Reaction score
1
Points
0
Location
Chicago area
I know what you mean. I like to try fixing thing myself but in this case it's probably better to sit back and let a pro fix it even though it'll cost a lot more. I'll just go with a good plumber to make sure it's done to last. Now to fine one...
 

Jadnashua

Retired Defense Industry Engineer xxx
Messages
32,770
Reaction score
1,190
Points
113
Location
New England
If you cut out the celing below, it's pretty straightforward to cut it off, then patch in new. Fixing the ceiling might be easier and less expensive than the plumber. Course, I suppose by the time you buy the materials and if you don't have the tools, maybe not. The plastic pipe can be cut with a wood saw, hack saw, or many other things. Gluing in new pieces is pretty simple.
 

Jeff_08

New Member
Messages
34
Reaction score
1
Points
0
Location
Chicago area
Drywall to me is very straightforward and I've done a lot of that but avoiding a patched area is always better. It's the solvent welding that I've had mixed results with, so I'd be concerned about that which is critical for leaks. Not sure why, but I do most projects myself and it's plumbing that I've had the least satisfaction with lol.
 

Jadnashua

Retired Defense Industry Engineer xxx
Messages
32,770
Reaction score
1,190
Points
113
Location
New England
I've not worked with abs, but pvc is about as straight-forward as it can get! Critical is measuring properly. Then, clean off any burrs caused during cutting. Prime, apply the cement to both inside and outside of the pieces, slide them together twisting say 1/4-turn to distribute the cement well, then hold it together for 15-30 seconds or so. Depends on how much cement you have, how tight the fitting is, and the size of the pipe. The cement actually melts the pvc...as the solvent evaporates, it welds itself together. Because the fittings are tapered and you push the straight pipe in to the bottom of the fitting (note, it is often impossible to do this before application of the cement so dry fitting can only go so far) it will try to push itself back out of the fitting until it welds itself together. Once set, though, it's basically one monolithic chunk. Just watch out for the purple primer (often required by some inspectors to verify you actually used a primer) - it will stain things and can damage plastic surfaces you might splash or drip it on, and, it's a pain to get off of your hands!
 

Jeff_08

New Member
Messages
34
Reaction score
1
Points
0
Location
Chicago area
Oh yeah, I've used that purple primer before for a few smaller projects - can be messy for sure. I honestly didn't know that there was ABS piping and also PVC - it looks similar so I always just called it PVC. I have to learn more about this stuff...
 

Jadnashua

Retired Defense Industry Engineer xxx
Messages
32,770
Reaction score
1,190
Points
113
Location
New England
ABS is black...pvc is an off-white or grey (for the heavier duty stuff which probably isn't used in a house much). ABS uses more of a glue than the cement on pvc. Thus, you don't get the solvent weld - more like gluing up a wood joint than solvent welding the pieces together. That's one big reason why joining the two is tough. Assuming you have ABS, and wanted to use pvc to make the final section, you could use a no-hub connector between. That actually gives you a little more flexibility in final exact angle...you can use it on abs to abs, too.
 

Jeff_08

New Member
Messages
34
Reaction score
1
Points
0
Location
Chicago area
It's a bit odd that this one appears to be a two tone sort of color at the flange area, but the piping leading away from it as well as the main stacks are the off-white/cream color so could this be PVC that has discolored or something like that? It's not a consistent color around the flange, and the other bathroom in the house is the same way so it's a little confusing. I took another picture below, but I have been reading other threads here and I saw how the ABS is a black color.
 

Attachments

  • Flange2.JPG
    Flange2.JPG
    30.2 KB · Views: 474

Jadnashua

Retired Defense Industry Engineer xxx
Messages
32,770
Reaction score
1,190
Points
113
Location
New England
The flange looks like pvc to me. If you scrape the top of the flange, it is probably the same color underneath. The insides of nearly any pipe will often get coated with stuff, so unless you scrape there, you won't know its true color. if you take off the ceiling, it should be obvious.
 

Jeff_08

New Member
Messages
34
Reaction score
1
Points
0
Location
Chicago area
The more I read, the more I am tempted to try this myself especially if I can use the no hub connection after cutting open the ceiling below. That doesn't sound as difficult as peeling away the old flange as mentioned before. Decisions, decisions...
 

Jeff_08

New Member
Messages
34
Reaction score
1
Points
0
Location
Chicago area
Did a one-piece closet bend and flange ever exist? I looked down along the side of the piping below the flange and I don't see anywhere that looks like it was joined other than at the other end of the bend going toward to the main stack. In the picture above you can see an area below the reduction (cracked) area in this flange where there's a gap that appears to be a solvent welded connection but I can't figure out how that could be when the outside of the pipe doesn't have the same gap like that. Is this some sort of older flange/bend part that they used to make 30-some years ago when the house was built? Any ideas? I was going to try peeling away the flange and add the 4x3 flange to try and repair this, but I can't figure out how this flange is the way it is. The rough areas around the inside diameter appear to be the remnants of a test cap I would assume. Thanks for any help.
 

Krow

Plumber
Messages
903
Reaction score
3
Points
16
Location
Ontario, Canada
The one peice that you are suggesting never existed. The flange is a regular flange that had a test cap premounted at the factory and then , later was removed at the WC installation.

From what I see, you have a regular ABS flange attached to a fitting 90 (hub x spigot). The spigot side of the 90 is the same diameter as the 3" ABS pipe. It is glued together
 

Jeff_08

New Member
Messages
34
Reaction score
1
Points
0
Location
Chicago area
Ok, I went back and looked again with a bright LED flexlight and I can see that it's glued to the outside of the bend. If I were to try removing this flange myself by "peeling" it away, wouldn't that usually make the outside of the bend too rough to give a good surface to glue a new flange? What I'm trying to figure out is if it's even possible to do without damaging the pipe too much or is a rough surface not as big of a deal to work with when gluing/solvent welding?
 

Krow

Plumber
Messages
903
Reaction score
3
Points
16
Location
Ontario, Canada
The only things that you have to be concerned with

1)make sure you remove all of the flange hub (don't worry what the glue left over looks like)
2) make sure you do not crack/split the 90

If its rough, its no big deal. The glue will take up and space or gaps that may exist. When glueing 2 pieces together, you push the fitting on and give 1/4 turn to make sure it seals and grabs properly.

It can be done. It has been done , and plumbers do it all the time. The only problem that you may have, you have never seen it done first hand, so you won't know what to expect.

worse comes to worse, (I think someone already suggested it), you may have to open the ceiling below and replace the 90 as well if it breaks/splits/cracks
 

Redwood

Master Plumber
Messages
7,335
Reaction score
13
Points
0
Location
Connecticut
You may also have to open the ceiling to have someone push up on the pipe if it is not supported well enough below.
 

Jeff_08

New Member
Messages
34
Reaction score
1
Points
0
Location
Chicago area
That's true, I haven't seen what the process looks like but I would just take it slow and work with a sharp chisel and hope for the best. The pipe runs through a joist not far from the bend which might give some support but that's a good idea.

When the old flange is completely removed, would I just do the normal primer/cement process or is there something else that should be used to clean the old pipe before that step (to remove the old cement, etc.)?
 
Last edited:
Top
Hey, wait a minute.

This is awkward, but...

It looks like you're using an ad blocker. We get it, but (1) terrylove.com can't live without ads, and (2) ad blockers can cause issues with videos and comments. If you'd like to support the site, please allow ads.

If any particular ad is your REASON for blocking ads, please let us know. We might be able to do something about it. Thanks.
I've Disabled AdBlock    No Thanks