Bathroom Vanity drain issue

Users who are viewing this thread

PAB

Member
Messages
35
Reaction score
3
Points
8
Location
Detroit
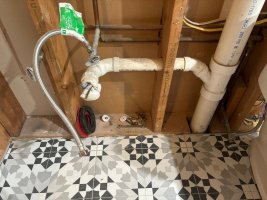
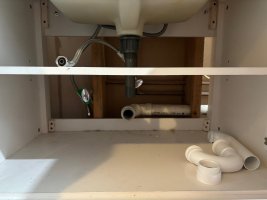
Hello - I'm having a hard time determining how to do the drain on my bathroom vanity. I've attached two pictures. One shows the wall plumbing that goes to the stack. The other shows under the vanity. There is a shelf in the vanity that I would prefer not to cut if I can avoid it. If I can't, let me know.

The pvc from the wall, when inside the vanity, is 2.5 inches above the shelf in the vanity. The drain from the sink drops down to about 6" above the shelf. The horizontal distance between the PVC and the drain is also approximately 6".

The 2.5" that the PVC is above the shelf doesn't provide me with enough room to have a trap that's below that level. Am I wrong?

Any ideas other than cutting? Thanks so much!
 

Attachments

  • IMG_3562.jpg
    IMG_3562.jpg
    99.1 KB · Views: 51
  • IMG_3563.jpg
    IMG_3563.jpg
    44.4 KB · Views: 53

wwhitney

In the Trades
Messages
6,567
Reaction score
1,847
Points
113
Location
Berkeley, CA
The way your vanity trap arm ties into the 3" stack is wrong and needs changing, so that will give you the opportunity to adjust your trap arm height to suit your new vanity.

At the 3" stack, the trap arm needs to go into a 3x3x1-1/2 san-tee, not a wye. And that 3" stack should have no fixture draining into it above the vanity. [There are a few ways to vent the vanity even with a fixture draining from a story above, but they are not so common.]

The current configuration does not properly vent the vanity, allowing its trap to siphon.

Cheers, Wayne
 

John Gayewski

In the Trades
Messages
4,364
Reaction score
1,349
Points
113
Location
Iowa
Yes you gotta cut the wye out of the stack and insert a tee. When you do that put it at the height you want.
 

PAB

Member
Messages
35
Reaction score
3
Points
8
Location
Detroit
Thanks for the reply. Now I wish I could have just cut the shelf - it would have been much easier!

So, it appears I would need the following to do this job and I'm hoping you can confirm:


A similar (to what there is now) 1.5" arrangement for the horizontal pipe coming from the new tee to the vanity.

and of course 3" PVC, glue, etc.

Procedure would be:
I'd cut the 3" drain at the bottom of the current wye. I'd then remove the wye by cutting the 3" drain above the top of the current wye allowing for an increase in height for the horizontal drain.

Attach the coupling to the bottom part of the 3" pvc. Attach the tee to the top part of the 3" pvc. attach 3" pipe in between. Finish going to the vanity using 1.5" pvc.

I hope this make sense.

BTW, I don't have anything above the vanity draining into the 3" PVC drain, so that's good.

Quick additional question: As seen in the first pic, there's a 1.5" hole in the stud for the current horizontal drain piece. I'll have to drill another 1.5" hole above this for the new pieces. Do you have any recommendations as to how close these holes can be together? The studs are 2x6, 87.5" long, and the current hole is about 15" from the bottom.

Thank you!!
 

wwhitney

In the Trades
Messages
6,567
Reaction score
1,847
Points
113
Location
Berkeley, CA
Various comments:

- You'll want to secure the 3" above and below your work area before cutting, so the upper section doesn't slide down.

- If the upper 3" vent can be raised up without trouble, then you can do the change with only solvent weld fittings as you've described. But that is unlikely to be the case (at the very least, the hole through the top plate should be draftstopped, so you'd be breaking that seal and should redo the draftstopping, e.g. with some of the orange "fire" foam).

- So if the upper and lower 3" segments are fixed axially, you'll need to use (2) 3" banded rubber couplings to make up your last stack connection by inserting a segment of the DWV system. E.g. Fernco 3005-33 or Mission P-300. One of them could take the place of your PVC coupling, the other would then either be above or below the new san-tee.b

- As for drilling the stud, leaving 2" of wood between the holes would be plenty. Not really sure that it is regulated. If the wall is load bearing, then the diameter of the hole is regulated to be at most 40% of the width of the stud (absent further reinforcement), or 2.2", and you are supposed to leave 5/8" of wood between the hole and the narrow edge of the stud.

Cheers, Wayne
 

John Gayewski

In the Trades
Messages
4,364
Reaction score
1,349
Points
113
Location
Iowa
You need either no hub bands or couplings w/out stop. You won't be able to use regular couplings becuse threads no room insert the hub onto the pipe. A no hub band can fold open a be tightened on. Or the more difficult route is sliding slip (no stop) couplings up and then down with is messy and can be very tough.
 

PAB

Member
Messages
35
Reaction score
3
Points
8
Location
Detroit
Thanks so much!
Here are two pictures of the drain pipe. While it doesn't appear to be fixed axially, I still think that the Fernco will be much easier for me. Please ignore the cobwebs!
IMG_3564.jpg
IMG_3565.jpg
 

PAB

Member
Messages
35
Reaction score
3
Points
8
Location
Detroit
And I know what you mean about the fire stop stuff. I've used that in other locations.
 

wwhitney

In the Trades
Messages
6,567
Reaction score
1,847
Points
113
Location
Berkeley, CA
As to "fixed axially" depends on what happens above the top plate. If it goes through the roof with a rubber flashing boot, the rubber boot might not like it if you push it up and then pull it back down, it could get inverted and if it's old it could crack.

If it hits an elbow and turns horizontal for a long enough run, then you might be able to slide it up the 3" you'd need to make up everything with solvent weld.

The other thing you could do, since the vent is downsized above anyway, is just cut out all the 3" vent in the wall cavity and go back in with 1-1/2" or 2" (can't tell from the picture what it downsizes to). Then you wouldn't need as much play in the pipe above the top of the wall to do it all in solvent weld.

Regardless, do draft stop that plate penetration when you are done, as well as all other pipe penetrations you've uncovered that lack draftstopping.

Cheers, Wayne
 

PAB

Member
Messages
35
Reaction score
3
Points
8
Location
Detroit
Thanks again Wayne! Switching the majority of the wall from 3" to 2" (which is what it switches to at the top) might be easier to work with and may work. In fact I don't know why I didn't do it to begin with. However, while probably a little late, I just have to make sure I have this up to code.

I previously found this in the Michigan plumbing codes, section 906:
https://up.codes/viewer/michigan/mi-plumbing-code-2015/chapter/9/vents#906.

So it would appear with anything between 10 and 21 fixtures, i can convert to 2" from 3" if my "MAXIMUM DEVELOPED LENGTH OF VENT (feet)" is less than 150 (which I'm having a bit of trouble understanding).

Here is what I think are fixtures in my house (I believe anything with hot and cold counts as two fixtures):

Top Floor (where this wall is): shower, diverter in shower for handheld, toilet, vanity.
Main Floor: bathtub with shower, toilet, vanity, kitchen sink, dishwasher
Basement: washing machine, sink by the washing machine
outside has a faucet for the hose.
Two other items that I don't think are fixtures but maybe: garbage disposal and furnace humidifier

One other question:
Would I also be able to use this fernco to go from 3" to 2"?


BTW I do believe it goes through the roof with the boot. No horizontal run - just a small curve and then out.

Thanks,
Paul
 

wwhitney

In the Trades
Messages
6,567
Reaction score
1,847
Points
113
Location
Berkeley, CA
Quick responses:

Developed length is the length of the pipe(s) that is a dry vent, measured along the pipe.

If you're in a cold climate, I'm surprised that the vent would go through the roof as 2". Usually they upsize to 3" just before passing through the thermal envelope to reduce the risk of frost closure blocking the vent. But I imagine you don't want to get into redoing your roof termination.

All non-underground rubber DWV couplings must be fully shielded. You would need the Fernco Proflex series. But I'm not seeing any scenario where you need to change sizes at the shielded rubber coupling.

Cheers, Wayne
 

PAB

Member
Messages
35
Reaction score
3
Points
8
Location
Detroit
Thanks Wayne. Not sure I understand the shielded part, but to comment on your roof part, I did bring it back up to 3" from 2" prior to going through the roof. So no issues there.
I appreciate your help!
Paul
 

wwhitney

In the Trades
Messages
6,567
Reaction score
1,847
Points
113
Location
Berkeley, CA
Look up the model numbers I suggested to see what shielded means.

The transition from 2" back to 3" should be inside the thermal envelope, so before the vent emerges out of the thermal insulation.

If you cut the 3" below the wye, and the 2" on the horizontal above the ceiling, then you may be able to rebuild it all with solvent weld fittings, if you so desire. The two shielded couplings option is also fine.

Cheers, Wayne
 

Jeff H Young

In the Trades
Messages
8,962
Reaction score
2,236
Points
113
Location
92346
Wayne Im not from cold weather either but whoever plumbed that might not know any better to think of keeping vent big through roof So I wouldnt be suprised to hear some substandard work going on there . clearly not on top of the game roughing in a lav so low in first place and the wye and 1/8th bend instead of santee tells me it wasent a plumber
 

PAB

Member
Messages
35
Reaction score
3
Points
8
Location
Detroit
I do believe that this renovation was done by non-professionals previous to me purchasing the house. When I tore up the floor and subfloor, there was a junction box under the subfloor. That to me was my first clue. I had no idea about the wye vs the tee but it seems a plumber most definitely would and obviously this was not done by a plumber. This was done prior to my purchase of the house and only noticed once the walls were demo'd.

Regarding the vent, I mentioned in my previous post how the vent is 3" as it goes through the roof. I tied it back to 3" before it went through the roof. This was intentional, mostly b/c I didn't want to have to full around with the area going through the roof. Please don't laugh but this is my post from three years ago regarding this:


Since that time I've had three surgeries and other issues, and had another functioning bathroom, so I've just been getting back into this to finish it up. Now I need to figure this out before the drywall goes up of course. I had no idea about the need to have the change in dimensions of the pvc done within the thermal envelope.

Hope this helps clarify. Thanks again for the help on this.

Paul
 
Top
Hey, wait a minute.

This is awkward, but...

It looks like you're using an ad blocker. We get it, but (1) terrylove.com can't live without ads, and (2) ad blockers can cause issues with videos and comments. If you'd like to support the site, please allow ads.

If any particular ad is your REASON for blocking ads, please let us know. We might be able to do something about it. Thanks.
I've Disabled AdBlock    No Thanks