Basement Toilet Rough-in

Users who are viewing this thread

mop708

New Member
Messages
5
Reaction score
0
Points
1
Location
Illinois
Hello everyone!

I'm finally getting to the tiling part of my basement finishing job and I am hoping to get some information on how to handle the toilet rough-in. So far, I have been able to find everything I need by searching, but this one has me stumped, so I signed up to ask.

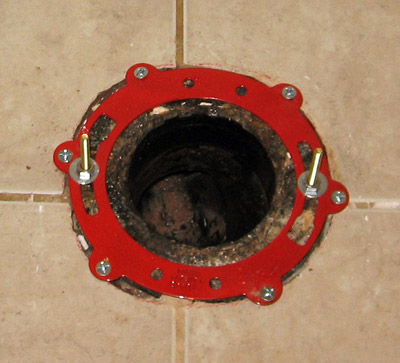
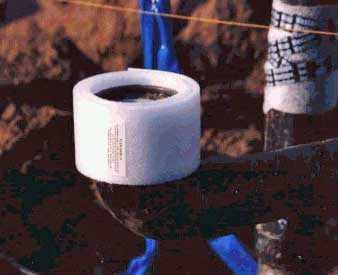
The builder roughed in the toilet drain (3" pipe), but left a lot of space between the pipe and the concrete (see the attached image)he pipe was surrounded in a Styrofoam tube before the concrete was done. The problem is that the hole in the concrete is about 6 1/4" diameter. I haven't bought a flange yet, but the flanges I see all have a screw hole diameter of 6".

How is this typically handled?

Also, when I did my shower, I was cutting the pipe flush with the floor and the pipe came out of the elbow below the concrete. Not a big deal, I just cemented it in. However, is this typically how this is done? Is the pipe normally left un-cemented so it can be removed? Should I give some good yanks and twists on the toilet pipe to see if it was cemented in? I pulled on it a little and it seems solid, but I was a little afraid to pull too hard. I'd hate to screw something up below the concrete, but I'd also hate to find out in the future that the pipe was never cemented.

Any help would be truly appreciated!

IMG_2366.JPG
 

mop708

New Member
Messages
5
Reaction score
0
Points
1
Location
Illinois
It is a picture of the toilet drain coming out of the concrete floor. Starting from the outside in, you see the concrete floor, the Styrofoam tube, a small gap, and then the 3" PVC pipe.
 

Reach4

Well-Known Member
Messages
38,749
Reaction score
4,400
Points
113
Location
IL
I see two ways.
1. Remove the styrofoam, and fill the outer area with concrete. I would find some resiliant spacer to put around the pipe to leave room for the outside flange.

2. Leave the hole, but put in a repair ring over the new closet flange to take the lifting force.
red_ring_03.jpg
 

mop708

New Member
Messages
5
Reaction score
0
Points
1
Location
Illinois
Thanks!
So in scenario 1, I would not attach the flange until after the concrete is in? Just find some way of leaving a smaller space between the pipe and the new concrete? Then after the concrete is in, get the spacer out, tile the floor and install the flange over the pipe?
 

mop708

New Member
Messages
5
Reaction score
0
Points
1
Location
Illinois
Actually, in seeing your picture, it looks like the repair ring may be the way to go. Thanks!!
 

Reach4

Well-Known Member
Messages
38,749
Reaction score
4,400
Points
113
Location
IL
They also sell foam wrap for the purpose. Some people get rid of the Styrofoam with a propane torch.

calwestern.jpg
 

CountryBumkin

Active Member
Messages
915
Reaction score
70
Points
28
Location
Orlando, FL
I don't follow the suggestions made here. Why wouldn't you just cut the PVC pipe to the correct height for the finished floor and then solvent-weld a closet flange to it? A PVC closet flange with a metal flange would be best, but I don't see why you would recommend installing a repair flange over the pipe and mounting to floor (how is the repair flange attached to the 3" PVC pipe)?

IMG_2366.JPG


It look to me like the builder left enough space around pipe for a plumber to install one of these:
https://www.ferguson.com/product/we...-closet-flange-i86150/_/R-105034?skuId=105034
Query.jpg
 

Reach4

Well-Known Member
Messages
38,749
Reaction score
4,400
Points
113
Location
IL
I don't follow the suggestions made here.
The problem is that the hole in the concrete is big, and there would seem to be a problem with the screw-to-floor holes of the flange not having concrete to bite into.
 

Jadnashua

Retired Defense Industry Engineer xxx
Messages
32,771
Reaction score
1,191
Points
113
Location
New England
I think I'd consider putting enough removable wrap around the pipe to allow a flange to be installed, then filling in the hole with concrete patching material. Then cement on the flange. The builder would have made the job easier if it were a 4" pipe, then he could have poured the concrete right up to it, since you could then use an internal fit flange. Doing that on a 3" pipe IMHO, just makes the ID too small, but doing it on a 4" pipe would leave more than what you have with a 3" pipe (about 3.5") and an external hub type flange which would be 3" used externally, and only about 2.5" internally.
 

mop708

New Member
Messages
5
Reaction score
0
Points
1
Location
Illinois
Thanks for the advice everyone. What I did was I shoved a piece 4" drain pipe down over the hub of the elbow below the riser as a spacer. Then I filled the space around with quick setting concrete. What you see in the picture is my spacer and the floor with the new concrete.

IMG_2380.JPG


I wanted space all the way down to the elbow because I'm still not 100% certain whether or not the joint is just dry-fit. I pulled and tugged and it seems solid, but I don't see any primer on the joint. Like the shower drain, I guess I won't know for sure until I get the sawzall out and cut the pipe flush. When I cut the shower pipe, it popped out of the joint.
 
Last edited:
Top
Hey, wait a minute.

This is awkward, but...

It looks like you're using an ad blocker. We get it, but (1) terrylove.com can't live without ads, and (2) ad blockers can cause issues with videos and comments. If you'd like to support the site, please allow ads.

If any particular ad is your REASON for blocking ads, please let us know. We might be able to do something about it. Thanks.
I've Disabled AdBlock    No Thanks