Convert copper pipes from tub/shower to shower?

Users who are viewing this thread

JohnfrWhipple

BATHROOM DESIGN & BUILD
Messages
3,225
Reaction score
102
Points
48
Location
North Vancouver, BC
I cut the drains with a metal cut off wheel and angle grinder. Polish edges with file. Use the tile to complete the edges. Ditch the end caps.

Crazy I know... But looks better. preforms better and the ACO plain edge channel drain is a glorified strainer no a drain. The channel body holds the grate. The drain is your primary clamping drain.
 
Last edited by a moderator:

JohnfrWhipple

BATHROOM DESIGN & BUILD
Messages
3,225
Reaction score
102
Points
48
Location
North Vancouver, BC
Ok, so my situation is different.

- I am planning to use a membrane + CBU, not a topical seal.

Use Chloray from Noble Company. It has a lifetime warranty. Some liners are affected by cleaning agents and get brittle in time.

- My wall build up is much thicker:
Water proofing membrane: 0.15" (4mm). I was thinking to use the same material as the shower liner. Not sure if that is overkill or stupid.

NO - dumb idea.

CBU: 0.5"
Thinset: 0.5" (given 18" x 18" tiles) I think that is the recommended trowel size for 18 x 18
tiles: 0.5"
Total: 1.65"

Does this look right?

No - your build up will be closer to 1 1/8"

hehe, I like this game... Water would spill out the door on the way to the drain. Perhaps the entire bathroom is a wet room with a secondary drain but I doubt that is the case... Also, unless the tiles on the right hand side are pitched to the drain, the drain should ideally be stretched across the entire length of the sloping tiles (else water would just accumulate on the right).

Tile is installed to low in photo. Your tile should be 1/16" - 1/8" above the drain channel body

Yeah, I am just realizing that the regular primary shower drains may not be ideal for "against the wall" linear drain installations. The Sioux Chief drain I have has a radius of 3.25" and a flange of almost 2". The ACO drains I believe are 3" wide. Assuming the ACO drain is centered on the shower drain, with my wall build-out that leaves about 1/4" gap from the wall to the drain. That gap will be even wider if the two two 45 fittings will put the shower drain even further. I did see that some put an additional CBU sheet be 1/2" or 1/4" to close any gaps.

The beutty of cutting these drains is that you can order a larger channel body and design the fisinehed wall to curb measurement to fit a stock grate. Or order the Quatro like me and fine tune both ends.

So that the water proofing and sealant don't conform to the weep holes thereby blocking them.

Ding Ding Ding. One point for you.
 

Arnav

Member
Messages
150
Reaction score
10
Points
18
Location
Florida
I cut the drains with a metal cut off wheel and angle grinder. Polish edges with file. Use the tile to complete the edges. Ditch the end caps.
Crazy I know... But looks better. preforms better and the ACO plain edge channel drain is a glorified strainer no a drain. The channel body holds the grate. The drain is your primary clamping drain.

ok, that is what I meant. I can see how that would work for a shower with a topical waterproofing. The water would simply fall from the channel onto the waterproofing. However, this method will not work for a mud pan shower, right? The water will take the top mud pan with it down the drain presumably...
 
Last edited:

JohnfrWhipple

BATHROOM DESIGN & BUILD
Messages
3,225
Reaction score
102
Points
48
Location
North Vancouver, BC
This method only works with a traditional mud bed. When you set the ACO drain it is in say a typical 2" Laticerete 3701 mortar bed. Water that gets below the tile or walls weeps under the mortar bed to the showers weep holes located on the primary shower drain.

I have a few tricks for that as well.

Do you know what Candle Wick is for a shower? Have you seen how I use Ditra Drain for this step? I've shared some of my work pictures here. I'm sure I posted them somewhere.

Maybe in the Tile tips discussion.
 

Arnav

Member
Messages
150
Reaction score
10
Points
18
Location
Florida
Apologies if I am being thick headed. Thanks in advance for the help. I just don't understand the mechanics of how this can work without eroding the mud pan.

- Water flows on the tiles to the drain.
- Some water will wick through the grout etc'. We are not worried about that - with a proper pre-slope it will drain through the weep holes.
So far so good.
- Now we cut the sides of the drain channel.
- Some water will drain straight to the primary drain, no issues here.
- However, without the sides of the drain channel, presumably water would go out the sides of the drain as well. I imagine maybe incorrectly that this is a lot of water which would make the mud pan really wet (way more then the grout alone) which can't be a good thing.

But, clearly that is not an issue, so I will not worry about it.

Do you know what Candle Wick is for a shower? Have you seen how I use Ditra Drain for this step? I've shared some of my work pictures here. I'm sure I posted them somewhere.

Maybe in the Tile tips discussion.
No idea what a Candle Wick is for a shower. I will try and find those posts you are referring to.
 

JohnfrWhipple

BATHROOM DESIGN & BUILD
Messages
3,225
Reaction score
102
Points
48
Location
North Vancouver, BC
Keep digging and you will find the answer you seek.

This photo might help you make sense of my design...

The strips all are dry layed. This photo is one of a series of 100 approx that I took showing a detailed ACO shower drain install. I'm sorry I can't share them all here for you but I need to keep some of the good stuff back for those online clients of mine.

The photo does not show the positive weep hole protector from Noble Company that I used.
 
Last edited by a moderator:

Arnav

Member
Messages
150
Reaction score
10
Points
18
Location
Florida
I had fun practicing/learning. I'm happy I did. I can probably get them looking better but I opened every single one and they had very good coverage of solder inside. Very cool how the solder gets sucked inside.
 

Attachments

  • IMG_2002.JPG
    IMG_2002.JPG
    44.4 KB · Views: 340

Arnav

Member
Messages
150
Reaction score
10
Points
18
Location
Florida
haha, it is always the $1 part which stops the project. I realized I need a street elbow.

1. The distance between the vertical cold and hot pipes is only 7-1/4" (center to center). I guess that is not enough for two regular 1/2" elbows so the builder/plumber used a street elbow on one side of the rough in value to make it fit. Is that ok (i.e. use a street elbow straight into the rough in value)?

2. I am assuming the rough-in value should be centered over the drain? At the moment it is 2.5" to the right. I wonder if it is worth moving (though it may not be as pronounced with a linear drain).

3. You think the valve may end up too close to the wall (esthetically) as there is 15.5" from the valve to the bare wall (and then there is the 1.5" studs + CBU + 0.5" tiles)?

Thanks!
 

Arnav

Member
Messages
150
Reaction score
10
Points
18
Location
Florida
Do you see an issue with this pipe layout?

I decided it would look better to center the rough in value over the drain and not have it so close to the wall. I know ideally the hot and cold would be of the same length, but hopefully this layout works.

Thx!
 

Attachments

  • IMG_2008 (copy).JPG
    IMG_2008 (copy).JPG
    51.2 KB · Views: 343
Last edited:

ShowerDude

Showers
Messages
710
Reaction score
66
Points
28
Location
Minnesota
pretty straightforward, i would spring for a few in line ball valve shutoffs, for future workability. always a good option to have....of course place them so they open out the back wall...!
 

ShowerDude

Showers
Messages
710
Reaction score
66
Points
28
Location
Minnesota
[QUOTE="johnfrwhipple, post: 434976, member: 34922"

This should not ever be considered. This is a bad idea. Even if someone at ACO tells you it's OK.


[/QUOTE]


the single one and only reason i cannot get behind the aco drain. placing it directly against the wall , while it could be done it would require the flange model with a mission band (then there is a 1/4" lip around the body which is essentially a dam.)

the plain edge drain is i agree one of the best , but requires a clamping drain and eliminates the thinbed option unless you use the flange version that as i said makes no sense to have a dam around the body.

trust me im trying hard to include an aco linear in my current project that must be placed tight to a wall that i cannot fur out to accomIdate the drain placement.

forcing me to continue using quick drAins with the jaeger flashing .

im trying john but cant use the aco again. !@&#

but it can work with your shower arnav.....

share some of your install pics with us plz....
 
Last edited by a moderator:

Eurob

master tile and stone installer
Messages
824
Reaction score
53
Points
28
Location
Montreal
Website
www.houzz.com
Do you see an issue with this pipe layout?

I decided it would look better to center the rough in value over the drain and not have it so close to the wall. I know ideally the hot and cold would be of the same length, but hopefully this layout works.

Thx!


This is for water , not for air . ;)

If copper pipes are used , it shouldn't be a problem ..... if pex or similar , I think the you should match the number of fittings on each side . It will create the same restrictions on the lies .

I am no plumber , but I am sure if I am wrong , some expert plumbers will let us know .:)
 

ShowerDude

Showers
Messages
710
Reaction score
66
Points
28
Location
Minnesota
RSCB - you just need a smaller primary drain. I do them all the time. Just not with the ACO primary.

home-design.jpg


ACO+Drain+over+NobleSeal+TS.jpg


ACO drain.
5/8" molding to show finished tile position
Watts Baby Blue clamping Drain
NobleSeal TS waterproofing on floor
Aqua D on the walls

Waterproofing+an+exterior+window+in+a+shower.jpg


Went a little cowboy on the window tie in.....

What's the issue?


if the drain is centered over that flange in the bottom pic and that is your finished wall w/aqua i cannot see that timing out with only tile and thinset??? call me nuts but i dont see it?

there is no issue i love the aco product .....you and i have differing opinion on how we build our pans......i prefer the thin bed full topical approach with my ts...... i would be ok with the flange edge for my builds i just cannot accept the flange model perimiter lip with a thinbed pan!!!


let me look into watts baby blue and do some layout math.

i think arnav needs to get his drain from you, he will benefit from your guidance further as he gets into his buildout....

happy pumpkin day!
 

ShowerDude

Showers
Messages
710
Reaction score
66
Points
28
Location
Minnesota
maybe just maybe if the baby blue is butted tight to wall. definately not with a sioux chief..... still the plain edge version kills my thinbed option and thats the bummer .

quickdrain has a new tile in grate i may have to go that route again .... and your quickdrain for sale in your boneyard just a bit long for this job......... darnit, again!
 

Arnav

Member
Messages
150
Reaction score
10
Points
18
Location
Florida
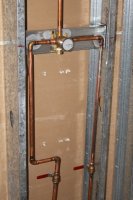
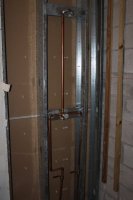
Thank you for "signing off" my copper layout and thanks for the shutoffs valves idea as well. I will definitely do it. It sucks its not there already. I am looking forward to tackling it next week.

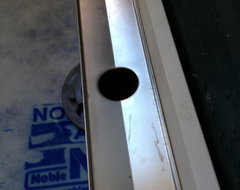
I am thinking of going with the Infinity Drains site sizable one (sorry John). For a first time DIY shower installation, I like the flexibility of being able to have the outlet anywhere on the channel run as well as size it myself (while having stops at the end). Probably not relevant for you pros, but for me it is two dimensions of freedom.

I came to terms with the fact that I will probably not going to be able to get the drain flush with the wall. Not the end of the world.

- My rough in shower drain is ~2.5" away from the studs.
- With two 45 deg elbows it is ~4.5" away.
- If I twist the elbows to the side (which seems ok if you use a linear drain...), I can shave off about an inch at ~3.5".

I am looking at linear drains that are 1-13/16" wide (the other site sizable ones are much more expensive).

(Almost) no amount of build out in the world will bridge that gap... :)

I will look into the baby blue one and see if that can help.

I don't know much about this, but I do learn more by the minute, so I reserve the right to change my mind later on (or at least until the build has started)... :)
 

Vegas_sparky

Digital Billy
Messages
486
Reaction score
42
Points
28
Location
LV,NV/ Nowhere,UT
The more details, and progress pics you post, the better you'll be in the end.

I'm looking forward to watching this one. I like the step by step posts. Problem solving along the way helps teach all of us who are reading.
 

Arnav

Member
Messages
150
Reaction score
10
Points
18
Location
Florida
Small victory... The new rough in valve, ball-shutoff valves, and shower head pipe are in. I tested it at full pressure with a plug at the shower head.

How long do you leave it at full pressure for it to be a good test?

I Don't know about a week, a month or a year from now. But at least for now it is not leaking... :)
 

Attachments

  • IMG_2010.JPG
    IMG_2010.JPG
    75.7 KB · Views: 1,649
  • IMG_2009.JPG
    IMG_2009.JPG
    64.8 KB · Views: 1,085
Top
Hey, wait a minute.

This is awkward, but...

It looks like you're using an ad blocker. We get it, but (1) terrylove.com can't live without ads, and (2) ad blockers can cause issues with videos and comments. If you'd like to support the site, please allow ads.

If any particular ad is your REASON for blocking ads, please let us know. We might be able to do something about it. Thanks.
I've Disabled AdBlock    No Thanks