New shower thread?

Users who are viewing this thread

Vegas_sparky

Digital Billy
Messages
486
Reaction score
42
Points
28
Location
LV,NV/ Nowhere,UT
The whole thread is gone. What happened? Oh wait, there's more below.
Keep reading down..
 
Last edited by a moderator:
Vegas_sparky

Digital Billy
Messages
486
Reaction score
42
Points
28
Location
LV,NV/ Nowhere,UT
This shower is in my own house. Its going to be my retirement home in 10 years or so. Its 250 miles from Vegas, and my wife and daughter live there full time. I make the drive every weekend. I've been working on this house for over a year. I'm exhausted, and looking forward to getting it done so I can spend more time with my family.

I want this bathroom to be the best I can make it to be on my blue collar budget. The shower will be the focal point of the bathroom. Having it leak is my biggest fear. Of course I want to find the best system to prevent problems. This isn't a damn game to me.

John, your comprehensive knowledge of this subject is admirable. Your expert advice is appreciated more than you know. Thanks for the help so far. You've put me in the right direction, but I'm not done yet.

The ice house looks like it was fun just for the fact its something totally off the wall. Your kids don't forget things like that, and later in life they realize how eccentric daddy really is. Carpe Diem, my friend! LOL
 
Last edited by a moderator:

Vegas_sparky

Digital Billy
Messages
486
Reaction score
42
Points
28
Location
LV,NV/ Nowhere,UT
After seeing even more awe inspiring projects from the master here, all I'll say is I should put the trowel down.

Good news is my pan holds water. Bad news is I'm using the biggest cluster$&@# of materials ever assembled. I've gone way past cowboy now, and have entered Blazing Saddles territory. That's what happens when you pick and choose methods, and techniques. Be warned all you DIY guys. There's a lot to a custom shower.

Back to the cement board.
 

JohnfrWhipple

BATHROOM DESIGN & BUILD
Messages
3,225
Reaction score
102
Points
48
Location
North Vancouver, BC
Last night I had a Blazing Saddle moment - about every 12 minutes like clockwork!!! lol the campfire bean scene if you remember.

I'm glad you flood tested your job. Did all the water drain when you finished?

Is the floor protected now from harm?

So easy to drop something while boarding....

When are you going to share pictures. I'll be nice.... lol maybe. lol
 

JohnfrWhipple

BATHROOM DESIGN & BUILD
Messages
3,225
Reaction score
102
Points
48
Location
North Vancouver, BC
You adding lights in those niches? IS that a two wire or four wire you got pulled?

Any diffuser? I've been using White Laminate Glass for this step.

I build about a 2-3" recess above the niche to house the lights, heatsink and diffuser. Are you planning something like this?


Love the trailer! Are you allowed to keep those on in the US while driving?
 

Vegas_sparky

Digital Billy
Messages
486
Reaction score
42
Points
28
Location
LV,NV/ Nowhere,UT
I pulled a dedicated 18/4 Belden cable to each niche(8 total). They all go back to a controller and power supply mounted under the shower bench. I'll set them up to slow color change/fade with the upper and lower niches on different color phases. I doubt I'll diffuse/cover them at the back of the niche. If I do, it'll be a small piece of polycarb fixed over the strip. I've done plenty of wet location LED projects, and they can be amazingly reliable, even underwater.

As far as driving with the trailer LEDs on, I've only done that twice. Once down LV Blvd for fun, and another time while on our way to go camping in the desert northeast of area 51(even more fun). Typically its illegal.
 

JohnfrWhipple

BATHROOM DESIGN & BUILD
Messages
3,225
Reaction score
102
Points
48
Location
North Vancouver, BC
Thanks for the info VEgas

Can you send me the info on your LED's. I would like to look more into your approach and play around with some of these LED lights.
 

Vegas_sparky

Digital Billy
Messages
486
Reaction score
42
Points
28
Location
LV,NV/ Nowhere,UT
I'll be happy to send you something.

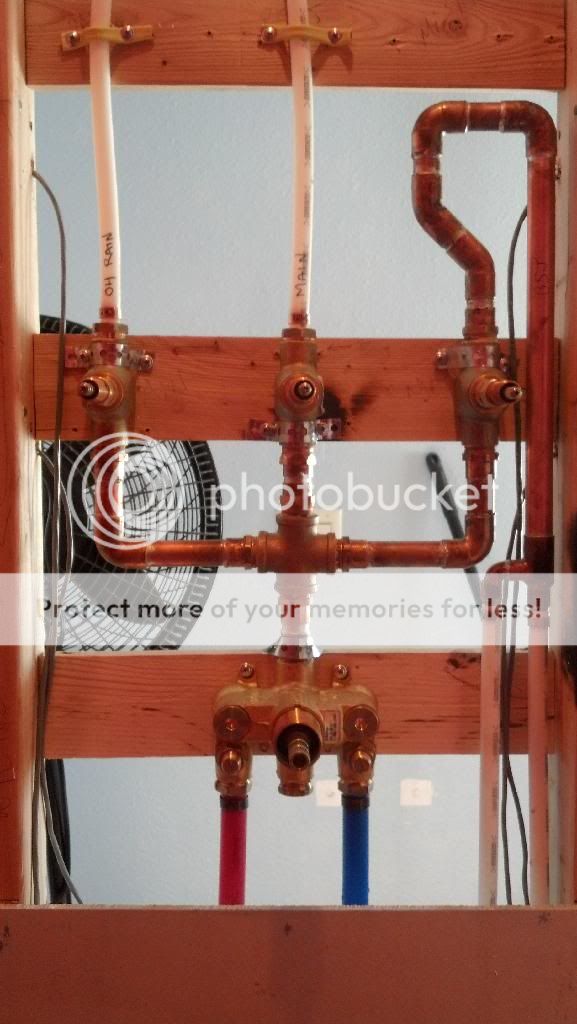
Spent the past week getting all the stuff to change my valve system. 1/2" stuff just won't cut it. Ended up with a 3/4" thermostatic valve(22 GPM), and (3) 3/4" volume control valves that will flow more than I'll ever need.

After calling no less than 7 plumbing supply houses I finally found a 3/4" brass threaded cross tee. I wanted a copper/sweat fitting, but I'll have to take what I found. Damn things are like unicorns.
 

JohnfrWhipple

BATHROOM DESIGN & BUILD
Messages
3,225
Reaction score
102
Points
48
Location
North Vancouver, BC
22 GPM

What-ca-building a Car Wash? LOL

What kind of drain you got there? You better be planning on a good 3/8" of water head above the drain with that kind of output….
 

Vegas_sparky

Digital Billy
Messages
486
Reaction score
42
Points
28
Location
LV,NV/ Nowhere,UT
I have used the car wash analogy talking to friends about this. LOL

I'll only have about 11 GPM through all the heads if all the restrictors remain. I just finished getting the valves installed, flushed, greased, and assembled. Nothing is leaking. Do you guys see any systemic problems before I close this up? Body sprays are (4) x 1.5 GPM fed from valve on right.


JohnfrWhipple

BATHROOM DESIGN & BUILD
Messages
3,225
Reaction score
102
Points
48
Location
North Vancouver, BC
Front wall is closed. I really can't believe I have to go through all this just to mastic some 4 1/4" white tile up. Sheeeesh

You didn't just say Mastic did you. Lean in closer to your screen so I can slap you !!! LOL

Please tell me you are just trying to get me worked up….

You are kidding right. Mastic. No _____ing way. Why not use bubble gum? Scotch Tape maybe.

What is the water proofing measures being used over the backer board?
 

Vegas_sparky

Digital Billy
Messages
486
Reaction score
42
Points
28
Location
LV,NV/ Nowhere,UT
I was kidding about the mastic. I thought you'd like that. LOL

This, not so funny to me. Added lots of blocking. I did a conventional liner in the pan.


I did flood test it. The last bit took a while to get out through the weep holes when drained.


Finish slope turned out worse than preslope, but I don't think its anything I can't correct during tile.

As for the walls, I went with liquid against all the advice here.


Before I started this I had more confidence in my skills with a brush and roller, than a trowel. I thought I'd have problems getting Kerdi to stick to the walls. Kerdi would have been much quicker to install, and wouldn't leave me wondering if it would really work. Its done the best I could do it.
 

Jadnashua

Retired Defense Industry Engineer xxx
Messages
32,771
Reaction score
1,191
Points
113
Location
New England
The key to using RedGard is to use a wet film gauge when putting the stuff up...there is a definite min/max for each coat you want to attain. This is not something where more is better. But, if you do get it up properly, it can work, just not my favorite substance.
 

Vegas_sparky

Digital Billy
Messages
486
Reaction score
42
Points
28
Location
LV,NV/ Nowhere,UT
I taped all the seams. I did the 4/1 prime coat. I did use a film gauge. They recommend a 3/4" nap roller to apply. Problem with that is the wet thickness varies considerably because the thick material gets pulled by the roller and leaves peaks. I used a 3/8" roller instead giving me 20 mil per pass wet. 3 coats got me to 60. Niches and corners got a fourth coat just cause. Time will tell.

One thing I am happy about is how flat, square, and plumb it all turned out. All the extra blocking made it really solid.
 

Vegas_sparky

Digital Billy
Messages
486
Reaction score
42
Points
28
Location
LV,NV/ Nowhere,UT
I filled the pan again yesterday to inner edge of curb. Air bubbles percolated in a couple of spots on the floor. I need to get a test ball to check it properly now. Are the bubbles normal?

I'm not a pro. I'm not an engineer. I am not AN ANIMAL! LMAO


As far as coverage, the elephant Lecter Redgard mask of shame is way thicker than spec, and color is identical. Corners where applied thick are also the same.


I may go one more coat, but this stuff seems to get brittle as it gets built up.
 
Last edited by a moderator:

Vegas_sparky

Digital Billy
Messages
486
Reaction score
42
Points
28
Location
LV,NV/ Nowhere,UT
I did work out the coverage via footage, and its damn close to right on the money. Another coat won't hurt.

The orange stuff (Cel phone cam color is off) is the dried RG pulled from the tray liner. I compared that to what was on wall.

I don't know what rubbing away the bubbles means. I'm assuming there are small air pockets beneath the surface. I was standing on it all weekend, had step stools on it, and don't have any cracks. I want to make sure the bubbles aren't a sign of structural weakness/voids.
 

Eurob

master tile and stone installer
Messages
824
Reaction score
53
Points
28
Location
Montreal
Website
www.houzz.com
Nice mask you got there Sparky . You definitely find new applications for the Redgard . I bet with another coat you will get close the the pvc liner .;)
 
Top
Hey, wait a minute.

This is awkward, but...

It looks like you're using an ad blocker. We get it, but (1) terrylove.com can't live without ads, and (2) ad blockers can cause issues with videos and comments. If you'd like to support the site, please allow ads.

If any particular ad is your REASON for blocking ads, please let us know. We might be able to do something about it. Thanks.
I've Disabled AdBlock    No Thanks