Dreaded cast iron retrofit or removal?

Users who are viewing this thread

monkeyshine

New Member
Messages
11
Reaction score
0
Points
0
Location
Houston
Happy Super Bowl Sunday to everyone and thanks for allowing me to be part of your forum.

I have an older 1950's home where the vent and drain lines were made of cast iron. I'm looking to relocate my current toilet as I have a spacious void in which I can take advantage of to install the new toilet location. My issue is the cast iron drain line which I'd like to either tap into at the very least (and more probable), replace with PVC for the new toilet. The bathroom is quite small (roughly 5' x 8') and the new location for the toilet will be about 4' away from the existing closet bend.

As these photos below demonstrate, in the pro's expertise, what is the best way to accomplish this exactly? I'm fairly proficient with plumbing mechanics, however, I'm thinking I may be in over my head here. I'm looking to relocate the toilet from where it is in the photo to a cut out right where the gas heater is in the photo.

image(2).jpgimage(3).jpgimage(4).jpgimage(5).jpg

Any clarifications please ask! Thanks for reading and any assistance you could provide - photos of similar circumstances or photos of what exactly I will need.
 

Jadnashua

Retired Defense Industry Engineer xxx
Messages
32,771
Reaction score
1,191
Points
113
Location
New England
There's no way to tell from those close-ups...you'd need a room layout showing current piping and what you want to accomplish. Normally, there's a way to do this without jumping through hoops. But, keep in mind you need any relocated pipes to be able to slope down at 1/4" per foot, and depending on how things are currently run, that may be hard to achieve without tearing out more than you may want.

Working with CI can be dangerous...the stuff s very heavy. When cutting out a section, make sure it is well supported, or it could fall and injure you or something.
 

monkeyshine

New Member
Messages
11
Reaction score
0
Points
0
Location
Houston
There's no way to tell from those close-ups...you'd need a room layout showing current piping and what you want to accomplish. Normally, there's a way to do this without jumping through hoops. But, keep in mind you need any relocated pipes to be able to slope down at 1/4" per foot, and depending on how things are currently run, that may be hard to achieve without tearing out more than you may want.

Working with CI can be dangerous...the stuff s very heavy. When cutting out a section, make sure it is well supported, or it could fall and injure you or something.

Hi Jad - thanks for the reply.

I hear you about CI being dangerous. I've read a few of your other posts actually regarding U-bolting it for added support. I certainly don't want that falling on my hands or foot so I'll be sure to be careful if it does in fact come to that.

This is (obviously) where I live and I anticipate I can be without the walls for about 3-4 days tops. That is my timeline, but you and the other guys would know better about what is realistic. I'll sketch something up tonight or at work tomorrow and show you guys exactly what my intent is. I trust the judgement from the experts here to be honest about whether or not an accomplished weekend warrior can accomplish this or not without professional help. Thanks and please stay tuned and I'll get a sketch up soon.
 

monkeyshine

New Member
Messages
11
Reaction score
0
Points
0
Location
Houston
Hi Jad - will this suffice do you think? Obviously artwork is not my calling :D My photos from the initial post probably make a bit more sense now.
Publication1.jpg

Your ideas would be appreciated! Thanks!
 

Jadnashua

Retired Defense Industry Engineer xxx
Messages
32,771
Reaction score
1,191
Points
113
Location
New England
We can't see the way the existing pipes run, their height, or direction. As long as you can maintain a downward slope of at least 1/4" per foot and aren't trying to run it around in loops, it should work. Running it an extra 4' means it will be 1" higher at the new end, and depending on how high the pipe is now, you may not have enough room for the toilet bend to go up. ALso, depending on how many changes of direction, you may need a cleanout. It also depends on how far away the stack is (I think you're allowed 10' with a 4" pipe, less with smaller).
 

monkeyshine

New Member
Messages
11
Reaction score
0
Points
0
Location
Houston
Yep, no loops would be necessary because it's a straight (and flat) run. At the very least, couldn't I drop the receiving drain to compensate for the 1/4" downward slope or is that out of the question? I appreciate your patience as I'm just trying to get my head around the whole project. Do you have an example of how to show the pipe runs etc? I've seen some CGI sketches but they look like they were produced with AUTOCad or something similar. The working area is very small b/c everything I'm wanting to do is all on the same wall within a 3'-4' range.

We can't see the way the existing pipes run, their height, or direction. As long as you can maintain a downward slope of at least 1/4" per foot and aren't trying to run it around in loops, it should work. Running it an extra 4' means it will be 1" higher at the new end, and depending on how high the pipe is now, you may not have enough room for the toilet bend to go up. ALso, depending on how many changes of direction, you may need a cleanout. It also depends on how far away the stack is (I think you're allowed 10' with a 4" pipe, less with smaller).
 

monkeyshine

New Member
Messages
11
Reaction score
0
Points
0
Location
Houston
Hi WJ - so if I'm within the 6' bubble, I should be alright then correct? There are no obstructions (thankfully) that I have to worry about as the space I'm looking at relocating the toilet to is literally a 4' x 4' void which was probably a closet at one time or something.
 

WJcandee

Wise One
Messages
3,182
Reaction score
170
Points
63
Location
New York, NY
Right, although you measure the trap arm a little differently on a water closet than you do, for example, a p-trap. There you measure the horizontal arm; on a water closet, you measure from the flange to the inner edge of the vent, so it's as if you stuck the little metal end of a tape measure on the flange and dropped it down through the closet bend and through the pipe and then read what the tape said at the inner edge of the vent. So the developed length from the flange to the inner edge of the vent can't be more than 6 feet.

I am a little concerned from your drawing about how you will do the change of direction where you are connecting the new line to the old line to the stack, but I suppose it's doable.
 

monkeyshine

New Member
Messages
11
Reaction score
0
Points
0
Location
Houston
I am a little concerned from your drawing about how you will do the change of direction where you are connecting the new line to the old line to the stack, but I suppose it's doable.

Trust me, I'm open to suggestions WJ b/c aside of changing out toilets, fixtures and the occasional copper water lines, I'm quite a novice when it comes to cast iron removal etc. I have pretty much every tool under the sun, but the mechanics are what I'm struggling with unfortunately. I believe I can get the 1/4"/ft slope with no problem, but tapping into the cast iron (or replacing the actual piping itself) is what makes me a bit nervous. I already know it will run about 2-3k to get a pro out to do the work, but I've done just about everything else to my home without a contractor - some of it quite difficult.

Can you please elaborate on what you mean about how I will accomplish the change of direction? Not quite sure I understand that.
 

Jadnashua

Retired Defense Industry Engineer xxx
Messages
32,771
Reaction score
1,191
Points
113
Location
New England
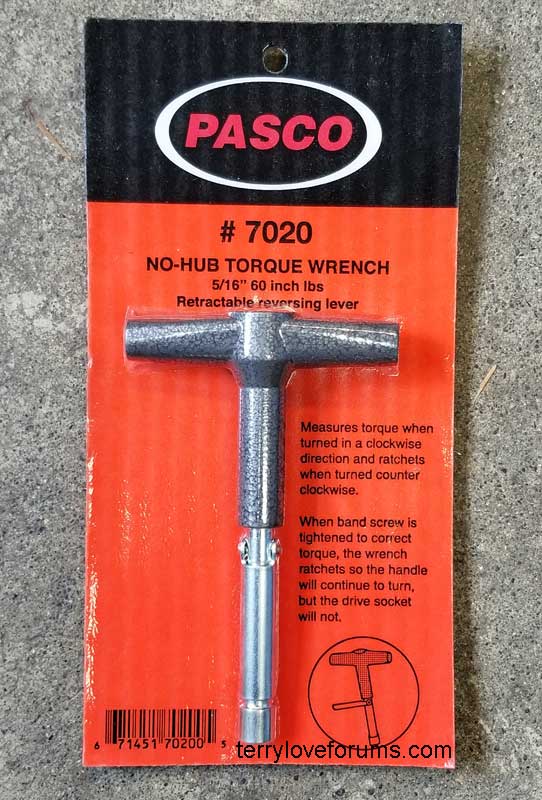
FWIW, CI is still the premium drain line material, and to make things easier, it is available without the hubs (socket) that require the lead joints...the pipe is all straight and you use no-hub connectors to attach the pieces. You still must cut the stuff, but with the right tools, that's pretty straightforward. In some ways, it's easier than pvc, since you just measure leaving about 1/8" or so for the joint which is then filled by the stop in the rubber no-hub sleeve you use to attach it to the next piece. If it doesn't snap off square, then it becomes more work squaring it off, but it's likely faster than tamping and leading a hubbed joint. You should pick up a torque wrench for the no-hub connector, though.

pasco-torque-wrench.jpg
 
Last edited by a moderator:

Cacher_Chick

Test, Don't Guess!
Messages
5,458
Reaction score
213
Points
63
Location
Land of Cheese
I'm having a little trouble figuring out what direction everything is facing in your pictures. That is a vertical stack which goes straight up through the roof? The galvanized pipe tee'd into it is the sink? Where is the tub connection?
 

monkeyshine

New Member
Messages
11
Reaction score
0
Points
0
Location
Houston
I'm having a little trouble figuring out what direction everything is facing in your pictures. That is a vertical stack which goes straight up through the roof? The galvanized pipe tee'd into it is the sink? Where is the tub connection?

Hi Cacher, you are correct. This might be a better view to give you guys perspective. The stack goes directly up from behind the toilet and the galvanized pipe tee's into the sink. The toilet will go over 3' (where the gas heater in the photo is) and back 2'.

This was taken from my shower:

photo.jpg

@JAD - I watched a few videos and have spoken with a few folks who have done similar work before and they swear by the chain tool to snap that pipe. Do you happen to have a diagram of how everything fits together from the vent stack to the drain to the street etc? I'm sure there is something fairly standard to look at, but I've been unable to find much in that respect.

Also, as it stands now, it appears that there is only one (1) inlet into the receiving hub (not sure what the proper terminology is sorry) which goes from the sink into the receiving hub. Considering I'm relocating the toilet, I'll need to reposition the hub so I don't have a gazillion bends and curves which from what I've read can create a nightmare for discharging solids or water. What is that piece called? Thanks again for your patience here guys - much appreciated.
 

Cacher_Chick

Test, Don't Guess!
Messages
5,458
Reaction score
213
Points
63
Location
Land of Cheese
It won't be certain how the new branch drain for the toilet will need to be connected until the floor is opened up. We still don't know for sure how the tub/shower is connected or where the building drain is heading.
 

hj

Master Plumber
Messages
33,599
Reaction score
1,037
Points
113
Location
Cave Creek, Arizona
Website
www.terrylove.com
I may be missing something, but I haven't seen a "gas water heater" in any of the pictures. I assume this is over a crawl space, or concrete slab, otherwise running a toilet arm on an angle like that would be somewhat destructive. Pictures of the piping ABOVE the floor are useless. We need to see what is UNDER the floor.
 
Last edited:

WJcandee

Wise One
Messages
3,182
Reaction score
170
Points
63
Location
New York, NY
I may be missing something, but I haven't seen a "gas water heater" in any of the pictures. I assume this is over a crawl space, otherwise running a toilet arm on an angle like that would be somewhat destructive. Pictures of the piping ABOVE the floor are useless. We need to see what is UNDER the floor.

He's talking about the rusty hulk mounted in the left side of the wall. "Gas heater" (i.e. heater of air) not "gas water heater".

My question is whether he is planning to perform surgery on the gas piping; potentially-dangerous to assume that it's permanently capped-off.
 

monkeyshine

New Member
Messages
11
Reaction score
0
Points
0
Location
Houston
I may be missing something, but I haven't seen a "gas water heater" in any of the pictures. I assume this is over a crawl space, or concrete slab, otherwise running a toilet arm on an angle like that would be somewhat destructive. Pictures of the piping ABOVE the floor are useless. We need to see what is UNDER the floor.

Hi HJ - if I said gas water heater, I apologize. Should've read "gas heater" which is the little firebox to the far left in the last photo. I'm going to cap it off up in the attic b/c I'll use that space for the toilet (hopefully).
 

monkeyshine

New Member
Messages
11
Reaction score
0
Points
0
Location
Houston
It won't be certain how the new branch drain for the toilet will need to be connected until the floor is opened up. We still don't know for sure how the tub/shower is connected or where the building drain is heading.

That is a very good question because I also don't know how it's connected b/c they are on opposite sides of the room, but I'll have a look at the shower side when I get home. Fortunately, I have easy access to find that out. Quick question however - you mentioned that you still don't know how the tub/shower is connected....why does that matter exactly? The only change that there will be, will be an extended drain line from the toilet so instead of 1ft. to the toilet, it will need to be 3'-4' in another direction.

I think I'll get cracking (no pun intended) on breaking up the bit of concrete which houses the receiving hub and this should give me/you guys a better indication of where the lines sit. Thanks again!
 

Cacher_Chick

Test, Don't Guess!
Messages
5,458
Reaction score
213
Points
63
Location
Land of Cheese
We don't know where the building drain is. Going only by your pictures, the tub/shower branch drain could be connected near the base of the stack under the floor. If so it will have to be considered when installing the new toilet branch.
 
Top
Hey, wait a minute.

This is awkward, but...

It looks like you're using an ad blocker. We get it, but (1) terrylove.com can't live without ads, and (2) ad blockers can cause issues with videos and comments. If you'd like to support the site, please allow ads.

If any particular ad is your REASON for blocking ads, please let us know. We might be able to do something about it. Thanks.
I've Disabled AdBlock    No Thanks