Help with Kohler Mistos Install

Users who are viewing this thread

Trevor

New Member
Messages
3
Reaction score
0
Points
0
Location
British Columbia
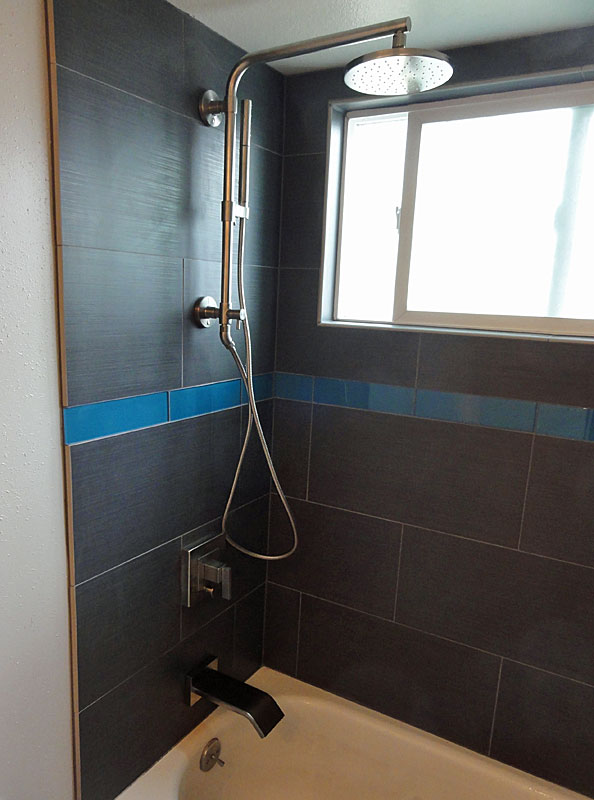
Can someone please help me with the installation of a Kohler mistos shower/bath unit? I now have the drywall installed and stressing that I do not have it installed correctly. My next step would be installing the tile.

I am using a Kohler Mistos K-R37028-4-CP:

http://www.us.kohler.com/us/Mistos%C2%AE+bath-shower+faucet+%28retail+only%29/productDetail/Non-Catalog/428492.htm

I tried to install the faucet deeper in the wall but the wall seemed pretty shallow. It was the deepest I could install it and still fasten down the pipes.

The distance from the center of the copper water pipe to the edge of the drywall is 2-5/8. The distance from the center of the pipe to the outside edge of the plastic frame is 2-3/4. The outside edge of the plastic is sticking out from the wall by 1/8th.

Am I in trouble? I was thinking of cutting back the plastic ring by 1/2inch, then putting the tile on closer to the center. Any advice would be greatly appreciated. Thanks. Trevor.

Rough in guide:
http://www.us.kohler.com/webassets/kpna/catalog/pdf/en/1171693_1.pdf

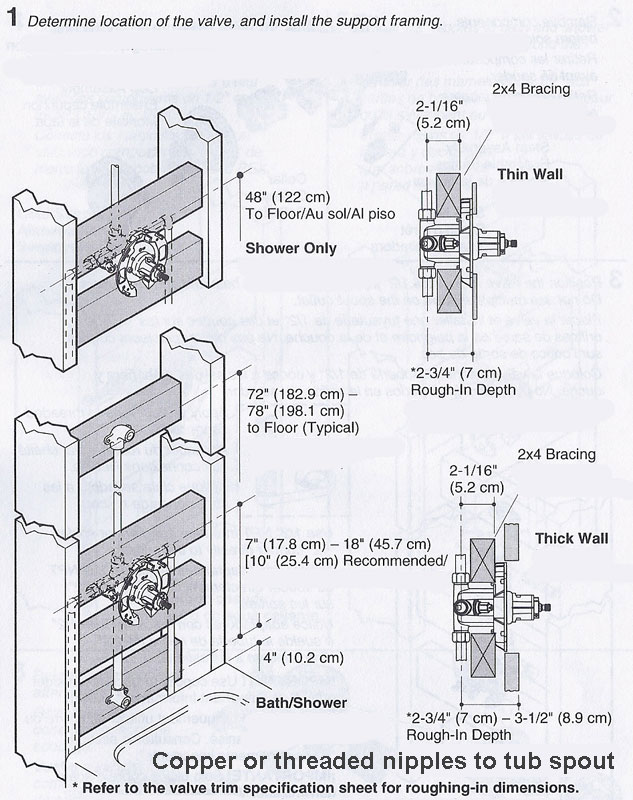
Install guide part 1:
http://www.us.kohler.com/webassets/kpna/catalog/pdf/en/1110626_2.pdf

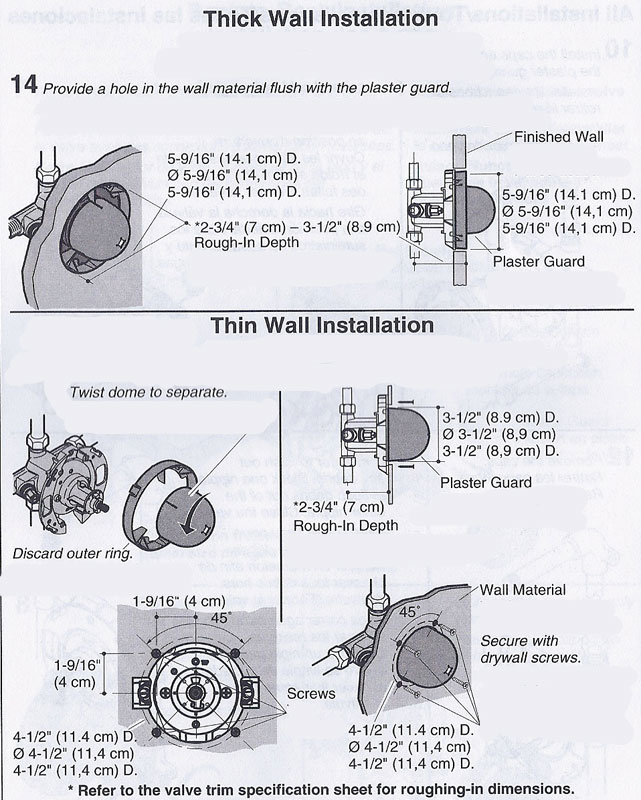
Install guide part 2:
http://www.us.kohler.com/webassets/kpna/catalog/pdf/en/1142462_2.pdf

The green stuff is a water proof sealer I painted on.

photo(1).JPG
and
photo.jpg
 

Trevor

New Member
Messages
3
Reaction score
0
Points
0
Location
British Columbia
That looks like a similar setup. Do you think mine is installed correctly? Is the unit sticking out too far from the drywall? Will the handle mount correctly once the tiles have been installed?
 

Terry

The Plumbing Wizard
Staff member
Messages
29,946
Reaction score
3,460
Points
113
Location
Bothell, Washington
Website
terrylove.com
If your tile is fairly thick, you should be okay.

2-3/4" (70 mm) Thin Wall
3-1/2" (89 mm) Thick Wall
If over 3-1/2" (89 mm) and
up to 4-1/4" (108 mm),
use Deep Roughing-in kit


From center of pipe.
Is this what you have. You have 3/4" to work with there.
 
Last edited:

JohnfrWhipple

BATHROOM DESIGN & BUILD
Messages
3,225
Reaction score
102
Points
48
Location
North Vancouver, BC
That looks like a similar setup. Do you think mine is installed correctly? Is the unit sticking out too far from the drywall? Will the handle mount correctly once the tiles have been installed?

Why do you have drywall installed in your shower? It appears that you mudded it as well.

The coverage on your waterproofing looks thin. Did you use a mil guage when installing.

Drywall is not allowed in B.C. showers - what ever colour it is , blue, pink, green or white.

If you are using it because you are trying to save money at the very least apply the proper coverage of that liquid membrane you use. I have never seen that colour of a product before.

Who makes it?

JW
 

SanAntonioDIY

New Member
Messages
4
Reaction score
0
Points
0
Location
San Antonio, Texas
It's probably poor etiquette to revive a 6 month old thread as a first post, and the OP is probably long gone, but for the benefit of others (like me) who are trying to figure out Kohler installation depth issues, here goes:

I think the best advice here would have been "You should read all the instructions for your product BEFORE getting started and figure out things like "how deep will my valve be? Is this a thick wall or a thin wall installation? Do those warnings about damage apply to me?" Or you could just jump right in and end up with problems.

I think the OP's install was thinner than a thin wall. I don't think that's the plaster ring in the side view, I think that's the body of the valve. It's got screw heads sticking out of it. His sheetrock is behind the valve, not in front of it. I don't know if he's ever said if his install turned out okay or not, but it doesn't look like a sound foundation. Maybe the tile covered it enough to fit the trim ring but I've got my doubts.

sagisi_01.jpg


Kohler HydroRail

I'm not posting just to throw stones, but to recommend to any future readers to read ALL the documentation first. And I mean ALL of it. I'm about to install a Kohler valve and Kohler trim. Their instructions are NOT the clearest and you should almost start at the end (installing the trim) and work backwards when planning the project. If you don't know the trim depth at the end of the install, then you won't know the rough in depth at the beginning. If you don't know the rough in depth, then you won't know where to place the braces shown in Terry's post #2. If you don't know whether you need to order the various optional kits (deep rough in, thin wall, thick wall, etc) then you're possibly stuck halfway through with parts that don't fit and hard to find "options" that are really required in your job.

You'd think Kohler could have all the info you need in one place, but they don't. Some of their products (like the Hydrorail shower) have two different depth requirements on the same piece. You can't use this piece with what I'd call a "normal" valve depth of about 3 inches from pipe centerline to finished wall without an adapter. Unless you read all the notes in the product spec sheet you won't even know there are deep or thin adapter kits. They aren't mentioned in the installation instructions, see page 4 here http://www.us.kohler.com/webassets/kpna/catalog/pdf/en/1184491_2.pdf and compare to the notes on page 2 here http://www.us.kohler.com/webassets/kpna/catalog/pdf/en/1185108_4.pdf

The OP was probably right to stress, I don't think his valve and drywall(?!?!) were installed correctly. Maybe some thick tile compensated, but I'd bet on there being leaks in the tile onto the rough cut drywall edge followed by mold and the tiles falling off.
 
Last edited by a moderator:

SanAntonioDIY

New Member
Messages
4
Reaction score
0
Points
0
Location
San Antonio, Texas
I guess I could also have added some more practical advice.

If, after reading, you discover like the OP that your wall cavity is too small by 1/8 inch for a proper install then maybe you can increase the size of the cavity by 1/8 before you put on the wall surface, like durock or similar and probably not drywall. An easy way to increase the wall cavity is to tack/glue 1/8 lauan ply strips onto the surface of the stud. A small adjustment like 1/8 shouldn't snowball into problems with the tile over the tub and the cement board screws should still have more than adequate bite into the actual stud to hold up the weight of the wall plus tile.

If more than 1/8 is required, then you probably don't want to expand toward the tub side since you will probably start to have finishing issues over the tub.
 

sszurek34

New Member
Messages
2
Reaction score
0
Points
1
Location
Ann Arbor, Michigan
Top
Hey, wait a minute.

This is awkward, but...

It looks like you're using an ad blocker. We get it, but (1) terrylove.com can't live without ads, and (2) ad blockers can cause issues with videos and comments. If you'd like to support the site, please allow ads.

If any particular ad is your REASON for blocking ads, please let us know. We might be able to do something about it. Thanks.
I've Disabled AdBlock    No Thanks