Replacing shower fixtures. Numerous questions

Users who are viewing this thread

Henry G

New Member
Messages
30
Reaction score
0
Points
0
Location
Washington, UPC code
Thanks to this forum I've gained a little experience in plumbing, but I still have a lot to learn.

I've gutted our bathroom with the intent to tile the floor, and shower surround. So far I've only replaced the tub, and everything lined up so far. Since it was gutted we figured we may as well replace the shower fixtures.

I'm unsure of the spacing needed to install the valve portion of the system. Here is the old plumbing:

moen-chateau-old-2.jpg


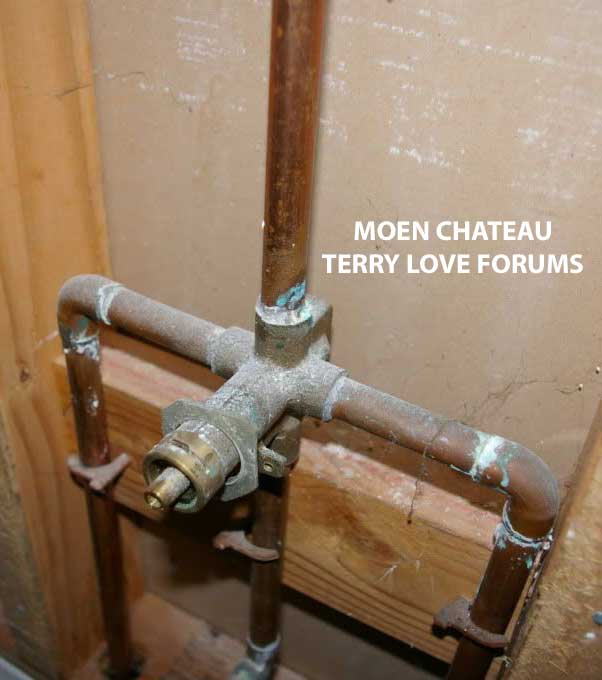
I'm hoping to leave as much of this intact as I can. I understand I need to replace the valve with the one supplied with the new fixture. The fixture is a Moen.

I'm assuming I need to follow the instructions for "1C" (below). The directions specify I need to make a hole 4.5in, but there is no information on how far forward to space the valve.

moen-shower-install-1.jpg


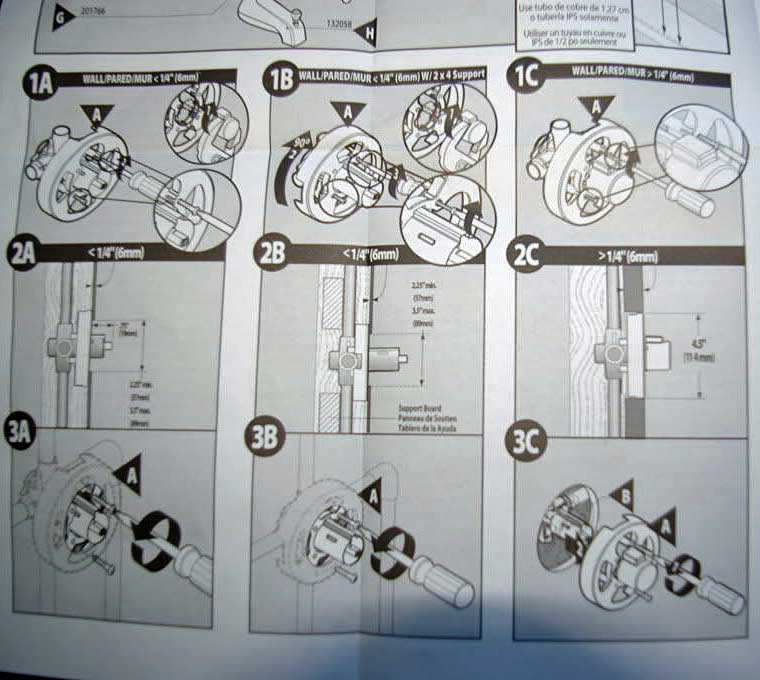
1) How do I determine the distance needed to install this valve? The plan is to put 1/2 backerboard up, and the tile itself is about 1/4 ( subway tile ). I'm hoping to cut away the existing valve, and reattach the new one in it's place.

When I hold up the valve, and this black plastic spacer(?) against the stud, it sticks out 1 in:
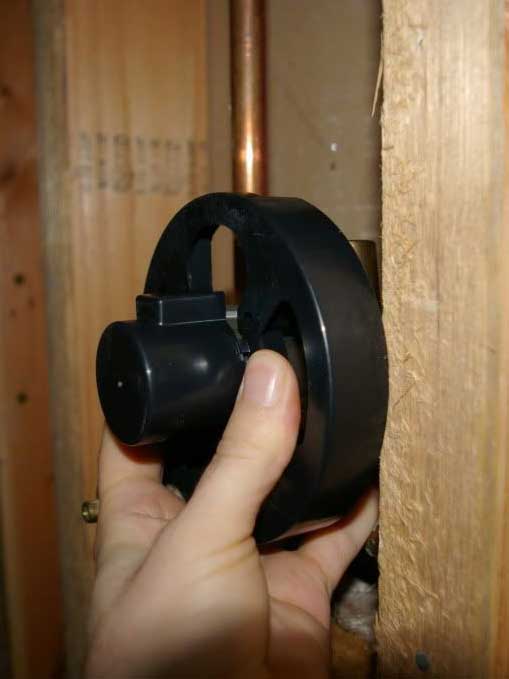
moen-shower-install-2.jpg


Now what? ;)
 
Last edited by a moderator:

Krow

Plumber
Messages
903
Reaction score
3
Points
16
Location
Ontario, Canada
The new valve looks like a Moen Positemp.

the positemp will have a minimum and maximum that the valve can be placed. You will have ~ 3/4" of play. the positemp positioning is very forgiving. If you still want a measurement, Have the front surface of the black cover stick out approx 3/4" from the rough stud.
 

Henry G

New Member
Messages
30
Reaction score
0
Points
0
Location
Washington, UPC code
With the cement board, and tile I'll add an additional 3/4 at least to the surface of the stud. Will 3/4 still be enough to place the edge of that black cover?
 

Jadnashua

Retired Defense Industry Engineer xxx
Messages
32,770
Reaction score
1,190
Points
113
Location
New England
The black plaster guard must be between the min/max marks once the finished wall is in place. I suggest you attach the trim and mock it up, as some people don't like the look of it if it sticks out at the max. If you get it sticking out too far, you won't be able to tighten the trim tight to the wall. If it is too far in, you won't be able to attach the trim at all. With the trim temporarily installed, you can determine where you want it and where it looks best to you.
 

Krow

Plumber
Messages
903
Reaction score
3
Points
16
Location
Ontario, Canada
With the cement board, and tile I'll add an additional 3/4 at least to the surface of the stud. Will 3/4 still be enough to place the edge of that black cover?

As I said earlier, The positemp is very forgiving. It is also designed to fit in thin walls as well, so between 3/4" to 1" will be plenty. Make sure you fasten the entire body to some bracing.
 

hj

Master Plumber
Messages
33,603
Reaction score
1,042
Points
113
Location
Cave Creek, Arizona
Website
www.terrylove.com
The "standard" position is with the face of that black ring flush with the finished wall. There is some latitude in or out, but less in the outward direction because you can get extensions for a deeper installation, but NOTHING will correct for a valve that is too far forward.
 

Henry G

New Member
Messages
30
Reaction score
0
Points
0
Location
Washington, UPC code
So in an effort to save me as much hassle as I can, I researched my options for keeping this valve installed.

From what I can figure out, this Moen "should" fit?

"Moen T2524 Single Handle Trim Kit for Standard Valve Shower with Single Function Showerhead from the Monticello Collection"

I don't know if I can post a link to the actual product, but that is the brand and model information.

The number I got from the valve itself looked to be #12289 or #13289. From the instructions page, this appears to be the same valve body.
 
Last edited by a moderator:

Plumbermurrieta

Plumber
Messages
18
Reaction score
0
Points
0
Location
Murrieta Southern California
Website
www.plumbermurrieta.info
Shower fixtures are one of those things that we see every day and tell ourselves that we really need to replace sometime soon. Then as soon as we are out of the shower and on to other things we forget about them.
-Take the old fixtures off. Hot and cold water handles can be removed by unscrewing a set screw on the bottom of the handle and gently wiggling them off. The trim for the handles will just come off when pulled. If there is any old caulk holding the trim on, you may want to go around the outside with a utility knife and separate the caulk from the wall. The shower head can be removed by unscrewing it from the pipe coming in from the wall.
-Clean the stems and shower head pipe threads with a good household cleaner. Allow them to dry and place some Teflon tape around the threads from the shower head pipe.
-Install the new shower head by screwing it onto the pipe and adjusting for proper positioning. Install the new hot and cold water handles by placing on the new trim pieces and then pushing the knobs on gently and screwing in the set screw at the bottom.
 

Redwood

Master Plumber
Messages
7,335
Reaction score
13
Points
0
Location
Connecticut
Shower fixtures are one of those things that we see every day and tell ourselves that we really need to replace sometime soon. Then as soon as we are out of the shower and on to other things we forget about them.
-Take the old fixtures off. Hot and cold water handles can be removed by unscrewing a set screw on the bottom of the handle and gently wiggling them off. The trim for the handles will just come off when pulled. If there is any old caulk holding the trim on, you may want to go around the outside with a utility knife and separate the caulk from the wall. The shower head can be removed by unscrewing it from the pipe coming in from the wall.
-Clean the stems and shower head pipe threads with a good household cleaner. Allow them to dry and place some Teflon tape around the threads from the shower head pipe.
-Install the new shower head by screwing it onto the pipe and adjusting for proper positioning. Install the new hot and cold water handles by placing on the new trim pieces and then pushing the knobs on gently and screwing in the set screw at the bottom.

Do you read before you post?
 

hj

Master Plumber
Messages
33,603
Reaction score
1,042
Points
113
Location
Cave Creek, Arizona
Website
www.terrylove.com
ANY valve will FIT. YOU have to do the necessary piping to make it fit YOUR installation. You have to determine how "thick" the finish wall will be from the studs and then set the valve at the proper position relative to it. WE know nothing about the actual dimensions of the materials that you will use, nor where the existing pipes are relative to where they have to be for the new valve.
 
Top
Hey, wait a minute.

This is awkward, but...

It looks like you're using an ad blocker. We get it, but (1) terrylove.com can't live without ads, and (2) ad blockers can cause issues with videos and comments. If you'd like to support the site, please allow ads.

If any particular ad is your REASON for blocking ads, please let us know. We might be able to do something about it. Thanks.
I've Disabled AdBlock    No Thanks