DallasDIY
New Member
This is my first post although I've read a lot on here and appreciate the great dialogue. I am fairly competent with tools. I have a problem I'm trying to solve in a bathroom and I would appreciate some input and feedback. Let me start by saying what I'm looking to do, then add some commentary.
To repair some water damage, I want to:
1. Fix/replace damaged subfloor, if needed.
2. Replace damaged closet flange, if necessary.
3. Lay 1/2" of plywood over OSB, then backerboard and tile. (Wife doesn't want vinyl again!)
4. Replace current 12" rough-in toilet with 10" model.
There was a slow toilet leak in one of the upstairs bathrooms in our 12 year old house. The wax ring was evidently compromised and went unnoticed until a lot of water appeared on the kitchen ceiling. It's not the first time it had leaked but it's the most significant.
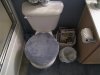
I pulled up the toilet, replaced the ring, reset the toilet and things seemed okay until I tightened down the toilet bolts to the flange. The more I tightened, the more the toilet settled into the flooring. I knew right away the subfloor under the sheet vinyl was wet and spongy. This was right before Christmas. I put a bead of caulk around the toilet and let it be. Cosmetically, it looked okay except you could see that the floor was depressed ever so slightly at the base of the toilet.
Let me also mention at this point that the other three bathrooms in the house are all plumbed/framed for 12" to 13" rough-in from the finished wall. However, this one is barely over 10" but they still used the 12" toilet. I had to cheat on the tank to get it set but I think this has been the root of the leakage problems over the years.
By the way, I hit the kitchen ceiling with Kilz, let it dry for a couple weeks and actually repainted the entire ceiling in the kitchen and adjacent living room since I couldn't get the "damaged" area to match up colorwise with the rest due to age, dust, etc. Now THAT was a fun job on the popcorn ceiling.
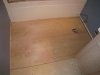
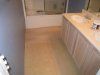
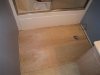
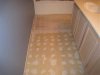
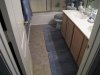
Skip forward to this week. We've been thinking about options for selling the house and that bathroom floor came to mind. I knew I had to do something so I pulled the toilet and ripped up the vinyl to expose the 3/4" OSB. Well, the flooring around the toilet was dry but flaky and certainly not strong and level. I also discovered there was a wet area at the corner of the floor near the tub and it looks like some water has been seeping ouit from the seam in the sliding door channel and saturating the floor. I've let it dry a few days and it doesn't appear to have lost substantial strength in that location.
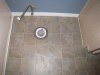
The closet flange is also somewhat rusted out and the bolt slots are deteriorated.
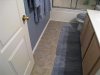
I questioned whether to replace the OSB at all or just fill it in and put a new layer of plywood down. However, that just opens up potential problems and I'd prefer to do it right even though the existing area is dried out and seems relatively strong. Replacing the OSB isn't a huge problem in open areas between trusses. (I only want to replace the damaged part.) The bathroom is 5'x10.5' and the floor trusses run parallel to the long dimension. They are bottom-bearing 2x4 web trusses, 3-1/2" wide and about 14" tall. Span is about 15 feet from the outside wall to a carrying wall in the middle of the house and about 30 feet overall. I've drawn approximate locations into two of the attached photos. There's one sort of down the middle and one to the right that appears to hit right at the toilet flange. The next one going toward the wall behind the toilet is in the adjacent bedroom. Going to the left of the center joist, it appears to be right under the wall on the left side of the bathroom.
If I cut out the bad stuff around the toilet, I'm okay on the front side since I can split the center truss and fully span the one by the flange. However, there's nothing behind the toilet to nail into as the truss is in the next room. Unless and until I rip up the subfloor, I won't know if any additional bracing is provided between the trusses to further support the toilet and waste pipe. I could see about attaching some joist hangers and creating a nailing plate somewhere between the flange and the wall in order to give it strength but that would require dropping some of the kitchen ceiling for access. I could also drop 2" screws into a flat 2x4 on each side of the cutout for some strength.
If I get the subfloor section ripped out, I should have enough room from above to cut the flange and extend the waste pipe higher so I can put a clean layer of plywood down and then flooring material. One thought is to replace the bad subfloor, add a layer of 1/2" plywood and Hardiboard, then lay ceramic tile.
Back to my original points...
1. Am I on the right track for wanting to replace the subfloor or do I have any good alternatives?
2. Is there an easier way to replace the closet flange and waste pipe other than getting in there, cutting the old off, adding a repair hub and a longer 3" pipe?
3. If I were going to lay 1/2" plywood (don't want to do 3/4" due to height issues compared to carpeted hallway) over the existing OSB (including the damaged area), would I be open to problems around the flange or would it be strong enough to carry the weight of the toilet since I'd be adding that and the backerboard? I'm not advocating doing a hack job and simply covering up problem areas--just exploring all options.
(By the way, I also realize it would be a good idea to inspect the truss wood if it's been leaked on next to the flange for any length of time.)
4. I still think I probably need to swap out the toilet as I'm not sure if there's room at the truss to gain the extra 2" from an offset flange without compromising the strength of the truss if I cut into the top chord.
I guess I'm trying to save some hassles by doing all the work from above. On the other hand, perhaps it's cheaper over the long run to just cut the kitchen ceiling for full access and then repair it, too.
I'm open to any suggestions or insights on this. Thanks for a great site. Photos are below.
John from Dallas


To repair some water damage, I want to:
1. Fix/replace damaged subfloor, if needed.
2. Replace damaged closet flange, if necessary.
3. Lay 1/2" of plywood over OSB, then backerboard and tile. (Wife doesn't want vinyl again!)
4. Replace current 12" rough-in toilet with 10" model.
There was a slow toilet leak in one of the upstairs bathrooms in our 12 year old house. The wax ring was evidently compromised and went unnoticed until a lot of water appeared on the kitchen ceiling. It's not the first time it had leaked but it's the most significant.
I pulled up the toilet, replaced the ring, reset the toilet and things seemed okay until I tightened down the toilet bolts to the flange. The more I tightened, the more the toilet settled into the flooring. I knew right away the subfloor under the sheet vinyl was wet and spongy. This was right before Christmas. I put a bead of caulk around the toilet and let it be. Cosmetically, it looked okay except you could see that the floor was depressed ever so slightly at the base of the toilet.
Let me also mention at this point that the other three bathrooms in the house are all plumbed/framed for 12" to 13" rough-in from the finished wall. However, this one is barely over 10" but they still used the 12" toilet. I had to cheat on the tank to get it set but I think this has been the root of the leakage problems over the years.
By the way, I hit the kitchen ceiling with Kilz, let it dry for a couple weeks and actually repainted the entire ceiling in the kitchen and adjacent living room since I couldn't get the "damaged" area to match up colorwise with the rest due to age, dust, etc. Now THAT was a fun job on the popcorn ceiling.
Skip forward to this week. We've been thinking about options for selling the house and that bathroom floor came to mind. I knew I had to do something so I pulled the toilet and ripped up the vinyl to expose the 3/4" OSB. Well, the flooring around the toilet was dry but flaky and certainly not strong and level. I also discovered there was a wet area at the corner of the floor near the tub and it looks like some water has been seeping ouit from the seam in the sliding door channel and saturating the floor. I've let it dry a few days and it doesn't appear to have lost substantial strength in that location.
The closet flange is also somewhat rusted out and the bolt slots are deteriorated.
I questioned whether to replace the OSB at all or just fill it in and put a new layer of plywood down. However, that just opens up potential problems and I'd prefer to do it right even though the existing area is dried out and seems relatively strong. Replacing the OSB isn't a huge problem in open areas between trusses. (I only want to replace the damaged part.) The bathroom is 5'x10.5' and the floor trusses run parallel to the long dimension. They are bottom-bearing 2x4 web trusses, 3-1/2" wide and about 14" tall. Span is about 15 feet from the outside wall to a carrying wall in the middle of the house and about 30 feet overall. I've drawn approximate locations into two of the attached photos. There's one sort of down the middle and one to the right that appears to hit right at the toilet flange. The next one going toward the wall behind the toilet is in the adjacent bedroom. Going to the left of the center joist, it appears to be right under the wall on the left side of the bathroom.
If I cut out the bad stuff around the toilet, I'm okay on the front side since I can split the center truss and fully span the one by the flange. However, there's nothing behind the toilet to nail into as the truss is in the next room. Unless and until I rip up the subfloor, I won't know if any additional bracing is provided between the trusses to further support the toilet and waste pipe. I could see about attaching some joist hangers and creating a nailing plate somewhere between the flange and the wall in order to give it strength but that would require dropping some of the kitchen ceiling for access. I could also drop 2" screws into a flat 2x4 on each side of the cutout for some strength.
If I get the subfloor section ripped out, I should have enough room from above to cut the flange and extend the waste pipe higher so I can put a clean layer of plywood down and then flooring material. One thought is to replace the bad subfloor, add a layer of 1/2" plywood and Hardiboard, then lay ceramic tile.
Back to my original points...
1. Am I on the right track for wanting to replace the subfloor or do I have any good alternatives?
2. Is there an easier way to replace the closet flange and waste pipe other than getting in there, cutting the old off, adding a repair hub and a longer 3" pipe?
3. If I were going to lay 1/2" plywood (don't want to do 3/4" due to height issues compared to carpeted hallway) over the existing OSB (including the damaged area), would I be open to problems around the flange or would it be strong enough to carry the weight of the toilet since I'd be adding that and the backerboard? I'm not advocating doing a hack job and simply covering up problem areas--just exploring all options.
(By the way, I also realize it would be a good idea to inspect the truss wood if it's been leaked on next to the flange for any length of time.)
4. I still think I probably need to swap out the toilet as I'm not sure if there's room at the truss to gain the extra 2" from an offset flange without compromising the strength of the truss if I cut into the top chord.
I guess I'm trying to save some hassles by doing all the work from above. On the other hand, perhaps it's cheaper over the long run to just cut the kitchen ceiling for full access and then repair it, too.
I'm open to any suggestions or insights on this. Thanks for a great site. Photos are below.
John from Dallas
Last edited: